Welcome to Wargaming.net Wiki!
Variants

AT 2

Jump to: navigation, search


AT 2

AnnoGB73_AT2.png
Battle Tier
1234567891011
Overview
Mouse over "
Well, the ones further down, of course.
" for more information
[Client Values; Actual values in
Specifically, the mismatch in crew values caused by commander's 10% crew skill bonus. Outside of a crew of 1 commander only, 100% crew is a fiction. The client values, given for 100% crew, will normally be taken into battle with 110% crew skill members aside from specific functions, causing their actual performance to deviate from the expected client value. These differences are taken into account in tooltip boxes.
]
425,000  Credits Cost
590118 HP Hit Points
40.95/4112.22/44 t Weight Limit
Crew
  1. Commander (Radio Operator)
  2. Driver
  3. Gunner
  4. Loader
Mobility
340395 hp Engine Power
20/10 km/h Speed Limit
1820 deg/s Traverse
8.332.32 hp/t Power/Wt Ratio
YesYes Pivot
Armor
// mm Hull Armor
Armament


{{#ifeq:ARMOR_PIERCING_CR|ARMOR_PIERCING||


{{#ifeq:HIGH_EXPLOSIVE|ARMOR_PIERCING||


AP/APCR/HE


{{#ifeq:ARMOR_PIERCING_CR|ARMOR_PIERCING||


{{#ifeq:HIGH_EXPLOSIVE|ARMOR_PIERCING||


AP/APCR/HE
Shells


45/2400/32


45/2400/32
Shell Cost
75/75/10075/75/100 HP Damage
105/170/30110/180/30 mm Penetration


|


|}}

|


|}}


26.09 r/m 

Standard Gun

Reload Times
Nominal: 2.3 s
50% Crew: 2.85 s
75% Crew: 2.49 s
100% Crew: 2.21 s
Rammer: 1.99 s
Vents: 2.16 s
Both: 1.95 s
Both and BiA: 1.9 s
Both and Max Crew %: 1.82 s

See Crew, Consumables, or Equipment for more information.


|


|}}

|


|}}


26.09 r/m 

Standard Gun

Reload Times
Nominal: 2.3 s
50% Crew: 2.85 s
75% Crew: 2.49 s
100% Crew: 2.21 s
Rammer: 1.99 s
Vents: 2.16 s
Both: 1.95 s
Both and BiA: 1.9 s
Both and Max Crew %: 1.82 s

See Crew, Consumables, or Equipment for more information.
Rate of Fire


|


|}}

|


|}}


1956.75

Standard Gun

Using Shell Type 1 (75 Damage):


Theoretical Damage Per Minute
Nominal DPM: 1956.75
50% Crew: 1579.5
75% Crew: 1809
100% Crew: 2040.75
100% Crew
Vents: 2086.5
Rammer: 2267.25
Both: 2318.25
Both and BiA: 2370
Both and Max Crew %: 2472.75

Advantageous Damage Per Minute
First-shot DPM: 2031.75
50% Crew: 1654.5
75% Crew: 1884
100% Crew: 2115.75
100% Crew
Rammer: 2342.25
Vents: 2161.5
Both: 2393.25
Both and BiA: 2445
Both and Max Crew %: 2547.75

See here, here, or here for more information.

Standard Gun

Using Shell Type 2 (75 Damage):


Theoretical Damage Per Minute
Nominal DPM: 1956.75
50% Crew: 1579.5
75% Crew: 1809
100% Crew: 2040.75
100% Crew
Vents: 2086.5
Rammer: 2267.25
Both: 2318.25
Both and BiA: 2370
Both and Max Crew %: 2472.75

Advantageous Damage Per Minute
First-shot DPM: 2031.75
50% Crew: 1654.5
75% Crew: 1884
100% Crew: 2115.75
100% Crew
Rammer: 2342.25
Vents: 2161.5
Both: 2393.25
Both and BiA: 2445
Both and Max Crew %: 2547.75

See here, here, or here for more information.

Standard Gun

Using Shell Type 3 (100 Damage):
With wholly penetrating hits

Theoretical Damage Per Minute
Nominal DPM: 2609
50% Crew: 2106
75% Crew: 2412
100% Crew: 2721
100% Crew
Vents: 2782
Rammer: 3023
Both: 3091
Both and BiA: 3160
Both and Max Crew %: 3297

Advantageous Damage Per Minute
First-shot DPM: 2709
50% Crew: 2206
75% Crew: 2512
100% Crew: 2821
100% Crew
Rammer: 3123
Vents: 2882
Both: 3191
Both and BiA: 3260
Both and Max Crew %: 3397

See here, here, or here for more information.


|


|}}

|


|}}


1956.75

Standard Gun

Using Shell Type 1 (75 Damage):


Theoretical Damage Per Minute
Nominal DPM: 1956.75
50% Crew: 1579.5
75% Crew: 1809
100% Crew: 2040.75
100% Crew
Vents: 2086.5
Rammer: 2267.25
Both: 2318.25
Both and BiA: 2370
Both and Max Crew %: 2472.75

Advantageous Damage Per Minute
First-shot DPM: 2031.75
50% Crew: 1654.5
75% Crew: 1884
100% Crew: 2115.75
100% Crew
Rammer: 2342.25
Vents: 2161.5
Both: 2393.25
Both and BiA: 2445
Both and Max Crew %: 2547.75

See here, here, or here for more information.

Standard Gun

Using Shell Type 2 (75 Damage):


Theoretical Damage Per Minute
Nominal DPM: 1956.75
50% Crew: 1579.5
75% Crew: 1809
100% Crew: 2040.75
100% Crew
Vents: 2086.5
Rammer: 2267.25
Both: 2318.25
Both and BiA: 2370
Both and Max Crew %: 2472.75

Advantageous Damage Per Minute
First-shot DPM: 2031.75
50% Crew: 1654.5
75% Crew: 1884
100% Crew: 2115.75
100% Crew
Rammer: 2342.25
Vents: 2161.5
Both: 2393.25
Both and BiA: 2445
Both and Max Crew %: 2547.75

See here, here, or here for more information.

Standard Gun

Using Shell Type 3 (100 Damage):
With wholly penetrating hits

Theoretical Damage Per Minute
Nominal DPM: 2609
50% Crew: 2106
75% Crew: 2412
100% Crew: 2721
100% Crew
Vents: 2782
Rammer: 3023
Both: 3091
Both and BiA: 3160
Both and Max Crew %: 3297

Advantageous Damage Per Minute
First-shot DPM: 2709
50% Crew: 2206
75% Crew: 2512
100% Crew: 2821
100% Crew
Rammer: 3123
Vents: 2882
Both: 3191
Both and BiA: 3260
Both and Max Crew %: 3397

See here, here, or here for more information.
Damage Per Minute


|


|}}


0.41 m 

With 50% Crew: 0.508 m
With 75% Crew: 0.443 m
With 100% Crew: 0.393 m
With BiA: 0.384 m
With BiA and Vents: 0.376 m
Maximum possible: 0.361 m

For more details, see Crew


|


|}}


0.37 m 

With 50% Crew: 0.458 m
With 75% Crew: 0.4 m
With 100% Crew: 0.355 m
With BiA: 0.347 m
With BiA and Vents: 0.339 m
Maximum possible: 0.325 m

For more details, see Crew
Accuracy


|


|}}


1.7 s 

With 50% Crew: 2.106 s
With 75% Crew: 1.839 s
With 100% Crew: 1.63 s
With GLD: 1.482 s
With BiA: 1.594 s
With BiA and Vents: 1.559 s
With both and GLD: 1.418 s
Maximum possible: 1.359 s

For more details, see Crew or Equipment


|


|}}


1.7 s 

With 50% Crew: 2.106 s
With 75% Crew: 1.839 s
With 100% Crew: 1.63 s
With GLD: 1.482 s
With BiA: 1.594 s
With BiA and Vents: 1.559 s
With both and GLD: 1.418 s
Maximum possible: 1.359 s

For more details, see Crew or Equipment
Aim time
2626 deg/s Gun Traverse Speed
26° Gun Arc
-7°/+13°-7°/+13° Elevation Arc
115115 rounds Ammo Capacity
General
2020 % Chance of Fire


310 m 

With 50% Crew: 243.6 m
With 75% Crew: 276.8 m
With 100% Crew: 310 m
With Recon and Situational Awareness: 325.7 m
With Coated Optics: 341 m
With Binocular Telescope: 387.5 m
Maximum possible: 443.8 m

For more details, see Skills or Equipment


310 m 

With 50% Crew: 243.6 m
With 75% Crew: 276.8 m
With 100% Crew: 310 m
With Recon and Situational Awareness: 325.7 m
With Coated Optics: 341 m
With Binocular Telescope: 387.5 m
Maximum possible: 443.8 m

For more details, see Skills or Equipment
View Range


|


|}}


400 m 

With 50% Crew: 314.3 m
With 75% Crew: 357.2 m
With 100% Crew: 400 m
With 100% Signal Boost: 480 m
When affected by 100% Relaying: 440 m
Maximum possible: 575.6 m

For more details, see Skills or Equipment


|


|}}


550 m 

With 50% Crew: 432.1 m
With 75% Crew: 491.1 m
With 100% Crew: 550 m
With 100% Signal Boost: 660 m
When affected by 100% Relaying: 605 m
Maximum possible: 791.4 m

For more details, see Skills or Equipment
Signal Range
Values are Stock - click for Top


V

AnnoGB73_AT2.png

425000

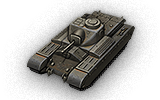
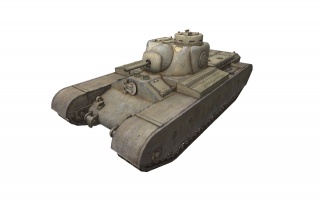
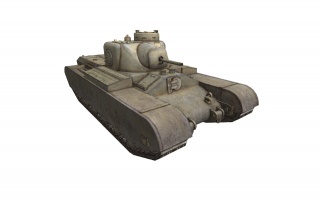
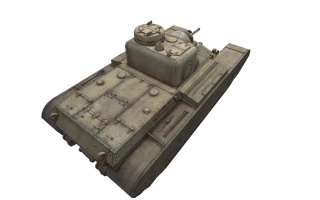
The AT 2 is a British tier 5 tank destroyer.

A design for an assault tank to break through enemy defensive lines. The design was completed by May 15, 1943. No prototypes were built, but the project helped to set the stage for another heavy assault tank, the A39 Tortoise.

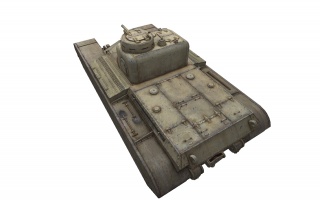
The AT 2 is radically different from its predecessors: it's the first true non-turreted British tank destroyer in its line. The AT 2 is well known for being tough as hell, boasting the highest armor in its tier (rivaling even Tier VII's) and a high HP pool (590). This vehicle's robust nature gives it the ability to endure heavy bouts of punishment before falling and returning this much hurt in its gun.

For this amount of armor the AT 2 is slow on the straight and turn so open-fielded maps wouldn't offer much to make the most of its protection, with SPG's free to take pot-shots as it trundles its way up a hill.

Unfortunately the AT 2's armor was significantly nerfed in the December 2017 updates, meaning that it is now possible for the AT 2 to be two-shotted, and greatly increasing its vulnerability to artillery fire. Other buffs were added to compensate such as greater damage output and speed, but above all it's best to be skilled to use the AT 2 correctly.


The AT 2 leads to the AT 8, and the Achilles.

Modules / Available Equipment and Consumables

Modules

Ico_gun_alpha.png

Guns

Tier Gun Penetration
(mm)
Damage
(HP)
Rate of fire
(rounds/minute)
Dispersion
(m/100m)
Aiming time
(s)
Weight
(kg)
Price
(Credits)

IV QF 6-pdr AT Gun Mk. III 105/170/30 75/75/100 26.09 0.41 1.7 400 27000
V QF 6-pdr AT Gun Mk. V 110/180/30 75/75/100 26.09 0.37 1.7 450 35000
V 3.7-inch AT Howitzer 47/110/30 370/280/100 8 0.49 2.3 393 35000

Ico_engine_alpha.png

Engines

Tier Engine Engine Power
(hp)
Chance of Fire on Impact
(%)
Weight
(kg)
Price
(Credits)

IV Nuffield Liberty Mk. III 395 20 383 11500
III Nuffield Liberty Mk. II 340 20 383 500

Ico_suspension_alpha.png

Suspensions

Tier Suspension Load Limit
(т)
Traverse Speed
(gr/sec)
Rmin Weight
(kg)
Price
(Credits)

IV AT 2 41 18 0 11000 4050
V AT 2 Mk. II 44 20 0 11000 9000

Ico_radio_alpha.png

Radios

Tier Radio Signal Range
(m)
Weight
(kg)
Price
(Credits)

VII WS No. 19 Mk. II 450 40 21000
VI WS No. 19 Mk. I 400 40 15000
VIII WS No. 19 Mk. III 550 40 22000

Compatible Equipment

Low Noise Exhaust System Class 2 Medium Spall Liner Camouflage Net Class 2 Coated Optics Class 2 Experimental Optics Wear-Resistant Gun Laying Drive Improved Configuration Venting System Innovative Loading System Enhanced Gun Laying Drive Class 2 Improved Hardening Class 2 Additional Grousers Class 2 Modified Configuration Class 2 Improved Rotation Mechanism Class 2 Improved Aiming Class 2 Improved Ventilation Class 2 Binocular Telescope Class 2 Gun Rammer Class 2 Turbocharger Class 2 

Compatible Consumables

Automatic Fire Extinguisher Natural Cover Optical Calibration Aim Tuning Experienced Firefighters 100-octane Gasoline 105-octane Gasoline Manual Fire Extinguisher Pre-Battle Maintenance Vent Purge Large First Aid Kit Large Repair Kit Duty Comes First Shell Organizer Orderly Ammo Rack Focus on Target Pudding and Tea Increased Focus Small First Aid Kit Small Repair Kit Gearbox Intricacy Steady Hand Combat Course 


Player Opinion

Pros and Cons

Pros:

- Even with "nerfed" armor it still boasts incredible protection -- great for taking in the punishment for less-protected tanks or as part as a diversion

- Top 6-pdr cannon has a very fast rate of fire, aim time, high DPM, and good accuracy

- Abnormally high HP pool for a TD

- High DPM, especially for its tier

- Decent top radio, but not the best, which can be a pain for such a slow tank

- Cupola can pull off some bounces


Cons:

- Upper glacis, gun mantlet, and massive cupola often compromise the armor, especially in higher tiers

- Armor has been halved, post-update, meaning the AT 2 is much easier to destroy. Skill is needed to make the use of these new changes

- Very slow speed and horrid traverse; very high flanking risk (made even worse due to bad view range)

- Small angles of gun traverse meaning the tank needs to turn often

- 6-pdr gun is awful by alpha damage standards. Worst alpha and pen of any Tier V TD. However the rate of fire for a skilled crew using vents is extraordinary and it is easily capable of causing multiple crew and module damage

- Tracks get shot down often; consider the suspension equipment as it's cheap and adds no weight


Performance

With very thick frontal and awesome rear and side armor the AT 2 is an intimidating opponent. Even though it's extremely well armored it has weak spots that are easy to hit up close, a very slow top speed, and a sluggish traverse speed. Its armor is weaker than advertised, especially around the gun mantlet and the upper glacis. It is very easy to get knocked out at close range, be it from weak spot snipers or faster tanks. Do not get overconfident with the AT 2's armor. In a Tier V battles the AT 2's armor is very difficult to break and most shots to the rear and sides and be deflected with simple angling. Always be mindful that the armor is less reliable now that it's been nerfed -- an average or below average player is unlikely to block 2000 damage every game any more.

The accurate and rapid-firing 6-pounder gun offers good damage per minute and ensures no enemy wants to stay in your path, no matter how tough they think they are -- you will quickly be able to find weak spots.

The AT 2 is very very slow, comparable to a Maus. Its top speed keeps it at a modest speed even when downhill. Furthermore the weak engine power means running into trees and stone fences will result in a serious speed decrease. Speed is the biggest flaw of the AT 2 and makes it a tank that is reliant on its team to protect its rear and to spot for it. The AT 2's weaknesses can be minimized by playing with constant support. Once you manage to make it to the enemy you'll find the AT 2's excellent armor and good gun extremely rewarding.


Early Research

  • Decide whether you really want the derp gun, the howitzer. Otherwise upgrading the gun is the last priority because the 6-pdr Mk. V is only a very slight improvement over the Mk. III.
  • The second radio might carry over from the Valentine AT. Mount it if you have it researched.
  • Your best performance gains will be from the Mk. III engine and the Mk. II suspension.


Suggested Equipment


Improved VentilationCoated Optics Toolbox Spall Liner 


Gallery

Historical Info

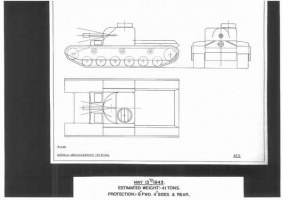
AT-2 is a Nuffield Mechanizations Limited design from May 1943. Total weight was estimated at 41 tons, and the vehicle was running on torsion bar suspension. It was introduced along with the AT-1 design, which had a turret that could mount a 75 mm high velocity gun or a 95 mm howitzer. With AT-2, it was decided an assault tank doesn't need a turret and so it was replaced with a fully enclosed superstructure. Both designs shared the same hull, but since AT-2 was supposed to have a casemate construction, it should have been around four tons lighter, and considerably cheaper to produced compared to the AT-1.


Historical Gallery

Historical Accuracy Errata

The following are consensus errors or inconsistencies which have been identified with the configuration of the vehicle in question and conflict with information available on the public record. The causes for these divergences in the game are normally not disclosed and may be rooted in game balance.

No historical records of the AT 2's armor values or performance specifications exist.


UK
Light Tanks ICruiser Mk. I IIM2 IICruiser Mk. II IILight Mk. VIC IIIValentine IIIStuart I-IV IIICruiser Mk. III IVCruiser Mk. IV VCovenanter VIA46 VICrusader VIIGSR 3301 Setter VIIIFV1066 Senlac VIIILHMTV IXGSOR3301 AVR FS XManticore
Medium Tanks IVickers Medium Mk. I IIVickers Medium Mk. II IIIVickers Medium Mk. III IVMatilda IVMatilda LVT IVGrant IVAC 1 Sentinel VCavalier VValiant VSherman III VMatilda Black Prince VISherman Firefly VICromwell VIAC 4 Experimental VICromwell B VISherman VC Firefly VIIComet VIIICenturion Mk. I VIIIFV4202 VIIIChieftain/T95 VIIICenturion Mk. 5/1 RAAC VIIIChimera IXCobra IXCenturion Mk. 7/1 XCenturion Action X
Heavy Tanks VChurchill I VExcelsior VIChurchill VII VITOG II* VIIBlack Prince VIIFV201 (A45) VIIICharlemagne VIIICaliban VIIIGonsalo VIIICaernarvon VIIICaernarvon Action X IXFV4201 Chieftain Proto IXConqueror XFV215b XSuper Conqueror XT95/FV4201 Chieftain
Tank Destroyers IIUniversal Carrier 2-pdr IVValentine AT IVAlecto VArcher VAT 2 VIChurchill Gun Carrier VIAchilles VIAT 8 VIExcalibur VIIChallenger VIIAT 15A VIIAT 7 VIIIGSOR 1008 VIIIAT 15 VIIICharioteer VIIITurtle Mk. I IXTortoise IXFV4004 Conway XFV215b (183) XFV4005 Stage II XFV217 Badger
Self-Propelled Artillery IILoyd Gun Carriage IIISexton II IIISexton I IVBirch Gun VBishop VIFV304 VIICrusader 5.5-in. SP VIIIFV207 IXFV3805 XConqueror Gun Carriage
Tank Destroyers
USA IIT3 HMC IIIT56 GMC IVM8A1 IVT40 VM10 Wolverine VT67 VIT78 VIM18 Hellcat VIM36 Jackson VIIM56 Scorpion VIIT28 Concept VIISuper Hellcat VIIT25/2 VIIT25 AT VIIITS-5 VIIIT28 VIIIT28 Prototype IXT30 IXT95 XT110E3 XT110E4
UK IIUniversal Carrier 2-pdr IVValentine AT IVAlecto VArcher VAT 2 VIChurchill Gun Carrier VIAchilles VIAT 8 VIExcalibur VIIChallenger VIIAT 15A VIIAT 7 VIIIGSOR 1008 VIIIAT 15 VIIICharioteer VIIITurtle Mk. I IXTortoise IXFV4004 Conway XFV215b (183) XFV4005 Stage II XFV217 Badger
Germany IIPanzerjäger I IIIMarder II IVStuG III Ausf. B IVPz.Sfl. IC IVJagdpanzer 38(t) Hetzer IVMarder 38T VStuG IV VPz.Sfl. IVc VStuG III Ausf. G VIDicker Max VIJagdpanzer IV VINashorn VIIE 25 VIIKrupp-Steyr Waffenträger VIIJagdpanther VIISturer Emil VIIIFerdinand VIIIKanonenjagdpanzer 105 VIIIRheinmetall Skorpion G VIIIRheinmetall Skorpion VIIIJagdpanther II VIII8,8 cm Pak 43 Jagdtiger VIIIRhm.-Borsig Waffenträger IXJagdtiger IXWaffenträger auf Pz. IV XGrille 15 XJagdpanzer E 100 XWaffenträger auf E 100
France IIRenault FT AC IIIFCM 36 Pak 40 IIIRenault UE 57 IVSomua SAu 40 VM10 RBFM VS35 CA VIARL V39 VIIAMX AC mle. 46 VIIIAMX AC mle. 48 VIIIAMX Canon d'assaut 105 IXAMX 50 Foch XAMX 50 Foch (155) XAMX 50 Foch B
USSR IIAT-1 IIISU-76I IVSU-85A IVSU-76M VSU-85 VSU-85I VISU-100 VISU-100Y VIIISU-122S VIISU-152 VIISU-100M1 VIISU-122-44 VIIIISU-152 VIIIISU-130 VIIIKV-4 KTTS VIIIT-103 VIIISU-130PM VIIIISU-152K VIIISU-101 IXK-91-PT IXObject 704 IXObject 263 XObject 268 XObject 268 Version V XObject 268 Version 4
China IIT-26G FT IIIM3G FT IVSU-76G FT V60G FT VIWZ-131G FT VIIT-34-2G FT VIIIWZ-111-1G FT VIIIWZ-120-1G FT IXWZ-111G FT IXWZ-120G FT XWZ-113G FT X114 SP2
Japan
Czechoslovakia VIIIShPTK-TVP 100
Sweden IIPvlvv fm/42 IIIIkv 72 IVSav m/43 VIkv 103 VIIkv 65 Alt II VIIIkv 90 Typ B VIIIUDES 03 VIIIStrv S1 IXStrv 103-0 XStrv 103B
Italy VSemovente M41 VISemovente M43 Bassotto VIISMV CC-56 VIIISMV CC-64 Vipera VIIISMV CC-67 IXControcarro 1 Mk. 2 XControcarro 3 Minotauro
Poland
ja:Tank:GB73 AT2