Valentine
Valentine

Mouse over "
[Client Values; Actual values in
| 40,000 |
| 37078 HP Hit Points |
| 16.26/16.59.46/20 t Weight Limit |
- Commander (Gunner, Radio Operator)
- Driver
- Loader
| 135165 hp Engine Power |
| 24/10 km/h Speed Limit |
| 3840 deg/s Traverse |
| 8.317.44 hp/t Power/Wt Ratio |
| NoNo Pivot |
| // mm Hull Armor |
| 65/65/6565/65/65 mm Turret Armor |
AP/APCR/HE
AP/APCR/HE Shells |
30/1200/15
45/2400/32 Shell Cost |
| 50/50/6075/75/100 HP Damage |
| 78/121/2375/110/30 mm Penetration |
|
18.75 r/m ▲
12 r/m Standard Gun ▲ Rate of Fire Standard Gun |
|
937.5 ▲
Standard Gun
▼
Standard Gun
▲
900 Standard Gun ▲
Standard Gun
▼
Standard Gun
▲ Damage Per Minute Standard Gun |
|
0.38 m ▲
0.43 m With 50% Crew: 0.484 m ▲ Accuracy With 50% Crew: 0.547 m |
| 1.7 s 2.7 s Aim time |
| 3638 deg/s Turret Traverse |
| 360° Gun Arc |
| -15°/+20°-8°/+17° Elevation Arc |
| 200130 rounds Ammo Capacity |
| 2015 % Chance of Fire |
| 310 m 320 m View Range |
| 350 m 400 m Signal Range |
III
40000
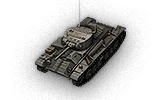
The Valentine is a British tier 3 light tank.
Designed in 1938 by Vickers-Armstrong, the tank was one of the best in its class. A total of 8,275 vehicles in various modifications were manufactured from 1940 through 1944.
Lowered to Tier III in version 1.9, the Valentine lost its heavy tank guns in exchange for the best armor on a non-premium tank in its tier and some of the highest-penetration guns on a Tier III light tank. With its slow speed, relatively high armor values, and good selection of guns, a "pocket heavy tank" might be the best way to describe the Valentine. It's a light tank in name only and should be played like a heavy, taking damage for your allies with your heavy armor.
The Valentine leads to the Matilda, and the Valentine AT.
Modules / Available Equipment and Consumables
Modules

Guns
| Tier | Gun | Penetration (mm) |
Damage (HP) |
Rate of fire (rounds/minute) |
Dispersion (m/100m) |
Aiming time (s) |
Weight (kg) |
Price (
| |
|---|---|---|---|---|---|---|---|---|---|
| IV | QF 2-pdr Mk. X | 78/121/23 | 50/50/60 | 19.35 | 0.38 | 1.7 | 130 | 6000 | |
| IV | QF 6-pdr Mk. III early | 70/105/30 | 75/75/100 | 12 | 0.45 | 2.7 | 400 | 27000 | |
| V | QF 6-pdr Gun Mk. V early | 75/110/30 | 75/75/100 | 12 | 0.43 | 2.7 | 450 | 35000 |

Engines
| Tier | Engine | Engine Power (hp) |
Chance of Fire on Impact (%) |
Weight (kg) |
Price (
| |
|---|---|---|---|---|---|---|
| III | AEC A190 | 131 | 15 | 800 | 2500 | |
| IV | GMC 6004 6-71S | 138 | 15 | 991 | 9000 | |
| V | GMC 6004 6-71A | 165 | 15 | 991 | 11000 | |
| II | AEC A189 | 135 | 20 | 800 | 2150 |

Suspensions
| Tier | Suspension | Load Limit (т) |
Traverse Speed (gr/sec) |
Rmin | Weight (kg) |
Price (
| |
|---|---|---|---|---|---|---|---|
| II | Valentine Mk. I | 16.5 | 38 | B/2 | 3200 | 710 | |
| III | Valentine Mk. VI | 20 | 40 | B/2 | 3200 | 2350 |

Radios
| Tier | Radio | Signal Range (m) |
Weight (kg) |
Price (
| |
|---|---|---|---|---|---|
| VI | WS No. 19 Mk. I | 400 | 40 | 15000 | |
| V | WS No. 9 | 375 | 40 | 3600 | |
| III | WS No. 11 | 350 | 40 | 600 |
Compatible Equipment


![]()
![]()
![]()


![]()


Compatible Consumables
![]()
![]()
![]()
![]()
![]()
![]()
![]()
![]()
![]()
![]()
![]()
![]()
![]()
![]()
![]()
![]()
![]()
![]()
![]()
![]()
![]()
Player Opinion
Pros and Cons
Pros:
- Very durable, best armor of any non-premium Tier III tank
- Stock gun has the best penetration of any gun on the tank, making for an easy stock grind
- Good hull and turret traverse rate despite low power/weight ratio
- Rather high camouflage value while stationary, but does not receive the light tank full-camo-on-moving bonus
Cons:
- Low top speed (24km/h) and power/weight ratio
- Armor has very little sloping; easier to penetrate than normal
- Joint lowest HP (390) of all Tier III light tanks
- The unusual crew layout means there are no premium British lights which can serve as a perfect crew trainer (but see below)
Performance
The Valentine has no problems accelerating with the top engine, but the 24km/h speed limit will mean you'll be picking up the rear of the advance. Performance is also quite sluggish going uphill. Turning is relatively fast, even with the stock engine, so you're not completely helpless against light tanks and other "brawlers".
Your armor will help you bounce shells from Tier III vehicles and many Tier IV's (for maximum bounce orient your hull so your gun -- when pointed at the enemy/threat axis -- is over the side and just past either front drive wheel). Try to keep enemies out of your rear quarter, your armor is generally weak there. The HP pool is lowest for all British lights but that's not saying much, the difference from the average across all same-tier lights (29 HP) is less that one hit from its own stock main gun.
Both the 2-pdr Mk. X and 6-pdr Mk. V early are worth trying out to see which suits the player best.
Your small silhouette, powerful guns, and thick armor makes this vehicle a pocket-sized heavy tank -- especially in its new tier -- able to threaten avenues of approach and deny opponents access to contested areas. The small size and consequently good camouflage values allow it to hide very easily, and can be positioned at lanes where scouts tend to rush down. The tank can hide behind virtually anything, and can even drive under some buildings. The superior firepower and armor combined with on-par maneuverability can mean certain death to lone scouts. Against heavier vehicles it can hit well above its weight in a slugging match, presenting a small, hardened target.
The Valentine has a very short profile, giving it the option of going for stealth, if desired. Given its slow speed (and the low fire rate of the 6-pdr Mk. V early, if you choose to use it) passive spotting and sniping can work well if placed in a Tier IV match. Naturally this works better with the Camouflage skill, but it's up to the player whether it's worth the trade-off over other skills. Like its bigger brother the Matilda it can defend positions with its armor, which when angled can bounce all but the most powerful shots.
There are no perfect premium crew trainers for the Valentine, but the A46 will do in a pinch if you use its gunner.
Early Research
- Nothing carries over from the Cruiser Mk. II
- You can research the engines first, but if you do go all the way to the GMC 6004 6-71A. The two in between give reduced chance of fire but at the cost of reduced horsepower
- Research the upgraded suspension for an increase in traverse speed
- Research the second turret, then the two 6-pdr guns
- Research the engines, if you haven't already
- Finally, research the radios
Suggested Equipment
![]()
![]()
![]()
![]()
![]()
Gallery


Historical Info
The many variants included riveted and welded construction, petrol and diesel power plants, and a progressive increase in armament. It was supplied in large numbers to the USSR and built under license in Canada. Developed by Vickers, it proved to be both strong and reliable
Name
There are several proposed explanations for the name Valentine. According to the most popular one the design was presented to the War Office on St. Valentine's Day, 14 February 1940, although some sources say that the design was submitted on Valentines Day 1938 or 10 February 1938. White notes that "incidentally" Valentine was the middle name of Sir John V. Carden, the man who was responsible for many tank designs including that of Valentine's predecessors, the A10 and A11. Another version says that Valentine is an acronym for Vickers-Armstrongs Ltd Elswick & (Newcastle-upon) Tyne. The "most prosaic" explanation according to David Fletcher is that it was just an in-house codeword of Vickers with no other significance.
Development
The Valentine started as a proposal based on their experience with the A9, A10 specification cruiser tanks and the A11 (Infantry Tank Mk I). As a private design by Vickers-Armstrongs it did not receive a General Staff "A" designation; it was submitted to the War Office on 10 February 1938. The development team tried to match the lower weight of a cruiser tank -- allowing the suspension and transmission parts of the A10 heavy cruiser to be used -- with the greater armour of an infantry tank. Working to a specification for a 60mm armour basis (the same as the A.11) but with a 2-pdr gun in a two man turret (the A.11 was armed only with a heavy machine gun), and a lower silhouette and as a light as possible resulted in a very compact vehicle with a cramped interior. Its armour was weaker than the Infantry Tank Mk II "Matilda", but due to a lower-powered engine the lighter tank had the same top speed. However by using components already proven on the A9 and A10 the new design was easier to produce and much less expensive.
The War Office was initially deterred by the size of the turret since they considered a turret crew of three necessary to free the vehicle commander from direct involvement in operating the gun. Concerned by the situation in Europe, however, it finally approved the design in April 1939 and placed the first order in July for deliveries in May 1940. At the start of the war Vickers were instructed to give absolute priority to the production of tanks. The vehicle reached trials in May 1940, which coincided with the loss of much of Britain's materiel in France during the evacuation at Dunkirk. The trials were successful and the vehicle was rushed into production as Tank, Infantry, Mark III; no pilot models were required as much of the mechanics had been proven on the A10, and it entered service from July 1941.
As well as Vickers, Metropolitan-Cammell Carriage and Wagon -- an associate company of Vickers -- and Birmingham Railway Carriage and Wagon Company (BRCW) were contracted to produce the Valentine. Metropolitan and the BRCW had both built small numbers of the A.10 and so had previous experience: their production runs were just finishing and they delivered their first Valentines in mid-1940. In 1943 production by Vickers peaked at 20 tanks per week. Metropolitan used two sites -- with Wednesbury joined by their Midland site in production of the Valentine. Vickers output started at 10 per month rising to 45 per month in a year and peaking at 20 per week in 1943 before production was slowed and then production of the Valentine and and vehicles based on the Valentine stopped in 1945. Vickers-Armstrongs produced 2515 vehicles and Metropolitan 2135, total UK production was 6855 units manufactured. For developing its own tank forces Canada had established its own tank production facilities. An order was placed in 1940 with Canadian Pacific and after modifications to the Valentine design, to use local standards and materials the production prototype was finished in 1941. [9] Canadian production was mainly at CPR Angus Shops in Montreal. 1420 were produced in Canada of which most were sent to the Soviet-Union, alongside 2394 of British production. They formed the Commonwealth's main export to the Soviet Union under the lend-lease programme. The remaining 30 were retained for training. The use of local GMC 'Detroit' diesel engines in Canadian production, was regarded as a success, and the engine was subsequently adopted for British production.
Between the British and Canadian production, at 8275 units, the Valentine was the most produced British tank design of the war.
Layout
The Valentine was of conventional layout internally divided into three compartments -- from front to back the driver's position, the fighting compartment with the turret, and finally the engine and transmission driving the tracks through rear sprockets. The driver's area contained only the driver and the driving controls. The driver sat on the centre of the hull line gaining access through either of two angled hatches over the seat, though there was an emergency exit hatch beneath his seat. The driver had a direct vision port -- cut in what was one of the hull's cross members - in front of him and two periscopes in the roof over his head. Driving was by clutch and brake steering through levers whose control rods ran the length of the hull to the transmission at the rear.
Behind the driver was a bulkhead that formed another of the hull's crossmembers and separated him from the fighting compartment. The first tanks had only a two man turret -- the gunner on the left of the gun and the commander acting also as the loader on the right. When three man turrets were introduced the commander set to the rear of the turret. The turret was made up of a cast front and a cast rear riveted to the side plates which were of rolled steel. All tanks carried the radio in the turret rear. Early tanks used the No. 11 Wireless with tannoy for the crew; later tanks had the No. 19 Wireless which included crew communications with long and short range networks. Turret rotation was by electric motor under the gunner's control with a hand-wheel for manual backup. The restrictions that the two-man turret placed on the commander, made more so if they were a troop commander and responsible for directing the actions of two other tanks besides their own, were addressed by enlarging the turret for the Mark III so that a dedicated loader for the main armament could be carried. The turret ring diameter was not changed so the extra space was found by moving the gun mounting forward in an extended front plate and increasing the bulge in the rear of the turret. This cost a weight increase of half a ton on the 2.5 ton two-man turret.
A final bulkhead separated the fighting compartment from the engine compartment. The engine, clutch and gearbox were bolted together to form a single unit.
The first Valentines used a petrol engine. The diesel engine which distinguished the Mark II -- at the time Tank Infantry Mark III* -- from the Mark I was based on the AEC Comet which was a commercial road vehicle engine. The Mark IV used a GMC 'Detroit' diesel; these were the majority of those used in the desert campaigns. The gearbox was a five speed, one reverse Meadows. Improved tracks were added to later marks.
Combat History
The tank first served in Operation Crusader in the North African desert, when it began to replace the Matilda Tank. Due to a lack of cruiser tanks it was issued to armoured regiments in the UK from mid-1941. The Valentine was better armed and faster than the Cruiser Mark II.
It was extensively used in the North African Campaign, earning a reputation as a reliable and well-protected vehicle. The first tanks in action were with the 8th Royal Tank Regiment in Operation Crusader. Some tanks had managed more than 3000 miles by the time the British Army reached Tunisia.
The Valentine shared the common weakness of the British tanks of the period: its 2-pounder gun lacked high-explosive (anti-personnel) capability, and soon became outdated as an anti-tank weapon too. Introduction of the 6-pdr in British service was delayed until the losses of Dunkirk had been made good so the 2-pdr was retained longer. The small size of the turret and of the turret ring meant mountings for larger guns proved a difficult task. Although versions with the 6-pounder and then with the Ordnance QF 75mm gun were developed, by the time they were available in significant numbers better tanks had reached the battlefield. Another weakness was the small crew compartment and the turret for only two men. A larger turret, with a loader position added, was used in some of the 2-pounder versions, but the position had to be removed again in variants with larger guns. Its relatively low height was an advantage in a battlefield with little cover, allowing it to take up a "good hull-down position in any convenient fold in the ground".
By 1944 the Valentine had been almost completely replaced in front-line units of the European Theatre by the Churchill (the "Infantry Tank Mark IV") and the US-made Sherman tanks. A few were used for special purposes or as command vehicles for units equipped with Archer.
In the Pacific the tank was employed in limited numbers, at least until May 1945. It was used by the 3rd New Zealand Division in the southwest Pacific campaign. A squadron was required but the 2-pdr HE shell lacked power especially compared to the 18 pound shell of the 3-inch howitzer. So Valentine III's in New Zealand had their main armament replaced by the 3-inch howitzer taken from Australian Matilda IV CS tanks. The converted tanks carried 21 HE and 14 smoke shells. Nine of the new 3-inch armed tanks and 16 normal Valentines -- with 2-inch HE shells produced in New Zealand -- formed the New Zealand Tank Squadron in 1944. New Zealand retained Valentines until 1955.
In Soviet service the Valentine was used from the Battle of Moscow until the end of the war. Although criticized for its low speed and weak gun, the Valentine was liked due to its small size, reliability, and generally good armour protection.
Surviving Vehicles
Around 40 Valentine tanks, and vehicles based on the Valentine chassis, survive. Tanks in running condition are at the Bovington Tank Museum (Mark IX), and in private hands in New Zealand and the United Kingdom. The Bovington collection includes two other Valentines -- a Mark II and a Valentine Scissors Bridgelayer.
Other examples are displayed at the Imperial War Museum Duxford in the UK; the Royal Military Museum in Brussels, Belgium; the Musée des Blindés, Saumur, France and the Kubinka Tank Museum, Russia. In the United States the Military Vehicle Technology Foundation and the Virginia Museum of Military Vehicles both own Valentines. Other examples are at the South African National Museum of Military History and the Indian Armoured Corps Museum in Ahmednagar Fort, Ahmednagar.
A number of Valentine hulls are in private ownership in Australia. These were sent there after the war for use as agricultural vehicles.
Two Canadian-built Valentines survive. Valentine Tank Mk VIIA, no. 838, built May 1943, was a Lend-Lease tank shipped to the Soviet Union. It fell through the ice of a boggy river near Telepino (Telepyne, Ukraine) during a Soviet counter-offensive on January 25, 1944. In 1990 a 74-year old villager helped locate the tank, and it was recovered and offered as a Glasnost-era gift to Canada. It was presented to the Canadian War Museum by independent Ukraine in 1992, and stands on display in the LeBreton Gallery. An additional Valentine built by Canadian Pacific resides at the Base Borden Military Museum in Barrie, Ontario.
A notable survivor is the only intact DD Valentine, this has been restored to running condition and is in private ownership in the United Kingdom by John Pearson. A number of DD Valentines that sank during training still lie off the British coast; several have been located and are regularly visited by recreational divers. This includes two in the Moray Firth in Scotland and two that lie 3.5 miles (5.6 km) out of Poole Bay in Dorset. These tanks lie 100 metres apart in 15 metres (49 ft) of water. A further tank is known to lie in around 10 meters of water in Bracklesham Bay, south of Chichester in West Sussex; the hull and turret are clearly recognizable as it sits on a gravel mound.
In October 2012 a Valentine Mk IX tank that fell through the ice while crossing a river in western Poland during the Soviet Army's march to Berlin was successfully recovered. The only surviving Valentine Mk IX to have actually seen combat is reportedly well preserved and could be made operational again within three years.
Historical Gallery


Historical Accuracy Errata
The actual crew layout of the Valentine is a commander, gunner, and driver. The commander acted as the loader.
- The Valentine Mk XI variant had four crew members, of whom the gunner is currently missing from the in-game vehicle.
- One of the Valentine's historical armaments, the OQF 3-inch howitzer, is also missing.