Tokachi

| Purchase priceSpecial |
| Hit Points32,000 |
| 127 mm/50 3rd Year Type in a turret6 х 2 pcs. |
| Rate of Fire8.57 shots/min. |
| Reload Time7 sec. |
| Rotation Speed25 deg./sec. |
| 180 Degree Turn Time7.2 sec. |
| Firing Range13.57 km. |
| Maximum Dispersion126 m. |
| HE Shell127 mm HE Type1 |
| Maximum HE Shell Damage2,150 |
| Chance of Fire on Target Caused by HE Shell9 % |
| Initial HE Shell Velocity915 m./s. |
| HE Shell Weight23 kg. |
| AP Shell127 mm AP Type0 |
| Maximum AP Shell Damage2,200 |
| Initial AP Shell Velocity915 m./s. |
| AP Shell Weight23 kg. |
| 120 mm/40 10th Year Type on a Model C mount4 х 1 pcs. |
| Firing Range5.6 km. |
| Rate of Fire10 shots/min. |
| Reload Time6 sec. |
| HE Shell120 mm HE Type0 |
| Maximum HE Shell Damage2,000 |
| Initial HE Shell Velocity825 m./s. |
| Chance of Fire on Target Caused by HE Shell8 % |
| 610 mm Triple2 х 3 pcs. |
| Rate of Fire0.86 shots/min. |
| Reload Time70 sec. |
| Rotation Speed25 deg./sec. |
| 180 Degree Turn Time7.2 sec. |
| TorpedoType90 1930 |
| Maximum Damage17,233 |
| Torpedo Speed70 knot |
| Torpedo Range12 km. |
| 127 mm/50 3rd Year Type in a turret6 х 2 pcs. |
| . . . Average Damage per Second60.6 |
| . . . Firing Range5.01 km. |
| 120 mm/40 10th Year Type on a Model C mount4 х 1 pcs. |
| . . . Average Damage per Second10 |
| . . . Firing Range4.5 km. |
| 40 mm/62 "HI" Type 91 on a twin mount2 х 2 pcs. |
| . . . Average Damage per Second15.8 |
| . . . Firing Range2.01 km. |
| 13 mm/76 Type 93 on a single mount2 х 1 pcs. |
| . . . Average Damage per Second2.8 |
| . . . Firing Range1.2 km. |
| Maximum Speed34.5 knot |
| Turning Circle Radius750 m. |
| Rudder Shift Time8.8 sec. |
| Surface Detectability Range11.76 km. |
| Air Detectability Range6.44 km. |

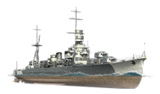
Tokachi — Japanese special premium Tier VII cruiser.
The armament of the scout cruisers originally included six 140 mm twin-gun turrets, but the project was later revised. In the 1930s, the Furutaka-class cruisers were rebuilt following the pattern of the Aoba-class cruisers and received three twin-gun turrets. If this hadn't happened, such cruisers would most likely have been turned into anti-aircraft defense ships during World War II with 127 mm dual-purpose guns in twin-gun mounts.
Tokachi was first available for completing Stage 50 of the Update 0.11.10 Premium Battle Pass on 02 November 2022.
Modules
 |
Rate of Fire (shots/min) | 180° Turn Time (sec) | Maximum Dispersion (m) | Maximum HE Shell Damage (HP) | Chance of Fire on Target Caused by HE Shell (%) | Maximum AP Shell Damage (HP) |
Research price (exp) |
Purchase price ( | |
|---|---|---|---|---|---|---|---|---|---|
| 127 mm/50 3rd Year Type in a turret | 8.6 | 7.2 | 126 | 2,150 | 9 | 2,200 | 0 | 0 |
 |
Hit Points (HP) | Armor (mm) | Armor (mm) | Main Turrets (pcs.) | Secondary Gun Turrets (pcs.) | AA Mounts (pcs.) | Torpedo Tubes (pcs.) | Hangar Capacity (pcs.) |
Research price (exp) |
Purchase price ( | |
|---|---|---|---|---|---|---|---|---|---|---|---|
| Tokachi | 32,000 | 10 | 76 | 6 | 4 | 2/2/4/6 | 2 | 0 | 0 |
 |
Rate of Fire (shots/min) | Torpedo Tubes Reload Time (sec) | 180° Turn Time (sec) | Maximum Damage (HP) | Torpedo Speed (knot) | Torpedo Range (km) |
Research price (exp) |
Purchase price ( | |
|---|---|---|---|---|---|---|---|---|---|
| Type93 mod. 1 | 0.9 | 70 | 7.2 | 17,233 | 70 | 12 | 0 | 0 |
 |
IDS_SHIP_PARAM_SUO_INCREASE_DIST (%) | Maximum Firing Range (km) |
Research price (exp) |
Purchase price ( | |
|---|---|---|---|---|---|
| Type7 mod. 1 | 0 | 0 | 0 |
 |
Maximum Speed (knot) |
Research price (exp) |
Purchase price ( | |
|---|---|---|---|---|
| Propulsion: 102,000 hp | 34.5 | 0 | 0 |
Compatible Upgrades
| Slot 1 |
|||||
|---|---|---|---|---|---|
| Slot 2 |
|||||
| Slot 3 |
|||||
| Slot 4 |
Player Opinion
Performance
Refer to the in-game Port screens for more useful data.
Tier VII premium Japanese light cruiser Tokachi offers a unique play style among IJN cruisers. Though she differs quite extensively from her tech tree counterparts, captains with experience in Atlanta will find themselves right at home with Tokachi’s gameplay. Offering great high-explosive damage output on a well armored hull, a skilled captain can make Tokachi a force to be reckoned with on the battlefield.
Survivability & Maneuverability
While most super-light cruisers are characterized by poor armor protection, Tokachi is the exception, and is quite durable. As a consequence of sharing Furutaka’s hull, she features a thick 48mm deck, able to bounce all AP shells and shatter the majority of cruiser HE shells, and a 25mm upper belt. This upper portion is capable of bouncing cruiser and small caliber battleship AP if adequately angled. Although a well-aimed salvo from a battleship will still overmatch this upper belt, Tokachi’s narrow hull means many of these shots will simply pass through. Unable to fuse in time, a lot of these shells will result in overpenetrations, and a small superstructure helps to reduce incoming damage as well. However, her extremities remain poorly armored at only 13mm thick. Battleships, but also heavy cruisers armed with 203mm guns and larger will overmatch Tokachi’s bow and stern, leaving her quite vulnerable in that regard.
Despite her thicker armor, captains should not think themselves as invincible. Her HP is rather low for a Tier VII cruiser, so focused fire will make quick work of her. She also lacks Atlanta’s low concealment and favorable agility, meaning captains must plan their movements in advance, but a good top speed allows her to reposition quickly when needed.
Armaments
Tokachi’s strongest feature is her ability to deal damage to enemy ships, and she brings quite a fearsome package to the table. In a first for an IJN cruiser, her guns come from the Japanese destroyer line, and use the same ballistics as ships such as Shiratsuyu, Akatsuki, or Hatsuharu. Players used to the ballistics of Atlanta or Dido will find Tokachi’s a fair bit better, but still on the poorer side. Although her guns have low range and penetration, Tokachi’s 12-barrel broadside is still a threat to enemy ships. Her HE shells feature high damage and fire chance for their caliber, and her damage can be further improved with the Heavy HE and SAP Shells commander skill for no downside. Her high base fire chance also means the Inertia Fuse for HE Shells skill will have less of a noticeable impact on her fires set as compared to Atlanta. Her AP shells, however, are a different story. Being destroyer caliber guns, they have very poor penetration that drops off quickly with range. Captains will find that they struggle to citadel cruisers unless at point blank range, and are only effective against battleships at closer ranges. Like some of the tech tree Japanese light cruisers, all of Tokachi’s turrets can rotate 360°, with a fast traverse speed that allows her to quickly respond to new threats.
In addition to her main battery, Tokachi features a strong torpedo armament. With high damage and speed and low detection, even a single hit will cause considerable damage to an enemy ship. Unfortunately, she only carries two triple torpedo launchers, one on each side, although this is mitigated a bit by their fast reload speed, only slightly above one minute, and her Torpedo Reload Booster ![]() consumable.
consumable.
Tokachi’s anti-aircraft fire leaves a lot to be desired, and should not be relied on. Although her guns are dual purpose, they produce few flak clouds, and her mid- and short-range AA damage is very low. Captains should stick close to teammates for AA cover, or expect to take hits from a determined aircraft carrier.
Gameplay
Players familiar with other destroyer-caliber cruisers like Colbert or Atlanta will find that experience greatly benefits Tokachi, as many of the same tactics can be applied. At the start of the battle, captains should find a suitable island near a capture point that they can fire over while remaining shielded from enemy fire. Her HE salvos will make quick work of enemy destroyers, and her devastating torpedoes can be used against any larger ship that attempts to push in and contest the point. Unfortunately, her weak AP shells should only ever be used against broadside cruisers and battleships at close ranges.
Due to Tokachi’s subpar range and ballistics, leading pushes is not her strong suit. If she must push, it’s best to have heavier teammates around to help draw fire. She instead thrives at dealing with enemies that push into her range. Captains should position accordingly to try and catch bold enemies off guard with her withering HE fire and torpedoes from cover if they attempt to move in. While Tokachi's is at her strongest when in cover, skilled captains can take advantage of her armor and speed in open water fighting. Use of active speed and rudder dodging, with her thicker deck and midsection plating, means a good portion of enemy salvos will bounce or outright miss.
Tokachi offers a unique playstyle that was previously limited to a handful of other nations, and is a good contrast to the standard heavy and light Japanese cruiser lines. Utilizing her strong main battery and torpedo power, Tokachi relies on a high, relatively fast damage output that makes her a little bit more flexible than most other cruisers.Pros:
- Great protection for her size
- Good reload and a numerous main battery
- Can utilize the Heavy HE and SAP skill with no penalty
- High HE alpha per shell and great fire chance
- Torpedoes are fast, deal high damage, and are quick to reload
- High top speed
- Decent concealment
- Features the Torpedo Reload Booster
 and Hydroacoustic Search
  consumables
- Fast turret traverse rate, and all turrets can rotate 360°
Cons:
- Below average HP pool
- Bow and stern can be overmatched by 203mm guns
- Turrets are easily knocked out
- Low HE and AP penetration
- Subpar ballistics
- Very short range
- Only three torpedoes per side
- Limited AA defense
Research
Optimal Configuration
Upgrades
The recommended upgrades are:
- Slot 1: Main Armaments Modification 1

- Slot 2: Engine Room Protection
 or Hydroacoustic Search Modification 1
- Slot 3: Aiming Systems Modification 1

- Slot 4: Propulsion Modification 1

Commander Skills
| Recommended Commander Skills | ||||||
|---|---|---|---|---|---|---|
| Cost (points) |
Attack | Defense | ||||
| 1 |
★ |
|
|
|
|
★★★ |
| 2 |
★ |
★★ |
|
|
★★★ |
|
| 3 |
★★★ |
★★ |
★★★ |
|
|
★★★ |
| 4 |
|
|
|
★★★ |
★★★ |
|
| Key: ★★★ - Extremely Useful ★★ - Frequently Useful ★ - Occasionally Useful No stars - Not Useful | ||||||
Consumables
Tokachi equips the following consumables:
- Slot 1: Damage Control Party

- Slot 2: Hydroacoustic Search – 3 charges
- Slot 3: Torpedo Reload Booster – 3 charges
- Slot 4: Catapult Fighter
 – 3 charges
Camouflage
As a premium ship, Tokachi comes with Default permanent camouflage and a set of permanent combat bonuses.
Signals
Recommended Signal Flags 
| |||||
|---|---|---|---|---|---|
| Combat | |||||
 ★★★ |

|

|

|
 ★★★ |
 ★★★ |
 ★★ |

|
 ★ |
 ★★★ |
 ★★ |

|

|
 ★★ | ||||
Note: Use of the Juliet Charlie signal makes detonation impossible.
Gallery
Historical Info
Historical Gallery
References
Ship Change Log
See here for links to Update notes.
- Available for testing by supertesters in the game starting from Update 0.11.8.
Testing Changes
- DevBlog 350:
- Preliminary characteristics.
- Note: The Dev Blog states states Tokachi produces 3 flak clouds per salvo; she actually produces 4.
- Preliminary characteristics.
- DevBlog 374:
- Torpedo speed increased from 60 to 70 knots.
- Update 0.11.10:
- Available as the reward for Stage 50 of the 0.11.10 Premium Battle Pass.
- Update 12.0:
- Fixed a bug in the characteristics of the Depth Charge Airstrike armament:
- Number of available flights of the Depth Charge Airstrike armament increased from 1 to 2.
- Fixed a bug in the characteristics of the Depth Charge Airstrike armament: