Type 4 Heavy
| Revision as of 10:21, 13 August 2017 | Revision as of 10:32, 13 August 2017 | |||
| Line 62: | Line 62: | |||
| |History= | |History= | |||
| The O-I super-heavy tank was sent to mobility tests in 1943. The vehicle however suffered issues in the mobility tests, which resulted in termination of the project. Fate of the O-I prototype is unknown. However, it was apparent that Japan didn't want to give up with super-heavy tank designs. | The O-I super-heavy tank was sent to mobility tests in 1943. The vehicle however suffered issues in the mobility tests, which resulted in termination of the project. Fate of the O-I prototype is unknown. However, it was apparent that Japan didn't want to give up with super-heavy tank designs. | |||
| + | ||||
| This most likely resulted into developing the new super-heavy tank design. In 1944, a new super-heavy tank design was ready. This single prototype likely was accepted to service as "Type 4". The vehicle is also sometimes referred as "Type 2604". Since the vehicle was the 2nd super-heavy tank design, it was likely that the full designation was "Type 4 O-Ro". | This most likely resulted into developing the new super-heavy tank design. In 1944, a new super-heavy tank design was ready. This single prototype likely was accepted to service as "Type 4". The vehicle is also sometimes referred as "Type 2604". Since the vehicle was the 2nd super-heavy tank design, it was likely that the full designation was "Type 4 O-Ro". | |||
Revision as of 10:32, 13 August 2017
Type 4 Heavy
Mouse over "
[Client Values; Actual values in
| 3,700,000 |
| 2050410 HP Hit Points |
| 158.65/16082.48/170 t Weight Limit |
- Commander
- Gunner
- Driver
- Radio Operator
- Loader
- Loader
| 11001200 hp Engine Power |
| 25/10 km/h Speed Limit |
| 1517 deg/s Traverse |
| 6.9314.55 hp/t Power/Wt Ratio |
| NoNo Pivot |
| // mm Hull Armor |
| 250/200/200250/200/200 mm Turret Armor |
AP//HE
AP//HE Shells |
0/4800/670
0/0/905 Shell Cost |
| 450/450/610600/600/770 HP Damage |
| 230/258/64257/290/70 mm Penetration |
|
3.68 r/m ▲
3.03 r/m Standard Gun ▲ Rate of Fire Standard Gun |
|
1656 ▲
Standard Gun
▼
Standard Gun
▲
1818 Standard Gun ▲
Standard Gun
▼
Standard Gun
▲ Damage Per Minute Standard Gun |
|
0.38 m ▲
0.4 m With 50% Crew: 0.471 m ▲ Accuracy With 50% Crew: 0.496 m |
| 2.3 s 2.9 s Aim time |
| 1717 deg/s Turret Traverse |
| 360° Gun Arc |
| -10°/+20°-10°/+20° Elevation Arc |
| 8060 rounds Ammo Capacity |
| 2020 % Chance of Fire |
| 390 m 390 m View Range |
| 425 m 750 m Signal Range |
IX
3700000
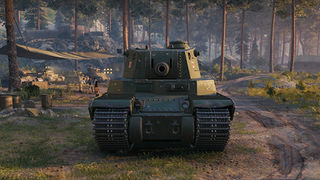
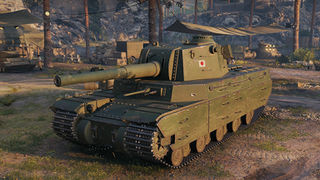
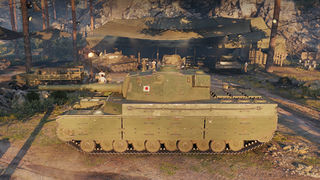
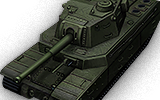
The Type 4 Heavy is a Japanese tier 9 heavy tank.
The Type 4, also known as the Type 2604, is a variant of the superheavy O-I tank that was developed during World War II. The vehicle was designed for breakthrough attacks on enemy fortifications as well as for coastal defense.
The Type 4 Heavy or just simply called Type 4 has bit different design compared to earlier Japanese heavies. It has much thicker overall armor, and it has completely different guns; it no longer carries similar 10cm guns or 15cm Type 96 howitzer like them, but has whole new bunch of huge naval guns. Compared to O-Ho, it no longer carries miniturrets that limits frontal depression. It also has very thick tracks that is effective for absorb the damage.
While Type 4 has much thicker side armor than predecessors, its cheeks on hull are now noticeably weaker than frontal hull armor. Combined with the fact that ammorack is located behind them, Type 4 isn't still good at sidescraping. Furthermore, its heaviest tank in the line (160 tons) but carries the same 1200 HP engine, which makes it even slower than other tanks on the line. All of its guns have dreadful rate of fire, accuracy, DPM and gun handling.
Type 4, while slow and clumsy, can be relatively respectable opponent due to its huge guns and thick armor. It shares few traits among with its brother, Type 5 Heavy, which prepares the player for it. However, it has few extra weaknesses compared to its brother, such as weaker cheek armor, noticeably weaker turret armor and much worse soft stats on its guns.
The Type 4 Heavy leads to the Type 5 Heavy.
Modules / Available Equipment and Consumables
Modules
| Tier | Engine | Engine Power (hp) |
Chance of Fire on Impact (%) |
Weight (kg) |
Price (
| |
|---|---|---|---|---|---|---|
| VII | 2x Kawasaki Type 98 V-12 (550) | 1100 | 20 | 1020 | 51000 | |
| VIII | 2x Kawasaki Type 98 V-12 (600) | 1200 | 20 | 1020 | 77500 |
| Tier | Suspension | Load Limit (т) |
Traverse Speed (gr/sec) |
Rmin | Weight (kg) |
Price (
| |
|---|---|---|---|---|---|---|---|
| VIII | Type 4 Heavy | 160 | 15 | B/2 | 40000 | 34000 | |
| IX | Type 4 Heavy Kai | 170 | 17 | B/2 | 40000 | 68000 |
| Tier | Radio | Signal Range (m) |
Weight (kg) |
Price (
| |
|---|---|---|---|---|---|
| VI | Type 96 Mk. 4 Bo | 425 | 50 | 14000 | |
| VIII | Type 3 Otsu | 550 | 240 | 22000 | |
| X | Type 3 Ko | 750 | 560 | 54000 |
Compatible Equipment
Compatible Consumables
Player Opinion
Pros and Cons
Pros:
- Absolutely monstrous thickness on its armor for tier 9 with lack of weakspots that can bounce even tier 10 standard rounds
- Third highest HP in its tier (2050)
- Excellent gun depression with 14cm gun(-10)
- Thick tracks that counts as thick armor can absorb shots effectively.
- Choice of two guns; both of them has huge damage potential for tier 9, as 14cm has highest AP damage of all tier 9 heavies while 15,2cm is capable of oneshot most of tier 7s and many tier 8s with premium HE!
- 3rd heaviest tank in the game; can easily push other tanks, wrecks and takes very little damage from ramming
- Shares same engine as earlier Japanese heavies, doesn't have additional turret and 12,7cm is better than average tier 9 stock gun; easier stock grind than most tier 9s
Cons:
- Very poor mobility, struggles to reach even its already low top speed
- One of the biggest tanks in the game with extremely poor camo values; priority target to SPG
- Terrible rate of fire, aim time, accuracy and DPM on both guns
- Hull cheeks became weakspot when not angled correctly; ammorack is located behind them
- Flat armor makes it very vulnerable to tier 10 and many tier 9 gold rounds and TDs in same and higher tiers.
- Huge ammorack can be easily damaged from side and from hull cheeks
- 15.2 cm howitzer has poor gun depression on front (-6.5)
Performance
Arguably one of the worse tier 9 heavies in the game, the Type 4 boasts incredible armour and alpha damage for it's tier. Staying near cover is a must considering its one of the biggest tanks in the game, making sure to not get hit by TDs, which often have enough penetration to go through the armor of Type, and artillery. Avoid going open areas as much as possible because this tank's camo value is laughably poor. Gun has poor dispersion, very long reload, aim time and mediocre gold penetration, meaning that you need to fight enemies as close as possible. Mobility is very poor though; worse than Maus, so you need to predict few minutes to ahead and have good map awareness to minimize chances to get left in behind. Avoid sidescraping, since hull cheeks are weak and has ammoracks located behind them. Instead, come out from corners by angling your hullfront and hiding hull cheek behind the corner. This is safest option since your lowerplate is as tough as front. Never go alone, because Type is big, slow and has very long reload. High alpha damage makes this tank relatively good at peek-a-booing. Having allies is again must to make you less vulnerable during your reload. Hulldown option is also usable with -10 degrees of gun depression. Lastly, you can reverse sidescrape unlike your big brother, Type 5 Heavy, since Type 4 entire rear can be covered behind buildings, exposing only your side and turret.
Overall, Type 4 can be relatively frustating tank to play due to size, poor mobility and very poor gun stats apart from damage and regular AP penetration, but on few situations, the tank can do its work very well.
Early Research
Engine is carried over from earlier Japanese heavies, mount it immediately. 14cm doesnt need tracks if you dont have ANY equipment; however in order to mount equipment and 14cm, tracks are necessary. You can go first for 14cm and remove equipment until you get improved tracks, or get tracks first and then get 14cm. After that, you can either go for Type 5 Heavy or research 15,2cm gun. Keep on mind that researching 15,2cm will immediately elite the Type 5 Heavy, and it can be mounted immediately on Type 5 if it has been researched on Type 4.
Suggested Equipment
Gallery
Historical Info
This most likely resulted into developing the new super-heavy tank design. In 1944, a new super-heavy tank design was ready. This single prototype likely was accepted to service as "Type 4". The vehicle is also sometimes referred as "Type 2604". Since the vehicle was the 2nd super-heavy tank design, it was likely that the full designation was "Type 4 O-Ro".
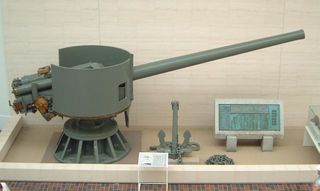
The main difference between vehicle was lack of multi-turret design of O-I. At this point, it was widely accepted that multi-turret concept doesn't work, and Japan was no expection. The main turret, instead of being shaped like hexagon, was shaped similarly to medium tank designs like Chi-To or Chi-Ri. The main armament was likely a 14 cm naval gun, commonly used on coastal fortifications, which given the intented role of the vehicle as moving bunker was logical option.
Type 4 had two 12 cylinder BMW marine engines with a rather complicated cooling system of three radiators per engine and one oil radiator, cooled by two central massive ventilators, powered by the drive train. The air is sucked in via massive grilles, positioned in the center over the engine compartment. The main advantage of the design was high protection of the engine from overheating.
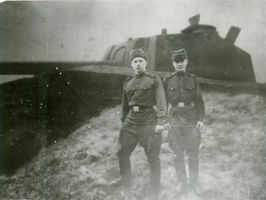
It is said that Type 4 entered service and was shipped into Manchuria. However, for unknown reasons, the turret was removed from the vehicle and placed on a stalemate bunker. Whether the tank itself broke down, was destroyed or just abandoned is mystery. The bunker and turret was found by Red Army after WW2 and photographed. However, some specifics like armor values are still not known.
Historical Gallery
Historical Accuracy Errata
Due to lack of information, many aspects of tanks such as armor values, top speed and weight are made up by Wargaming. Hull itself is based on rough sketch, meaning it also most likely has historical inaccuracies.
- While it is not mentioned anywhere, it is likely that the full designation of vehicle was "Type 4 O-Ro", which means "second super-heavy tank".
- There is no historical basis of 12,7 cm or 15,2cm naval guns being used on Type 4 Heavy; while not directly stated anywhere, the armament was very likely 14cm naval gun
- In-game description is inaccurate. The vehicle was not a direct modification of O-I, but it's own tank design. However, it is very well possible that vehicle shared similarities and components with the O-I.
Sources and External Links
| Light Tanks | IRenault Otsu • IIType 95 Ha-Go • IIType 97 Te-Ke • IIIType 97 Chi-Ha • IIIType 98 Ke-Ni • IVType 5 Ke-Ho |
| Medium Tanks | IIChi-Ni • IIType 89 I-Go/Chi-Ro • IVType 1 Chi-He • VType 3 Chi-Nu • VType 3 Chi-Nu Kai • VIType 4 Chi-To • VIIType 5 Chi-Ri • VIIISTA-1 • VIIISTA-2 • IXType 61 • XSTB-1 |
| Heavy Tanks | IIIType 91 Heavy • IVType 95 Heavy • VO-I Experimental • VIHeavy Tank No. VI • VIO-I • VIIO-Ni • VIIIO-Ho • IXType 4 Heavy • XType 5 Heavy |
| Tank Destroyers | |
| Self-Propelled Artillery |


