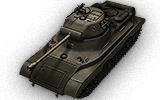
Welcome to Wargaming.net Wiki!
Variants

Pawlack Tank

Jump to: navigation, search


Ambox_important.png This article requires additional modification.
The design and/or content of this article do not conform to wiki standards.

Missing Content:

  • Gallery
  • Player Opinion: Equipment


Pawlack Tank

AnnoA142_Pawlack_Tank.png
Battle Tier
1234567891011
Overview
Mouse over "
Well, the ones further down, of course.
" for more information
[Client Values; Actual values in
Specifically, the mismatch in crew values caused by commander's 10% crew skill bonus. Outside of a crew of 1 commander only, 100% crew is a fiction. The client values, given for 100% crew, will normally be taken into battle with 110% crew skill members aside from specific functions, causing their actual performance to deviate from the expected client value. These differences are taken into account in tooltip boxes.
]
905,000  Credits Cost
900190 HP Hit Points
36.81/3717.44/40 t Weight Limit
Crew
  1. Commander (Radio Operator)
  2. Gunner
  3. Driver
  4. Loader
Mobility
600650 hp Engine Power
45/14 km/h Speed Limit
3032 deg/s Traverse
16.337.27 hp/t Power/Wt Ratio
YesYes Pivot
Armor
// mm Hull Armor
101.6/63.5/38.1139.7/76.2/38.1 mm Turret Armor
Armament


{{#ifeq:ARMOR_PIERCING_CR|ARMOR_PIERCING||


{{#ifeq:HIGH_EXPLOSIVE|ARMOR_PIERCING||


AP/APCR/HE


{{#ifeq:ARMOR_PIERCING_CR|ARMOR_PIERCING||


{{#ifeq:HIGH_EXPLOSIVE|ARMOR_PIERCING||


AP/APCR/HE
Shells


96/2800/68


255/4400/255
Shell Cost
115/115/185240/240/320 HP Damage
128/177/38160/205/45 mm Penetration


|


|}}

|


|}}


17.14 r/m 

Standard Gun

Reload Times
Nominal: 3.5 s
50% Crew: 4.34 s
75% Crew: 3.79 s
100% Crew: 3.36 s
Rammer: 3.02 s
Vents: 3.29 s
Both: 2.96 s
Both and BiA: 2.89 s
Both and Max Crew %: 2.77 s

See Crew, Consumables, or Equipment for more information.


|


|}}

|


|}}


6.67 r/m 

Standard Gun

Reload Times
Nominal: 9 s
50% Crew: 11.15 s
75% Crew: 9.73 s
100% Crew: 8.63 s
Rammer: 7.77 s
Vents: 8.44 s
Both: 7.6 s
Both and BiA: 7.43 s
Both and Max Crew %: 7.12 s

See Crew, Consumables, or Equipment for more information.
Rate of Fire


|


|}}

|


|}}


1971.1

Standard Gun

Using Shell Type 1 (115 Damage):


Theoretical Damage Per Minute
Nominal DPM: 1971.1
50% Crew: 1591.6
75% Crew: 1822.75
100% Crew: 2056.2
100% Crew
Vents: 2102.2
Rammer: 2285.05
Both: 2335.65
Both and BiA: 2388.55
Both and Max Crew %: 2490.9

Advantageous Damage Per Minute
First-shot DPM: 2086.1
50% Crew: 1706.6
75% Crew: 1937.75
100% Crew: 2171.2
100% Crew
Rammer: 2400.05
Vents: 2217.2
Both: 2450.65
Both and BiA: 2503.55
Both and Max Crew %: 2605.9

See here, here, or here for more information.

Standard Gun

Using Shell Type 2 (115 Damage):


Theoretical Damage Per Minute
Nominal DPM: 1971.1
50% Crew: 1591.6
75% Crew: 1822.75
100% Crew: 2056.2
100% Crew
Vents: 2102.2
Rammer: 2285.05
Both: 2335.65
Both and BiA: 2388.55
Both and Max Crew %: 2490.9

Advantageous Damage Per Minute
First-shot DPM: 2086.1
50% Crew: 1706.6
75% Crew: 1937.75
100% Crew: 2171.2
100% Crew
Rammer: 2400.05
Vents: 2217.2
Both: 2450.65
Both and BiA: 2503.55
Both and Max Crew %: 2605.9

See here, here, or here for more information.

Standard Gun

Using Shell Type 3 (185 Damage):
With wholly penetrating hits

Theoretical Damage Per Minute
Nominal DPM: 3170.9
50% Crew: 2560.4
75% Crew: 2932.25
100% Crew: 3307.8
100% Crew
Vents: 3381.8
Rammer: 3675.95
Both: 3757.35
Both and BiA: 3842.45
Both and Max Crew %: 4007.1

Advantageous Damage Per Minute
First-shot DPM: 3355.9
50% Crew: 2745.4
75% Crew: 3117.25
100% Crew: 3492.8
100% Crew
Rammer: 3860.95
Vents: 3566.8
Both: 3942.35
Both and BiA: 4027.45
Both and Max Crew %: 4192.1

See here, here, or here for more information.


|


|}}

|


|}}


1600.8

Standard Gun

Using Shell Type 1 (240 Damage):


Theoretical Damage Per Minute
Nominal DPM: 1600.8
50% Crew: 1291.2
75% Crew: 1480.8
100% Crew: 1670.4
100% Crew
Vents: 1708.8
Rammer: 1855.2
Both: 1898.4
Both and BiA: 1939.2
Both and Max Crew %: 2023.2

Advantageous Damage Per Minute
First-shot DPM: 1840.8
50% Crew: 1531.2
75% Crew: 1720.8
100% Crew: 1910.4
100% Crew
Rammer: 2095.2
Vents: 1948.8
Both: 2138.4
Both and BiA: 2179.2
Both and Max Crew %: 2263.2

See here, here, or here for more information.

Standard Gun

Using Shell Type 2 (240 Damage):


Theoretical Damage Per Minute
Nominal DPM: 1600.8
50% Crew: 1291.2
75% Crew: 1480.8
100% Crew: 1670.4
100% Crew
Vents: 1708.8
Rammer: 1855.2
Both: 1898.4
Both and BiA: 1939.2
Both and Max Crew %: 2023.2

Advantageous Damage Per Minute
First-shot DPM: 1840.8
50% Crew: 1531.2
75% Crew: 1720.8
100% Crew: 1910.4
100% Crew
Rammer: 2095.2
Vents: 1948.8
Both: 2138.4
Both and BiA: 2179.2
Both and Max Crew %: 2263.2

See here, here, or here for more information.

Standard Gun

Using Shell Type 3 (320 Damage):
With wholly penetrating hits

Theoretical Damage Per Minute
Nominal DPM: 2134.4
50% Crew: 1721.6
75% Crew: 1974.4
100% Crew: 2227.2
100% Crew
Vents: 2278.4
Rammer: 2473.6
Both: 2531.2
Both and BiA: 2585.6
Both and Max Crew %: 2697.6

Advantageous Damage Per Minute
First-shot DPM: 2454.4
50% Crew: 2041.6
75% Crew: 2294.4
100% Crew: 2547.2
100% Crew
Rammer: 2793.6
Vents: 2598.4
Both: 2851.2
Both and BiA: 2905.6
Both and Max Crew %: 3017.6

See here, here, or here for more information.
Damage Per Minute


|


|}}


0.42 m 

With 50% Crew: 0.52 m
With 75% Crew: 0.454 m
With 100% Crew: 0.403 m
With BiA: 0.394 m
With BiA and Vents: 0.385 m
Maximum possible: 0.369 m

For more details, see Crew


|


|}}


0.42 m 

With 50% Crew: 0.52 m
With 75% Crew: 0.454 m
With 100% Crew: 0.403 m
With BiA: 0.394 m
With BiA and Vents: 0.385 m
Maximum possible: 0.369 m

For more details, see Crew
Accuracy


|


|}}


2.2 s 

With 50% Crew: 2.725 s
With 75% Crew: 2.38 s
With 100% Crew: 2.109 s
With GLD: 1.918 s
With BiA: 2.063 s
With BiA and Vents: 2.018 s
With both and GLD: 1.835 s
Maximum possible: 1.759 s

For more details, see Crew or Equipment


|


|}}


2.4 s 

With 50% Crew: 2.973 s
With 75% Crew: 2.596 s
With 100% Crew: 2.301 s
With GLD: 2.092 s
With BiA: 2.25 s
With BiA and Vents: 2.202 s
With both and GLD: 2.001 s
Maximum possible: 1.918 s

For more details, see Crew or Equipment
Aim time
3235 deg/s Turret Traverse
360° Gun Arc
-5°/+15°-5°/+15° Elevation Arc
9054 rounds Ammo Capacity
General
1515 % Chance of Fire


350 m 

With 50% Crew: 275 m
With 75% Crew: 312.5 m
With 100% Crew: 350 m
With Recon and Situational Awareness: 367.7 m
With Coated Optics: 385 m
With Binocular Telescope: 437.5 m
Maximum possible: 501.1 m

For more details, see Skills or Equipment


360 m 

With 50% Crew: 282.8 m
With 75% Crew: 321.5 m
With 100% Crew: 360 m
With Recon and Situational Awareness: 378.2 m
With Coated Optics: 396 m
With Binocular Telescope: 450 m
Maximum possible: 515.4 m

For more details, see Skills or Equipment
View Range


|


|}}


395 m 

With 50% Crew: 310.3 m
With 75% Crew: 352.7 m
With 100% Crew: 395 m
With 100% Signal Boost: 474 m
When affected by 100% Relaying: 434.5 m
Maximum possible: 568.4 m

For more details, see Skills or Equipment


|


|}}


615 m 

With 50% Crew: 483.2 m
With 75% Crew: 549.2 m
With 100% Crew: 615 m
With 100% Signal Boost: 738 m
When affected by 100% Relaying: 676.5 m
Maximum possible: 884.9 m

For more details, see Skills or Equipment
Signal Range
Values are Stock - click for Top


VI

AnnoA142_Pawlack_Tank.png

905000

The Pawlack Tank is an American tier 6 heavy tank.

In 1944, Leon Pawlack introduced a vehicle design that was built as a miniature with a cast hull. Its drive wheels were located at the front, and a 76 mm gun was mounted to a turret of original design. Its crew consisted of 4 members. The vehicle was supposed to be equipped with electric transmission and a diesel engine that could accelerate it up to 40 km/h. However, this data could not be verified as no prototypes were built.

The Pawlack Tank leads to the M-II-Y.

Modules / Available Equipment and Consumables

Modules

Ico_gun_alpha.png

Guns

Tier Gun Penetration
(mm)
Damage
(HP)
Rate of fire
(rounds/minute)
Dispersion
(m/100m)
Aiming time
(s)
Weight
(kg)
Price
(Credits)

VI 76 mm Gun M1A2 128/177/38 115/115/185 17.65 0.4 2.1 1590 62000
VII 90 mm Gun M41 P 160/205/45 240/240/320 6.67 0.42 2.4 1075 78000
VI 76 mm Gun T91E5 137/185/38 115/115/185 17.65 0.39 2.1 775 69200

Ico_engine_alpha.png

Engines

Tier Engine Engine Power
(hp)
Chance of Fire on Impact
(%)
Weight
(kg)
Price
(Credits)

V GM Diesel P V1 600 15 2500 15000
VI GM Diesel P V2 650 15 2500 28500

Ico_suspension_alpha.png

Suspensions

Tier Suspension Load Limit
(т)
Traverse Speed
(gr/sec)
Rmin Weight
(kg)
Price
(Credits)

V Pawlack Tank A 37 30 0 8000 9200
VI Pawlack Tank B 40 32 0 8000 14400

Ico_radio_alpha.png

Radios

Tier Radio Signal Range
(m)
Weight
(kg)
Price
(Credits)

IX SCR 506 615 110 33600
VI SCR 508 395 100 21600

Compatible Equipment

Low Noise Exhaust System Class 2 Medium Spall Liner Camouflage Net Class 2 Coated Optics Class 2 Experimental Optics Wear-Resistant Gun Laying Drive Improved Configuration Venting System Innovative Loading System Enhanced Gun Laying Drive Class 2 Improved Hardening Class 2 Additional Grousers Class 2 Modified Configuration Class 2 Improved Rotation Mechanism Class 2 Improved Aiming Class 2 Improved Ventilation Class 2 Binocular Telescope Class 2 Gun Rammer Class 2 Turbocharger Class 2 

Compatible Consumables

Automatic Fire Extinguisher Natural Cover Optical Calibration Case of Cola Aim Tuning Experienced Firefighters Manual Fire Extinguisher Pre-Battle Maintenance Vent Purge Large First Aid Kit Large Repair Kit Duty Comes First Shell Organizer Orderly Ammo Rack Focus on Target Increased Focus Small First Aid Kit Small Repair Kit Gearbox Intricacy Steady Hand Combat Course 


Player Opinion

Pros and Cons

Pros:


  • High DPM with 2nd 76mm gun
  • 240 alpha with top 90mm gun
  • Good top speed (45kph) and best in class acceleration (17.83 hp/t), good traverses
  • Small, rounded turret with odd angles, surprisingly bouncy if hull-down
  • Common 4-man crew layout, easily trains to other tanks in this line and several premiums


Cons:


  • Enormous hull with prominent nose weakspot
  • Enlarged turret ring with obvious driver port weakspot
  • Generally bad gun overall: poor gun handling, low DPM, terrible gun elevation/depression
  • Low HP, light weight: vulnerable to ramming
  • 90m M41P APCR is inferior to M3 APCR (205mm vs 243mm)


Performance

Though classed as a heavy, the Pawlack Tank is something more like an upgunned medium tank. Compared to other heavies of this tier, the defenses can be easily found lacking; the unusually tall turret ring is surprisingly flat at the front and easy for most same-tier guns to penetrate, and aside from the turret front, the rest of the armor is thin and unreliable. However, the Pawlack is surprisingly nimble for its size, and while it's no Easy 8 it will still move faster than many of the other heavy tanks lumbering around at this tier.

Keep the Pawlack out of sight and in flat ground as you approach enemies, though don't approach too closely; the very un-American 5 degrees of gun depression will cripple your hill-fighting ability, and your height will make it hard to hit shorter targets near to you. However, the ability to peek out and blast enemies for 240 damage can make up for a great many sins. If you can find sufficiently tall cover and can park behind it, leave only your turret peeking out for relatively safe defense options.

The Pawlack's low DPM and terrible hull armor makes sidescraping and corner fighting into non-options. Instead, circle around and hit enemies at close range while they're busy with your allies. In some instances, it might be more viable to keep the second 76mm gun and play like an overweight Easy 8.


Gallery

Historical Info

A heavy tank proposed by Leon S. Pawlack during World War 2. Not much is known about the project, and only a picture of Pawlack with a scale model of his tank survives.


Historical Gallery


USA
Light Tanks IT1 Cunningham IIM2 Light Tank IIT1E6 IIT2 Light Tank IIT7 Combat Car IIIM22 Locust IIIM3 Stuart IIIMTLS-1G14 IVM5 Stuart VM24 Chaffee VM7 VIM24E2 Super Chaffee VIT21 VIT37 VIIT71 CMCD VIIT71 DA VIIIT92 VIIIM41 Walker Bulldog IXT49 XXM551 Sheridan
Medium Tanks IIT2 Medium Tank IIIConvert. Medium Tank T3 IIIM2 Medium Tank IVT6 Medium IVM3 Lee VM4 Improved VM4A2E4 Sherman VM4A1 Sherman VRam II VIM4A3E8 Fury VIM4A3E8 Thunderbolt VII VIM4A3E8 Sherman VIM4A3E2 Sherman Jumbo VIIT26E3 Eagle 7 VIIT20 VIIT23E3 VIIIT25 Pilot Number 1 VIIITL-1 LPC VIIIT42 VIIIASTRON Rex 105 mm VIIIAMBT VIIIM46 Patton KR VIIIM26 Pershing VIIIT26E4 SuperPershing VIIIT69 VIIIT95E2 IXM46 Patton XM48A5 Patton XM60 XT95E6
Heavy Tanks VT14 VT1 Heavy Tank VIPawlack Tank VIM6 VIIKing Tiger (Captured) VIIM-II-Y VIIT29 VIIIChrysler K VIIIChrysler K GF VIIIT26E5 VIIIT26E5 Patriot VIIIM54 Renegade VIIIT77 VIIIM-III-Y VIIIM-IV-Y VIIIM6A2E1 VIIIT32 VIIIT34 VIIIT34 B IXAE Phase I IXConcept 1B IXM-VI-Y IXM103 IXT54E1 XM-V-Y XT110E5 XT57 Heavy Tank
Tank Destroyers IIT3 HMC IIIT56 GMC IVM8A1 IVT40 VM10 Wolverine VT67 VIT78 VIM18 Hellcat VIM36 Jackson VIIM56 Scorpion VIIT28 Concept VIISuper Hellcat VIIT25/2 VIIT25 AT VIIITS-5 VIIIT28 VIIIT28 Prototype IXT30 IXT95 XT110E3 XT110E4
Self-Propelled Artillery IIT1 HMC IIIT18 HMC IIIM7 Priest IVT82 HMC IVM37 VM41 HMC VIM44 VIIM12 VIIIM40/M43 IXM53/M55 XT92 HMC
Heavy Tanks
USA VT14 VT1 Heavy Tank VIPawlack Tank VIM6 VIIKing Tiger (Captured) VIIM-II-Y VIIT29 VIIIChrysler K VIIIChrysler K GF VIIIT26E5 VIIIT26E5 Patriot VIIIM54 Renegade VIIIT77 VIIIM-III-Y VIIIM-IV-Y VIIIM6A2E1 VIIIT32 VIIIT34 VIIIT34 B IXAE Phase I IXConcept 1B IXM-VI-Y IXM103 IXT54E1 XM-V-Y XT110E5 XT57 Heavy Tank
UK VChurchill I VExcelsior VIChurchill VII VITOG II* VIIBlack Prince VIIFV201 (A45) VIIICharlemagne VIIICaliban VIIIGonsalo VIIICaernarvon VIIICaernarvon Action X IXFV4201 Chieftain Proto IXConqueror XFV215b XSuper Conqueror XT95/FV4201 Chieftain
Germany IVPz.Kpfw. B2 740 (f) IVDurchbruchswagen 2 VITiger 131 VIVK 30.01 (P) VIVK 36.01 (H) VIIVK 45.03 VIITiger I VIITiger (P) VIIIVK 100.01 (P) VIIIVK 168.01 (P) VIIIVK 168.01 Mauerbrecher VIIIVK 75.01 (K) VIIIE 75 TS VIIILöwe VIIITiger II VIIIVK 45.02 (P) Ausf. A IXE 75 IXMäuschen IXVK 45.02 (P) Ausf. B XE 100 XPz.Kpfw. VII XMaus XVK 72.01 (K)
France IVB1 VBDR G1 B VIARL 44 VIIAMX M4 mle. 45 VIIIAMX 50 100 VIIIAMX M4 mle. 49 VIIIAMX M4 mle. 49 Liberté VIIIAMX 65 t VIIISomua SM VIIIFCM 50 t IXAMX 50 120 IXLorraine 50 t IXAMX M4 mle. 51 XAMX 50 B XAMX M4 mle. 54
USSR VChurchill III VKV-220-2 VKV-220-2 Beta Test VKV-1 VKV-1 shielded VIKV-1S VIKV-2 VIKV-2 (R) VIKV-85 VIObject 244 VIT-150 VIIIS VIIKV-3 VIIKV-122 VIIIS-2M VIIIS-2 shielded VIIIS-2 VIIIIS-3 VIIIIS-6 VIIIIS-6 B VIIIKV-5 VIIIKV-4 VIIIIS-5 (Object 730) VIIIIS-3A VIIIIS-3A Peregrine VIIIKirovets-1 VIIIKV-4 Kreslavskiy VIIIObject 252U Defender VIIIObject 252U VIIIIS-M VIIIObject 703 Version II VIIIIS-2-II IXT-10 IXObject 777 Version II IXObject 257 IXObject 705 IXIS-3-II IXST-I XIS-4 XIS-7 XObject 260 XObject 705A XObject 277 XObject 279 early XST-II XObject 780
China VIIIS-2 VIIIWZ-111 VIIIWZ-111 Alpine Tiger VIII110 VIII112 IXWZ-111 model 1-4 IXWZ-114 X113 X113 Beijing Opera XWZ-111 model 5A XWZ-111 Qilin
Japan IIIType 91 Heavy IVType 95 Heavy VO-I Experimental VIHeavy Tank No. VI VIO-I VIIO-Ni VIIIO-Ho IXType 4 Heavy XType 5 Heavy
Czechoslovakia VIIŠkoda T 45 VIIVz. 44-1 VIIIŠkoda T 56 VIIITNH 105/1000 IXTNH T Vz. 51 XVz. 55
Sweden VIIIEmil I VIIIEMIL 1951 VIIIBofors Tornvagn IXEmil II IXStrv K XKranvagn
Italy VIICarro d'assalto P.88 VIIIProgetto CC55 mod. 54 VIIIBisonte C45 IXProgetto C50 mod. 66 XRinoceronte
Poland VII45TP Habicha VIII50TP prototyp VIII53TP Markowskiego IX50TP Tyszkiewicza X60TP Lewandowskiego
ja:Tank:A142 Pawlack Tank