Lexington
| Revision as of 04:46, 28 January 2020 | Revision as of 08:05, 24 September 2020 | |||
5 intermediate revisions by 4 users not shown | ||||
| Line 7: | Line 7: | |||
| |Performance=<!-- write text about performance in battles below --> | |Performance=<!-- write text about performance in battles below --> | |||
| ? | Overall, ''Lexington'' is a strong Tier VIII aircraft carrier. She is fast — 33.6 knots — but she turns like a brick, and her huge size advertises her presence for miles around. Although she has a strong wing of aircraft, careful usage of her bomber aircraft is vital as the anti-aircraft power of most Tier VIII ships and above that she will encounter begins to be very competitive. The higher health pool of its planes will help immensely in survival and in attack potential. The CV itself has a large detection radius of 14.5k, so | + | Overall, ''Lexington'' is a strong Tier VIII aircraft carrier. She is fast — 33.6 knots — but she turns like a brick, and her huge size advertises her presence for miles around. Although she has a strong wing of aircraft, careful usage of her bomber aircraft is vital as the anti-aircraft power of most Tier VIII ships and above that she will encounter begins to be very competitive. The higher health pool of its planes will help immensely in survival and in attack potential. The CV itself has a large detection radius of 14.5k, so careful positioning behind islands and such is vital in survival. | |
| *Attack aircraft | *Attack aircraft | |||
| ? | You have two choices in upgrading attack planes: the HVAR 127mm rockets or the Tiny Tims. The | + | You have two choices in upgrading your attack planes: the HVAR 127mm rockets or the Tiny Tims. The HVARs have an HE pen of 32mm but launches the payloads more densely, making it easier to hit DDs even when mistargeted. They are somewhat less effective in attacking targets with a thick deck armour due to lack of penetration(ex. Izumo, GK, etc; useful for Republique, Alsace, most cruisers) and don't deal as much damage(max 2000) Then the have the Tiny Tims. The Tiny Tim are heavy rockets that hit hard(68mm of pen) but only 6 rockets are launched. You'll have to aim carefully in order to be successful in hitting dds with these rockets. It is best advised to use these against larger targets due to the innacuracy of the TTs. But if you are able to hit dds with these, it will reward you greatly. | |
| *Torpedo bombers | *Torpedo bombers | |||
| ? | American torp planes aren't as good as IJN ones as they lack speed(35kts) and range(3.9k). However, they | + | American torp planes aren't as good as IJN ones as they lack speed(35kts) and range(3.9k). However, they are able to deal more damage when all of them hit. They have a good amount of hp, which allows you to drop your payload at a closer distance. When you upgrade to SB2C Helldivers, they drop 3 torps instead of 2: giving you more chances in succeeding the drop. Closing the distance when attacking is recommended to maximize the damage and flood chance. | |
| *Dive bombers | *Dive bombers | |||
| ? | They are effective against all | + | They are effective against all BBs and cruisers as you can use HE bombs to cause multiple fires. They're not recommended to be used against DDs as they are not very accurate (unless the target is on low hp). Of course these being bombers, beware of going into a cluster of enemy ships if you fancy dropping your payload nearby them. Upgrading to the SB2C Helldiver will increase your attacking flight from 2 to 3 and bombs you to drop 1 extra bomb per payload(amounting to 6 bombs dropped at a time). | |
| ? | Interestingly — perhaps in a nod to her battlecruiser origins — ''Lexington'' has a greater amount of armor than would be expected of a carrier, even retaining almost a proper armor belt. Captains should be advised, though, that while her armor may bounce the odd destroyer shell, it also means cruiser and battleship armor-piercing rounds have a greater chance of causing full penetration or | + | Interestingly — perhaps in a nod to her battlecruiser origins — ''Lexington'' has a greater amount of armor than would be expected of a carrier, even retaining almost a proper armor belt. Captains should be advised, though, that while her armor may bounce the odd destroyer shell, it also means cruiser and battleship armor-piercing rounds have a greater chance of causing full penetration or citadel damage that would otherwise overpenetrate on softer targets. | |
| |Pros=<!-- write list of positive points below. use * as in ordinary wiki-list. --> | |Pros=<!-- write list of positive points below. use * as in ordinary wiki-list. --> | |||
| ? | * | + | * Planes have a decent healthpool | |
| ? | * | + | * Good plane restoration time | |
| ? | * | + | * HVAR rockets have 33mm of penetration and are dropped in large amounts (24 per drop) | |
| ? | * | + | * Can equip Tiny Tim rockets with high alpha damage, penetration and fire chance | |
| ? | * | + | * High alpha strike and fire chance with AN-M65 bombs, with six (6) bombs per drop | |
| + | * Very powerful AA suite | |||
| + | * Excellent ship speed of 33 knots | |||
| |Cons=<!-- write list of negative points below. use * as in ordinary wiki-list. --> | |Cons=<!-- write list of negative points below. use * as in ordinary wiki-list. --> | |||
| ? | * | + | * Massive ship with poor concealment | |
| ? | * | + | * Very large turn radius and slow rudder shift | |
| ? | * | + | * Torpedo bombers and dive bombers have poor speed | |
| ? | * | + | * ''Lexington'''s hull is poorly armored, takes large amounts of damage from all sources | |
| ? | * Tiny Tims are | + | * Tiny Tims are inaccurate and only six of them are launched per attack run | |
| ? | + | |||
| |Research=<!-- write text about priority sequence of research below --> | |Research=<!-- write text about priority sequence of research below --> | |||
| ? | # Upgrade to SB2C Helldiver( | + | # Upgrade to SB2C Helldiver (dive bombers, followed by torpedo bombers) | |
| ? | # Upgrade to F4U-1D Corsair(Attack aircraft) : choose between HVAR 127mm | + | # Upgrade to F4U-1D Corsair( Attack aircraft): choose between HVAR 127mm or Tiny Tim | |
| ? | # Upgrade to Hull(B) for AA, CV health and rudder shift | + | # Upgrade to Hull(B) for AA, CV health and rudder shift | |
| ? | # Proceed to the Midway | + | # Proceed to the ''Midway'' | |
| |OptimalConfiguration=<!-- write some general text about selection of optimal configuration below (optional)--> | |OptimalConfiguration=<!-- write some general text about selection of optimal configuration below (optional)--> | |||
| Line 47: | Line 48: | |||
| *'''Slot 1''': {{Air Groups Modification 1}} | *'''Slot 1''': {{Air Groups Modification 1}} | |||
| *'''Slot 2''': {{Aircraft Engines Modification 1}} | *'''Slot 2''': {{Aircraft Engines Modification 1}} | |||
| ? | *'''Slot 3''': {{ | + | *'''Slot 3''': {{Aerial Torpedoes Modification 1}} | |
| ? | *'''Slot 4''': {{ | + | *'''Slot 4''': {{Bombers Modification 2}} | |
| *'''Slot 5''': {{Flight Control Modification 1}} | *'''Slot 5''': {{Flight Control Modification 1}} | |||
| Line 66: | Line 67: | |||
| | rating18 = 2 <!-- Last Gasp --> | | rating18 = 2 <!-- Last Gasp --> | |||
| ? | | rating21 = | + | | rating21 = 0 <!-- High Alert --> | |
| | rating22 = <!-- Jack of All Trades --> | | rating22 = <!-- Jack of All Trades --> | |||
| | rating23 = 0 <!-- Expert Marksman --> | | rating23 = 0 <!-- Expert Marksman --> | |||
| Line 72: | Line 73: | |||
| | rating25 = 0 <!-- Smoke Screen Expert --> | | rating25 = 0 <!-- Smoke Screen Expert --> | |||
| | rating26 = 3 <!-- Improved Engines --> | | rating26 = 3 <!-- Improved Engines --> | |||
| ? | | rating27 = | + | | rating27 = 1 <!-- Adrenaline Rush --> | |
| | rating28 = 0 <!-- Last Stand --> | | rating28 = 0 <!-- Last Stand --> | |||
| Line 79: | Line 80: | |||
| | rating33 = 0 <!-- Torpedo Armament Expertise--> | | rating33 = 0 <!-- Torpedo Armament Expertise--> | |||
| | rating34 = 3 <!-- Aircraft Armor --> | | rating34 = 3 <!-- Aircraft Armor --> | |||
| ? | | rating35 = | + | | rating35 = <!-- Basic Firing Training --> | |
| | rating36 = <!-- Superintendent --> | | rating36 = <!-- Superintendent --> | |||
| | rating37 = 1 <!-- Demolition Expert --> | | rating37 = 1 <!-- Demolition Expert --> | |||
| Line 87: | Line 88: | |||
| | rating42 = <!-- Fire Prevention --> | | rating42 = <!-- Fire Prevention --> | |||
| | rating43 = 0 <!-- Inertia Fuse for HE Shells --> | | rating43 = 0 <!-- Inertia Fuse for HE Shells --> | |||
| ? | | rating44 = | + | | rating44 = 2 <!-- Sight Stabilization --> | |
| | rating45 = <!-- Advanced Firing Training --> | | rating45 = <!-- Advanced Firing Training --> | |||
| | rating46 = 0 <!-- Massive AA Fire --> | | rating46 = 0 <!-- Massive AA Fire --> | |||
| | rating47 = 0 <!-- Radio Position Finding --> | | rating47 = 0 <!-- Radio Position Finding --> | |||
| ? | | rating48 = | + | | rating48 = 3 <!-- Concealment Expert --> | |
| }} | }} | |||
| Line 123: | Line 124: | |||
| |Signals=<!-- write text about best set of signals below --> | |Signals=<!-- write text about best set of signals below --> | |||
| ? | In the past, all carriers could only mount at most four signals at a time. This is not longer the case, ''{{#var:ship_name}}'' can mount 8 total Signals. As a carrier, ''{{#var:ship_name}}'' has no risk of detonating. As such, the signal ({{Juliet Charlie|Size=18px}}) should be disregarded for this ship. | + | In the past, all carriers could only mount at most four signals at a time. This is not longer the case, ''{{#var:ship_name}}'' can mount 8 total Signals. | |
| + | ||||
| + | As a carrier, ''{{#var:ship_name}}'' has no risk of detonating. As such, the signal ({{Juliet Charlie|Size=18px}}) should be disregarded for this ship. | |||
| + | ||||
| Players should mount Equal Speed Charlie London ({{Equal Speed Charlie London|Size=18px}}) for 50% XP gain, Zulu Hotel ({{Zulu Hotel|Size=18px}}) for 50% Commander XP gain, November Echo Setteseven ({{November Echo Setteseven|Size=18px}}) increased AA damage, Mike Yankee Soxisix ({{Mike Yankee Soxisix|Size=18px}}) secondary battery range & firing buff, Juliet Whiskey Unaone ({{Juliet Whiskey Unaone|Size=18px}}) flooding chance increase (Very useful), India-X-Ray ({{India X-Ray|Size=18px}}) fire chance increase, Victor Lima ({{Victor Lima|Size=18px}}) large fire & flooding chance increase, and India Yankee ({{India Yankee|Size=18px}}) for faster fire dissipation. | Players should mount Equal Speed Charlie London ({{Equal Speed Charlie London|Size=18px}}) for 50% XP gain, Zulu Hotel ({{Zulu Hotel|Size=18px}}) for 50% Commander XP gain, November Echo Setteseven ({{November Echo Setteseven|Size=18px}}) increased AA damage, Mike Yankee Soxisix ({{Mike Yankee Soxisix|Size=18px}}) secondary battery range & firing buff, Juliet Whiskey Unaone ({{Juliet Whiskey Unaone|Size=18px}}) flooding chance increase (Very useful), India-X-Ray ({{India X-Ray|Size=18px}}) fire chance increase, Victor Lima ({{Victor Lima|Size=18px}}) large fire & flooding chance increase, and India Yankee ({{India Yankee|Size=18px}}) for faster fire dissipation. | |||
| ? | These | + | ||
| + | These signals are to buff the ship performance while gaining a fair bonus of XP. | |||
| + | ||||
| + | Players can also choose to equip the Dragon Signal ({{Dragon Flag|Size=18px}}) instead of Zulu Hotel ({{Zulu Hotel|Size=18px}}) signal the for faster commander (re)training. | |||
| + | ||||
| + | Having a high leveled Captain while playing Carrier can give you an edge over other Captains. | |||
| {{Signal Flags | {{Signal Flags | |||
| Line 193: | Line 202: | |||
| |Ref= <!-- write below --> | |Ref= <!-- write below --> | |||
| + | # [https://en.wikipedia.org/wiki/USS_Lexington_(CV-2) USS ''Lexington'' (CV-2) - Wikipedia] | |||
| + | # [https://en.wikipedia.org/wiki/Lexington-class_aircraft_carrier ''Lexington''-class aircraft carrier - Wikipedia] | |||
| }}<!-- DO NOT DELETE THIS LINE. DO NOT INSERT ANYTHING BELOW THIS LINE --> | }}<!-- DO NOT DELETE THIS LINE. DO NOT INSERT ANYTHING BELOW THIS LINE --> | |||
Revision as of 08:05, 24 September 2020

| Research price161000 exp |
| Purchase price11,500,000 |
| Hit Points54,300 |
| 127 mm/38 Mk.12 on a Mk.24 mount8 х 1 pcs. |
| Firing Range4.5 km. |
| Rate of Fire10 shots/min. |
| Reload Time6 sec. |
| HE Shell127 mm HE Mk32 |
| Maximum HE Shell Damage1,800 |
| Initial HE Shell Velocity792 m./s. |
| Chance of Fire on Target Caused by HE Shell5 % |
| 127 mm/38 Mk.12 on a Mk.32 mount4 х 2 pcs. |
| Firing Range4.5 km. |
| Rate of Fire10 shots/min. |
| Reload Time6 sec. |
| HE Shell127 mm HE Mk32 |
| Maximum HE Shell Damage1,800 |
| Initial HE Shell Velocity792 m./s. |
| Chance of Fire on Target Caused by HE Shell5 % |
| 127 mm/38 Mk.12 on a Mk.24 mount8 х 1 pcs. |
| . . . Average Damage per Second64 |
| . . . Firing Range5.01 km. |
| 127 mm/38 Mk.12 on a Mk.32 mount4 х 2 pcs. |
| . . . Average Damage per Second60.4 |
| . . . Firing Range5.01 km. |
| 20 mm Oerlikon on a Mk.4 mount52 х 1 pcs. |
| . . . Average Damage per Second187.2 |
| . . . Firing Range2.01 km. |
| 40 mm/56 Bofors on a Mk.2 mount9 х 4 pcs. |
| . . . Average Damage per Second143.1 |
| . . . Firing Range3.51 km. |
| Maximum Speed33 knot |
| Turning Circle Radius1 180 m. |
| Rudder Shift Time21.9 sec. |
| Surface Detectability Range14.51 km. |
| Air Detectability Range10.02 km. |

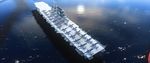
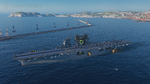
Lexington — American Tier VIII aircraft сarrier.
When commissioned, Lexington was one of the largest aircraft carriers in existence. She was converted from an unfinished battlecruiser. The ship had good armor and advanced torpedo protection. Owing to her dimensions, the aircraft carrier was equipped with a very spacious hangar and was armed with numerous AA and dual-purpose artillery. The ship's powerful propulsion created very high speeds.
Modules
 |
Hit Points (HP) | Armor (mm) | Armor (mm) | Main Turrets (pcs.) | Secondary Gun Turrets (pcs.) | AA Mounts (pcs.) | Torpedo Tubes (pcs.) | Hangar Capacity (pcs.) |
Research price (exp) |
Purchase price ( | |
|---|---|---|---|---|---|---|---|---|---|---|---|
| Lexington (A) | 54,300 | 6 | 178 | 8/4 | 52/9/8/4 | 0 | 1,200,000 | ||||
| Lexington (B) | 57,300 | 6 | 178 | 8/4 | 16/2/23/8/4 | 27,000 | 3,000,000 |
 |
Speed (knot) | IDS_SHIP_PARAM_SQUADRON_MED_DAMAGE (HP/min) | IDS_SHIP_PARAM_SQUADRON_AMMO_AMOUNT | Hit Points (HP) |
Research price (exp) |
Purchase price ( | |
|---|---|---|---|---|---|---|---|
| F6F Hellcat | 160 | 1,400 | 0 | 600,000 | |||
| F4U-1D Corsair Tiny Tim | 169 | 1,460 | 18,000 | 1,500,000 | |||
| F4U-1D Corsair HVAR 127 mm | 169 | 1,460 | 18,000 | 1,500,000 |
 |
Maximum Torpedo Damage (HP) | Speed (knot) | Hit Points (HP) |
Research price (exp) |
Purchase price ( | |
|---|---|---|---|---|---|---|
| TBF Avenger | 6,467 | 120 | 1,800 | 0 | 600,000 | |
| SB2C Helldiver | 6,467 | 125 | 1,880 | 18,000 | 1,500,000 |
 |
Maximum Bomb Damage (HP) | Speed (knot) | Hit Points (HP) |
Research price (exp) |
Purchase price ( | |
|---|---|---|---|---|---|---|
| SBD Dauntless | 122 | 1,890 | 0 | 600,000 | ||
| SB2C Helldiver | 125 | 1,980 | 18,000 | 1,500,000 |
 |
Maximum Speed (knot) |
Research price (exp) |
Purchase price ( | |
|---|---|---|---|---|
| Propulsion: 180,000 hp | 33 | 0 | 500,000 |
Compatible Upgrades
| Slot 1 |
|||||
|---|---|---|---|---|---|
| Slot 2 |
|||||
| Slot 3 |
|||||
| Slot 4 |
|||||
| Slot 5 |
Player Opinion
Performance
Overall, Lexington is a strong Tier VIII aircraft carrier. She is fast — 33.6 knots — but she turns like a brick, and her huge size advertises her presence for miles around. Although she has a strong wing of aircraft, careful usage of her bomber aircraft is vital as the anti-aircraft power of most Tier VIII ships and above that she will encounter begins to be very competitive. The higher health pool of its planes will help immensely in survival and in attack potential. The CV itself has a large detection radius of 14.5k, so careful positioning behind islands and such is vital in survival.
- Attack aircraft
You have two choices in upgrading your attack planes: the HVAR 127mm rockets or the Tiny Tims. The HVARs have an HE pen of 32mm but launches the payloads more densely, making it easier to hit DDs even when mistargeted. They are somewhat less effective in attacking targets with a thick deck armour due to lack of penetration(ex. Izumo, GK, etc; useful for Republique, Alsace, most cruisers) and don't deal as much damage(max 2000) Then the have the Tiny Tims. The Tiny Tim are heavy rockets that hit hard(68mm of pen) but only 6 rockets are launched. You'll have to aim carefully in order to be successful in hitting dds with these rockets. It is best advised to use these against larger targets due to the innacuracy of the TTs. But if you are able to hit dds with these, it will reward you greatly.
- Torpedo bombers
American torp planes aren't as good as IJN ones as they lack speed(35kts) and range(3.9k). However, they are able to deal more damage when all of them hit. They have a good amount of hp, which allows you to drop your payload at a closer distance. When you upgrade to SB2C Helldivers, they drop 3 torps instead of 2: giving you more chances in succeeding the drop. Closing the distance when attacking is recommended to maximize the damage and flood chance.
- Dive bombers
They are effective against all BBs and cruisers as you can use HE bombs to cause multiple fires. They're not recommended to be used against DDs as they are not very accurate (unless the target is on low hp). Of course these being bombers, beware of going into a cluster of enemy ships if you fancy dropping your payload nearby them. Upgrading to the SB2C Helldiver will increase your attacking flight from 2 to 3 and bombs you to drop 1 extra bomb per payload(amounting to 6 bombs dropped at a time).
Interestingly — perhaps in a nod to her battlecruiser origins — Lexington has a greater amount of armor than would be expected of a carrier, even retaining almost a proper armor belt. Captains should be advised, though, that while her armor may bounce the odd destroyer shell, it also means cruiser and battleship armor-piercing rounds have a greater chance of causing full penetration or citadel damage that would otherwise overpenetrate on softer targets.Pros:
- Planes have a decent healthpool
- Good plane restoration time
- HVAR rockets have 33mm of penetration and are dropped in large amounts (24 per drop)
- Can equip Tiny Tim rockets with high alpha damage, penetration and fire chance
- High alpha strike and fire chance with AN-M65 bombs, with six (6) bombs per drop
- Very powerful AA suite
- Excellent ship speed of 33 knots
Cons:
- Massive ship with poor concealment
- Very large turn radius and slow rudder shift
- Torpedo bombers and dive bombers have poor speed
- Lexington's hull is poorly armored, takes large amounts of damage from all sources
- Tiny Tims are inaccurate and only six of them are launched per attack run
Research
- Upgrade to SB2C Helldiver (dive bombers, followed by torpedo bombers)
- Upgrade to F4U-1D Corsair( Attack aircraft): choose between HVAR 127mm or Tiny Tim
- Upgrade to Hull(B) for AA, CV health and rudder shift
- Proceed to the Midway
Optimal Configuration
Upgrades
The recommended upgrades for Lexington are as follows:
- Slot 1: Air Groups Modification 1

- Slot 2: Aircraft Engines Modification 1

- Slot 3: Aerial Torpedoes Modification 1

- Slot 4: Bombers Modification 1

- Slot 5: Flight Control Modification 1

Upgrade Slot 5 offers players Concealment System Modification 1 ![]() , which stacks with Concealment Expert and Camouflage to bring Lexington`s surface detection down to a decent range of 11.8km. However, you would want Flight Control Modification 1
, which stacks with Concealment Expert and Camouflage to bring Lexington`s surface detection down to a decent range of 11.8km. However, you would want Flight Control Modification 1 ![]() for more plane output.
for more plane output.
Commander Skills
| Recommended Commander Skills | ||||||||
|---|---|---|---|---|---|---|---|---|
| Cost (points) |
Endurance | Attack | Support | Versatility | ||||
| 1 |
|
Χ |
Χ |
★★★ |
|
★★ |
Χ |
★★ |
| 2 |
Χ |
|
Χ |
★★★ |
Χ |
★★★ |
★ |
Χ |
| 3 |
|
★★★ |
Χ |
★★★ |
|
|
★ |
Χ |
| 4 |
Χ |
|
Χ |
★★ |
|
Χ |
Χ |
★★★ |
| Key: ★★★ - Extremely Useful ★★ - Frequently Useful ★ - Occasionally Useful No stars - Meh Χ - Not recommended | ||||||||
Consumables
Lexington has access to the following consumables:
- Slot 1: Damage Control Party
 unlimited
- Slot 2: CAP Fighter
 4
4
All aircraft carrier consumables are automatically activated.
Attack Aircraft:
- Slot 1: Engine Cooling
 2
2
- Slot 2: Patrol Fighter
 3
3
Torpedo Bombers:
- Slot 1: Engine Cooling 2
- Slot 2: Patrol Fighter 3
- Slot 3: In-flight Repair
 3
3
Bombers:
- Slot 1: Engine Cooling 2
- Slot 2: Patrol Fighter 3
Camouflage
Type 1, 2, or 5 camouflage can be equipped for credits; Types 1 or 5 are recommended at a minimum to reduce detectibility range.
Players who wish to spend doubloons can equip Lexington with Type 18 camouflage that lowers her detection radius, reduces the accuracy of incoming shells, reduces her repair costs, and increases the amount of experience she earns.
Lexington also has an alternate premium camouflage called "Nobilium", in which she appears as she does during the Halloween scenario "Sunray in the Darkness".
Lexington has another alternate premium camouflage called "Ice and Fire - Lexington", which was sold as a collaboration between World of Warships and the famous hockey player Alexander Ovechkin.
Signals
In the past, all carriers could only mount at most four signals at a time. This is not longer the case, Lexington can mount 8 total Signals.
As a carrier, Lexington has no risk of detonating. As such, the signal (![]() ) should be disregarded for this ship.
) should be disregarded for this ship.
Players should mount Equal Speed Charlie London (🚫) for 50% XP gain, Zulu Hotel (🚫) for 50% Commander XP gain, November Echo Setteseven (![]() ) increased AA damage, Mike Yankee Soxisix (
) increased AA damage, Mike Yankee Soxisix (![]() ) secondary battery range & firing buff, Juliet Whiskey Unaone (
) secondary battery range & firing buff, Juliet Whiskey Unaone (![]() ) flooding chance increase (Very useful), India-X-Ray (
) flooding chance increase (Very useful), India-X-Ray (![]() ) fire chance increase, Victor Lima (
) fire chance increase, Victor Lima (![]() ) large fire & flooding chance increase, and India Yankee (
) large fire & flooding chance increase, and India Yankee (![]() ) for faster fire dissipation.
) for faster fire dissipation.
These signals are to buff the ship performance while gaining a fair bonus of XP.
Players can also choose to equip the Dragon Signal (🚫) instead of Zulu Hotel (🚫) signal the for faster commander (re)training.
Having a high leveled Captain while playing Carrier can give you an edge over other Captains.
Recommended Signal Flags 
| |||||
|---|---|---|---|---|---|
| Combat | |||||

|

|

|

|

|

|
 ★★★ |

|
 ★★★ |
 ★ |

|
 ★★ |

|

| ||||
Note: Use of the Juliet Charlie signal makes detonation impossible.
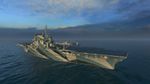
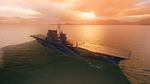
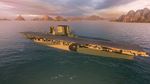
Gallery
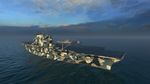
Lexington with Type 1 camouflage.
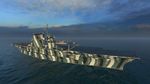
Lexington with Type 2 camouflage.
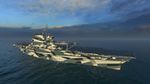
Lexington with Type 5 camouflage.

Lexington with Type 6 camouflage.
Lexington with Type 18 permanent camouflage.

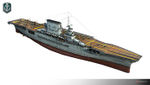
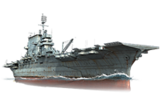
Model of Lexington as originally built. This hull module was omitted in favor of the 1942 configuration, which replaced the 203 mm gun turrets with 127 mm dual-purpose gun turrets.
Fire and Ice camo for Lexington from the Alexander Ovechkin collaboration in 2018
USS Lexington in the Nobilium camouflage as appeared in the 2018 Halloween scenario "Sunray in the Darkness".


.jpg)
.jpg)
.jpg)


Historical Info
Historical Gallery

_firing_203mm_guns_1928.jpg)


.jpg)
References
| Japan | IV Hōshō • VI Ryūjō • VIII Shōkaku • VIII Kaga |
| U.K. | IV Hermes • VI Furious • VI Ark Royal |
| France | VI Béarn |
| U.S.S.R. | IV Komsomolets • VI Serov • VIII Pobeda • VIII Chkalov |
| U.S.A. | IV Langley • VI Independence • VI Ranger • VIII Yorktown • VIII Lexington • VIII Enterprise |
| Germany | IV Rhein • VI Weser • VI Erich Loewenhardt |
| Pan-Asia | VIII Sanzang |
| Spain | |
| Europe | |
| Netherlands | |
| Italy | VIII Aquila |
| Commonwealth | |
| Pan-America |