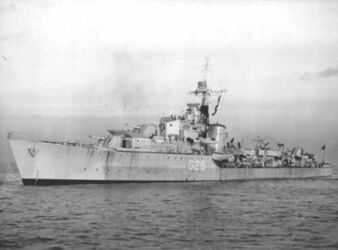
Stord

| Research price35000 exp |
| Purchase price3,000,000 |
| Hit Points11,600 |
| 120 mm/45 QF Mk.IX on a CPXXII mount4 х 1 pcs. |
| Rate of Fire15 shots/min. |
| Reload Time4 sec. |
| Rotation Speed10 deg./sec. |
| 180 Degree Turn Time18 sec. |
| Firing Range10 km. |
| Maximum Dispersion97 m. |
| HE Shell120 mm HE |
| Maximum HE Shell Damage1,700 |
| Chance of Fire on Target Caused by HE Shell8 % |
| Initial HE Shell Velocity808 m./s. |
| HE Shell Weight22.68 kg. |
| 533 mm QR Mk IV2 х 4 pcs. |
| Rate of Fire0.8 shots/min. |
| Reload Time75 sec. |
| Rotation Speed25 deg./sec. |
| 180 Degree Turn Time7.2 sec. |
| TorpedoTorped M1924 mod 2 |
| Maximum Damage7,533 |
| Torpedo Speed72 knot |
| Torpedo Range7.5 km. |
| 20 mm Oerlikon Mk.I on a Mk.IIA mount4 х 1 pcs. |
| . . . Average Damage per Second14.4 |
| . . . Firing Range2.01 km. |
| 40 mm/56 OQF Mk.XI on a Mk.V mount1 х 2 pcs. |
| . . . Average Damage per Second12.3 |
| . . . Firing Range3.51 km. |
| Maximum Speed36.8 knot |
| Turning Circle Radius590 m. |
| Rudder Shift Time4.2 sec. |
| Surface Detectability Range7 km. |
| Air Detectability Range3.16 km. |

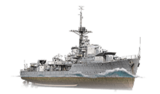
Stord — European Tier VI destroyer.
With the outbreak of World War II, Great Britain started the mass construction of destroyers in batches of eight. As a rule, all of them had four single-gun mounts with 102–120 mm guns and one or two quadruple-tube torpedo launchers. Two of them were transferred to the Norwegian Navy and received the names "Stord" and "Svenner." Stord entered service in September 1943. In 1943 and 1944, she participated in operations in the North Atlantic and escorted polar convoys. During the Battle of the North Cape, Stord was involved in sinking German battleship Scharnhorst. In 1944, the destroyer participated in covering the landings in Normandy, then returned to escorting convoys heading for the U.S.S.R. After the war, Stord became the flagship of the Norwegian Navy.
Stord was first released during patch 12.4.
Modules
 |
Rate of Fire (shots/min) | 180° Turn Time (sec) | Maximum Dispersion (m) | Maximum HE Shell Damage (HP) | Chance of Fire on Target Caused by HE Shell (%) | Maximum AP Shell Damage (HP) |
Research price (exp) |
Purchase price ( | |
|---|---|---|---|---|---|---|---|---|---|
| 120 mm/45 QF Mk.IX on a CPXXII mount | 15 | 18 | 97 | 1,700 | 8 | 0 | 300,000 |
 |
Hit Points (HP) | Armor (mm) | Armor (mm) | Main Turrets (pcs.) | Secondary Gun Turrets (pcs.) | AA Mounts (pcs.) | Torpedo Tubes (pcs.) | Hangar Capacity (pcs.) |
Research price (exp) |
Purchase price ( | |
|---|---|---|---|---|---|---|---|---|---|---|---|
| Stord (A) | 11,600 | 6 | 16 | 4 | 4/1 | 2 | 0 | 450,000 | |||
| Stord (B) | 11,900 | 6 | 16 | 4 | 4/1 | 2 | 12,000 | 810,000 |
 |
Rate of Fire (shots/min) | Torpedo Tubes Reload Time (sec) | 180° Turn Time (sec) | Maximum Damage (HP) | Torpedo Speed (knot) | Torpedo Range (km) |
Research price (exp) |
Purchase price ( | |
|---|---|---|---|---|---|---|---|---|---|
| 533 mm Mk VII | 0.8 | 75 | 7.2 | 7,533 | 72 | 7.5 | 0 | 300,000 |
 |
IDS_SHIP_PARAM_SUO_INCREASE_DIST (%) | Maximum Firing Range (km) |
Research price (exp) |
Purchase price ( | |
|---|---|---|---|---|---|
| SUO Mk 6 Mod. 1 | 0 | 0 | 300,000 | ||
| SUO Mk 6 Mod. 2 | 0 | 8,000 | 540,000 |
 |
Maximum Speed (knot) |
Research price (exp) |
Purchase price ( | |
|---|---|---|---|---|
| Propulsion: 40,000 hp | 36.8 | 0 | 300,000 |
Compatible Upgrades
| Slot 1 |
|||||
|---|---|---|---|---|---|
| Slot 2 |
|||||
| Slot 3 |
|||||
| Slot 4 |
Player Opinion
Performance
Refer to the in-game Port screens for more useful data.
The Ship
Tier VI Stord is a destroyer with a high rate of fire and a maneuverable hull, but she also has a small health pool, weak torpedoes, and she cannot fire AP ammunition.
With a top speed of 36.8 knots, Stord is able to keep up with most of her peers, but she lags behind the fastest destroyers at her tier. Her rudder shift time of 3 seconds and a tight turning circle of 590 meters combine to make her one of the most nimble ships at Tier VI. Stord has a base surface concealment of 7 km, that can be reduced to 6.3 km with the Concealment Expert skill. This is not the worst at her tier, but many other destroyers will still outspot her.
Unfortunately, her health pool is one of the lowest of all Tier VI destroyers. Her upgraded hull has 11,900 hit points, the same as Muavenet’s upgraded hull. Survivability Expert is necessary to bring her health to a useful level.
Stord retains her predecessor’s consumables — a Smoke Generator ![]() and Engine Boost
and Engine Boost ![]() . The smokescreen is standard for a Tier VI destroyer, with a 20 second action time, 81 second dispersion time and three charges as standard, with a 160 second cooldown between uses. The Engine Boost provides an 8% boost to her top speed for 90 seconds, taking her up to 39.7 knots. This has four charges as standard, with a 90 second cooldown between uses.
. The smokescreen is standard for a Tier VI destroyer, with a 20 second action time, 81 second dispersion time and three charges as standard, with a 160 second cooldown between uses. The Engine Boost provides an 8% boost to her top speed for 90 seconds, taking her up to 39.7 knots. This has four charges as standard, with a 90 second cooldown between uses.
Armament
Stord shares the same main gun battery as many mid-tier British destroyers, although she gains an improved reload but loses AP rounds. She boasts one of the highest HE DPM totals of the Tier VI destroyers, although her salvo weight is one of the lowest due to her small gun caliber. Her lack of AP rounds may not seem like a large drawback, but it does limit STORD’S tactical options when fighting lightly armored cruisers.
Her gunnery emphasizes short range duels, as her shells have a low initial velocity and quickly lose speed. This causes them to “float” as the range increases, which can make long range firing difficult against nimble targets. Although they are small caliber, her rounds have enough penetration to defeat the bow and stern plating of most cruisers. When engaging battleships, players will need to aim for the superstructure to cause direct damage.
Stord has an improved torpedo armament compared to Muavenet, with two quad launchers. An increased range of 7.5 km means they can be launched from stealth. However, despite these improvements she retains a relatively weak torpedo armament. They have the lowest flood chance and damage per torpedo among Tier VI destroyers; even with a faster than average reload of 75 seconds, STORD has one of the lowest torpedo DPM totals in her tier.
Anti-Aircraft
Like most Tier VI destroyers, Stord has fairly weak AA defenses. She may shoot down one or two aircraft when facing same tier carriers, but her anti-air defenses cannot keep her safe from a determined attack.
Anti-Submarine
Stord drops a pattern of eight depth charges from her stern, similar to that of British destroyers. However, her depth charges deal less than half the damage of American or British ones, just 2400 damage for a direct hit. Multiple depth charges will be needed to sink a submarine, even with direct hits. To add to this challenge, Stord does not have a Hydroacoustic Search, so tracking submarines can be difficult.
Battle Performance
Stord’s gameplay centers around short range duels with enemy destroyers. Although she has good DPM from her main guns, her small health pool means players can find themselves outmuscled by dedicated gunboats. French and Russian destroyers in particular are capable of matching her damage output and have larger health pools, making them difficult targets to take down. If friendly support is not available, players are often best served by breaking contact and waiting for support before attempting to engage.
If players need to fight larger ships, then Stord’s best option is usually to use her rapid reload to try and set fires on her targets from the relative safety of a smoke screen. Her torpedoes can provide a deterrent despite their low damage, but they will not pose a serious threat to any healthy ships.Pros:
- High HE DPM
- Good fire-starting potential
- High speed
- Good agility
- Smoke Screen Consumable
Cons:
- Small health pool
- No AP rounds
- Weak torpedoes with short range
- No Hydroacoustic search
Research
Researchable upgrades for Stord:
- Hull: Upgrade to Hull (B) for improved survivability, maneuverability and AA. Research of this module unlocks progression to Grom.
- Gun Fire Control System: Upgrade to SUO Mk 6 Mod. 2 for an extra 10% range on the main battery.
Optimal Configuration
Upgrades
The recommended upgrades are:
- Slot 1: Main Armaments Modification 1
- Slot 2: Engine Room Protection -or- Engine Boost Modification 1
- Slot 3: Aiming Systems Modification 1
- Slot 4: Propulsion Modification 1 -or- Steering Gears Modification 1
Commander Skills
| Recommended Commander Skills | ||||||
|---|---|---|---|---|---|---|
| Cost (points) |
Attack | Defense | ||||
| 1 |
★ |
|
|
|
|
★★★ |
| 2 |
★★ |
|
★ |
|
|
★★★ |
| 3 |
★★ |
|
★★ |
|
★★ |
★★★ |
| 4 |
|
|
|
★ |
★★★ |
|
| Key: ★★★ - Extremely Useful ★★ - Frequently Useful ★ - Occasionally Useful No stars - Not Useful | ||||||
Consumables
Stord equips the following consumables:
- Slot 1: Damage Control Party

- Slot 2: Smoke Generator
 – 3 charges
- Slot 3: Engine Boost
 – 4 charges
Signals
Recommended Signal Flags 
| |||||
|---|---|---|---|---|---|
| Combat | |||||

|

|

|

|
 ★ |
 ★ |
 ★ |

|

|
 ★★ |

|

|
 ★ |

| ||||
Gallery
Historical Info
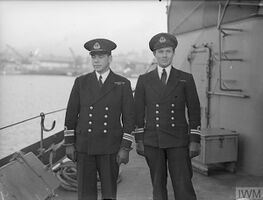
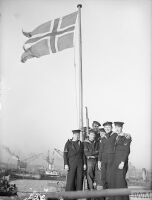
Historical Gallery
References
Ship Change Log
See here for links to Update notes.
- Available for testing by supertesters in the game starting from Update 12.2.
Testing Changes
- DevBlog 417:
- Preliminary characteristics.
- DevBlog 422:
- Fixed incorrect progression of ASW armament parameters:
- Depth charge damage reduced from 5,000 to 2,400.
- Number of depth charges per drop reduced from 16 to 8.
- Fixed incorrect progression of ASW armament parameters:
- DevBlog 429:
- AP shells have been removed.
- DevBlog 441:
- Detectability range by air increased from 3 to 3.2 km.
- DevBlog 446:
- Torpedo range increased from 6 to 7.5 km.
- Update 12.4:
- Available from sequential bundle #2 of the European Destroyers event (for European Tokens).
- Introduced into the game as a researchable ship in Update 12.6.
| Destroyers | II Tátra • III Romulus • IV Klas Horn • V Visby • V Muavenet • V Kalmar |
| Cruisers | I Gryf • VI Elli |
| Battleships | V Viribus Unitis |
| Aircraft Carriers |
| Netherlands | IX Groningen |
| U.S.A. | II Sampson • II Smith |
| Commonwealth | III Vampire |
| Europe | II Tátra • III Romulus • IV Klas Horn • V Visby • V Muavenet • V Kalmar |
| Germany | II V-25 • III G-101 • IV V-170 • V T-22 • VI Ernst Gaede • VI T-61 |
| U.S.S.R. | II Storozhevoi • III Derzki • IV Izyaslav • V Gremyashchy |
| Italy | II Curtatone • III Nazario Sauro • IV Turbine • V Maestrale • VI Aviere • VI Leone |
| Pan-America | VI Juruá |
| Japan | II Tachibana |
| U.K. | II Medea • III Valkyrie • III Campbeltown |
| France | II Enseigne Gabolde • III Fusilier • IV Bourrasque • V L'Adroit • V Jaguar • V Siroco |
| Pan-Asia | II Longjiang • III Phra Ruang • IV Shenyang • V Jianwei • VI Fushun • VI Anshan |
| Spain | X Álvaro de Bazán |