Medea

| Research price650 exp |
| Purchase price65,000 |
| Hit Points8,000 |
| 102 mm/40 QF Mk.IV on a PIX mount3 х 1 pcs. |
| Rate of Fire12 shots/min. |
| Reload Time5 sec. |
| Rotation Speed8 deg./sec. |
| 180 Degree Turn Time22.5 sec. |
| Firing Range8.03 km. |
| Maximum Dispersion81 m. |
| HE Shell102 mm HE 31 lb |
| Maximum HE Shell Damage1,500 |
| Chance of Fire on Target Caused by HE Shell6 % |
| Initial HE Shell Velocity664 m./s. |
| HE Shell Weight14.1 kg. |
| AP ShellIDS_PBPA064_102MM_AP_QF_MKIV |
| Maximum AP Shell Damage1,500 |
| Initial AP Shell Velocity664 m./s. |
| AP Shell Weight14.1 kg. |
| 533 mm Mk I2 х 2 pcs. |
| Rate of Fire1.13 shots/min. |
| Reload Time53 sec. |
| Rotation Speed25 deg./sec. |
| 180 Degree Turn Time7.2 sec. |
| Torpedo533 mm Mk II |
| Maximum Damage10,000 |
| Torpedo Speed53 knot |
| Torpedo Range6 km. |
| Maximum Speed32 knot |
| Turning Circle Radius460 m. |
| Rudder Shift Time3.2 sec. |
| Surface Detectability Range5.24 km. |
| Air Detectability Range1.94 km. |

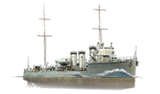
Medea — British Tier II destroyer.
Initially intended for the Greek Navy, but with the outbreak of World War I, she was assigned to the Royal Navy. Medea's main advantage over her same-type foreign contemporaries was her large-caliber—533 mm—torpedoes.
Modules
 |
Rate of Fire (shots/min) | 180° Turn Time (sec) | Maximum Dispersion (m) | Maximum HE Shell Damage (HP) | Chance of Fire on Target Caused by HE Shell (%) | Maximum AP Shell Damage (HP) |
Research price (exp) |
Purchase price ( | |
|---|---|---|---|---|---|---|---|---|---|
| 102 mm/40 QF Mk.IV on a PIX mount 102 mm/45 QF Mk.V on an LA CP Mk.II mount | 12 | 18 | 81 | 1,500 | 6 | 0 | 7,500 |
 |
Hit Points (HP) | Armor (mm) | Armor (mm) | Main Turrets (pcs.) | Secondary Gun Turrets (pcs.) | AA Mounts (pcs.) | Torpedo Tubes (pcs.) | Hangar Capacity (pcs.) |
Research price (exp) |
Purchase price ( | |
|---|---|---|---|---|---|---|---|---|---|---|---|
| Medea (A) | 8,000 | 6 | 6 | 3 | 2 | 0 | 10,000 | ||||
| Medea (B) | 8,700 | 6 | 6 | 3 | 2 | 2 | 300 | 28,000 |
 |
Rate of Fire (shots/min) | Torpedo Tubes Reload Time (sec) | 180° Turn Time (sec) | Maximum Damage (HP) | Torpedo Speed (knot) | Torpedo Range (km) |
Research price (exp) |
Purchase price ( | |
|---|---|---|---|---|---|---|---|---|---|
| 533 mm Mk II | 1.1 | 53 | 7.2 | 10,000 | 53 | 6 | 0 | 9,500 |
 |
IDS_SHIP_PARAM_SUO_INCREASE_DIST (%) | Maximum Firing Range (km) |
Research price (exp) |
Purchase price ( | |
|---|---|---|---|---|---|
| Mk II mod. 1 | 0 | 0 | 4,500 | ||
| Mk II mod. 2 | 0 | 250 | 16,000 |
 |
Maximum Speed (knot) |
Research price (exp) |
Purchase price ( | |
|---|---|---|---|---|
| Propulsion: 23,000 hp | 32 | 0 | 5,000 |
Compatible Upgrades
| Slot 1 |
|---|
Player Opinion
Performance
HMS Medea introduces players to the British Destroyer tech tree. As such, Medea will be most effectively played as a defensive destroyer.
Medea will be most comfortably played as a destroyer that is supporting an allied screen of destroyers or cruisers, or within contention of a cap circle. While she does not have the gun angles to pursue foes, she can keep all her guns pointed forward, which allows quick response to oncoming threats, as well as allowing her to maneuver whilst keeping pressure on the enemy. Given her good health pool, she has the stamina to survive drawn out gunfights given proper situational awareness and decision-making.
Furthermore, single-fire torpedoes provide Medea captains a degree of flexibility not seen in the tier. In a defensive situation, captains can manually decrease the spread between torpedoes to ensure a heavy punch into a vulnerable broadside of an unaware foe, or can use individual torpedoes to misdirect an enemy into a heavier spread of incoming fish; catching them off-guard. Once Medea closes the distance, she is a difficult adversary to shake off.
A special note on the Short-Burst Smoke GeneratorPros:
- Good hit point pool.
- 2nd best artillery range.
- X-turret rotates 180˚
- Torpedoes can fire individually.
- Each individual torpedo inflicts a lot of damage.
- Torpedoes are fast with good range.
- Good surface concealment.
- Smokescreen reload is fastest of all Destroyers in-class.
- Accelerates faster than other destroyers in-class.
Cons:
- Low shell velocity for 102mm guns.
- Average number of guns and torpedo launchers.
- Wide gun angles.
- Slowest torpedo reload of all Tier 2 Destroyers.
- Average top speed and turning radius.
- Smokescreen duration is lowest of all Destroyers in-class
- Does not get access to Engine Boost consumable.
Research
Availability of researchable upgrades for Medea is as follows:
- Hull: Upgrade to Hull B for increase in hit-points, increase in artillery performance, and improvement in AA suite. Research of this module unlocks progression to Valkyrie.
- Gun Fire Control System: Upgrade to Mk II mod. 2 for increase in range.
Optimal Configuration
Upgrades
Recommended:
- Slot 1: Main Armaments Modification 1

Commander Skills
Recommended skills for Medea commanders should be focused on enhancing her ability to engage other destroyers in artillery duels. This equates to a preference for skills focused on survivability and gun performance. A full breakdown of recommended skills are shown below:
| Recommended Commander Skills | ||||||
|---|---|---|---|---|---|---|
| Cost (points) |
Attack | Defense | ||||
| 1 |
|
★ |
|
|
|
★★ |
| 2 |
★★ |
|
★ |
|
|
★★★ |
| 3 |
★★ |
|
★★ |
|
★★ |
★ |
| 4 |
|
|
|
|
★★★ |
|
| Key: ★★★ - Extremely Useful ★★ - Frequently Useful ★ - Occasionally Useful No stars - Not Useful | ||||||
Consumables
Medea equips the following consumables:
- Slot 1: Damage Control Party

- Slot 2: Short-Burst Smoke Generator
 - 6 charges
Note on Smoke Generator ![]() : Royal Navy destroyers come equipped with a unique smoke screen generator. Once activated, they will only dispense for a maximum of 40 seconds, but in turn the consumable will recharge in 80 seconds.
: Royal Navy destroyers come equipped with a unique smoke screen generator. Once activated, they will only dispense for a maximum of 40 seconds, but in turn the consumable will recharge in 80 seconds.
Camouflage
Camouflage for this ship is purely cosmetic.
Signals
Combat signal flags will be the ones most frequently mounted; it is recommended to focus on buffing her speed and main battery. Full list of appropriate signals for Medea is shown below:
Recommended Signal Flags 
| |||||
|---|---|---|---|---|---|
| Combat | |||||
 ★★★ |

|

|

|
 ★★★ |
 ★★ |
 ★★ |

|

|
 ★★★ |
 ★★ |

|
 ★★ |

| ||||
Gallery


Historical Info
Historical Gallery


References
Ship Change Log
See here for links to Update notes.
Testing Changes
- June 23, 2018:
- Preliminary characteristics.
- July 10, 2018:
- The Engine Boost consumable was removed.
- August 15, 2018:
- The wide spread aim option for the ship's torpedoes was replaced with a narrow spread.
- The Smoker Generator consumable was adjusted:
- Action time was reduced from 15 to 10 s.
- Duration of the screen was reduced to 40 s.
- Cooldown was reduced from 240 (160 s) to 80 s (60 s).
- Number of charges was increased from 2 (3) to 5 (6).
- October 1, 2018:
- The difference in cooldown times of the premium and standard Smoke Generator consumable was changed from a flat 20 s (70 vs 90) to a 50% difference. The standard cooldown was raised from 90 to 105 s. The premium version remained untouched.
- Available for testing by supertesters in the game starting from Update 0.7.7.
- Introduced into the game as a researchable ship in Update 0.7.10.
- Update 0.7.11:
- Minor fixes to geometry and textures.
- Update 0.7.12:
- Increased protection of aft ammunition magazines against high-explosive damage.
- Minor fixes to geometry and textures.
- Update 0.8.3:
- The value of the ship's detectability in smoke after firing was rounded up to 2 km.
| Netherlands | IX Groningen |
| U.S.A. | II Sampson • II Smith |
| Commonwealth | III Vampire |
| Europe | II Tátra • III Romulus • IV Klas Horn • V Visby • V Muavenet • V Kalmar |
| Germany | II V-25 • III G-101 • IV V-170 • V T-22 • VI Ernst Gaede • VI T-61 |
| U.S.S.R. | II Storozhevoi • III Derzki • IV Izyaslav • V Gremyashchy |
| Italy | II Curtatone • III Nazario Sauro • IV Turbine • V Maestrale • VI Aviere • VI Leone |
| Pan-America | VI Juruá |
| Japan | II Tachibana |
| U.K. | II Medea • III Valkyrie • III Campbeltown |
| France | II Enseigne Gabolde • III Fusilier • IV Bourrasque • V L'Adroit • V Jaguar • V Siroco |
| Pan-Asia | II Longjiang • III Phra Ruang • IV Shenyang • V Jianwei • VI Fushun • VI Anshan |
| Spain | X Álvaro de Bazán |