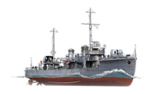
Wakatake
Wakatake

Tech Tree Position
stock
top
General
| Research price2000 exp |
| Purchase price256,000 |
| Hit Points7,300 |
Main Battery
| 120 mm/45 3rd Year Type on a Model G mount3 х 1 pcs. |
| Rate of Fire5 shots/min. |
| Reload Time12 sec. |
| Rotation Speed6 deg./sec. |
| 180 Degree Turn Time30 sec. |
| Firing Range9.41 km. |
| Maximum Dispersion85 m. |
| HE Shell120 mm HE Type1 |
| Maximum HE Shell Damage1,700 |
| Chance of Fire on Target Caused by HE Shell7 % |
| Initial HE Shell Velocity825 m./s. |
| HE Shell Weight20.3 kg. |
| AP Shell120 mm AP Type0 |
| Maximum AP Shell Damage2,000 |
| Initial AP Shell Velocity825 m./s. |
| AP Shell Weight20.3 kg. |
Torpedo Tubes
| 533 mm Twin2 х 2 pcs. |
| Rate of Fire1.54 shots/min. |
| Reload Time39 sec. |
| Rotation Speed25 deg./sec. |
| 180 Degree Turn Time7.2 sec. |
| Torpedo533 mm Type44 mod. 2 |
| Maximum Damage9,067 |
| Torpedo Speed57 knot |
| Torpedo Range6.99 km. |
AA Defense
| 6.5 mm/115 3rd Year Type on a single mount2 х 1 pcs. |
| . . . Average Damage per Second2.4 |
| . . . Firing Range0.99 km. |
Maneuverability
| Maximum Speed35.5 knot |
| Turning Circle Radius470 m. |
| Rudder Shift Time4 sec. |
Concealment
| Surface Detectability Range5.94 km. |
| Air Detectability Range2.04 km. |
Battle Levels
12345678910

III
256,000
Wakatake — Japanese Tier III destroyer.
A small yet well-armed and very fast destroyer. Wakatake carries 533 mm torpedoes with better range than similar munitions used by potential rivals. An unconventional placement of torpedo launchers allows her to fire from the bow sectors.
Modules
 |
Rate of Fire (shots/min) | 180° Turn Time (sec) | Maximum Dispersion (m) | Maximum HE Shell Damage (HP) | Chance of Fire on Target Caused by HE Shell (%) | Maximum AP Shell Damage (HP) |
Research price (exp) |
Purchase price ( | |
|---|---|---|---|---|---|---|---|---|---|
| 120 mm/45 3rd Year Type on a Model G mount | 5 | 22.5 | 85 | 1,700 | 7 | 2,000 | 0 | 21,000 |
 |
Hit Points (HP) | Armor (mm) | Armor (mm) | Main Turrets (pcs.) | Secondary Gun Turrets (pcs.) | AA Mounts (pcs.) | Torpedo Tubes (pcs.) | Hangar Capacity (pcs.) |
Research price (exp) |
Purchase price ( | |
|---|---|---|---|---|---|---|---|---|---|---|---|
| Wakatake (A) | 7,300 | 6 | 12 | 3 | 2 | 2 | 0 | 30,000 | |||
| Wakatake (B) | 8,200 | 6 | 12 | 3 | 1 | 2 | 950 | 70,000 |
 |
Rate of Fire (shots/min) | Torpedo Tubes Reload Time (sec) | 180° Turn Time (sec) | Maximum Damage (HP) | Torpedo Speed (knot) | Torpedo Range (km) |
Research price (exp) |
Purchase price ( | |
|---|---|---|---|---|---|---|---|---|---|
| Type44 mod. 2 | 1.5 | 39 | 7.2 | 9,066 | 57 | 7 | 0 | 24,000 |
 |
IDS_SHIP_PARAM_SUO_INCREASE_DIST (%) | Maximum Firing Range (km) |
Research price (exp) |
Purchase price ( | |
|---|---|---|---|---|---|
| Type3 mod. 1 | 0 | 0 | 18,500 |
 |
Maximum Speed (knot) |
Research price (exp) |
Purchase price ( | |
|---|---|---|---|---|
| Propulsion: 21,500 hp | 35.5 | 0 | 19,500 |
Compatible Upgrades
| Slot 1 |
|||
|---|---|---|---|
| Slot 2 |
Player Opinion
Performance
Warning: The data presented in the AA Defense sidebar section may be incorrect.
Refer to the in-game Port screens for more useful data.
Refer to the in-game Port screens for more useful data.
Pros:
- Very agile and maneuverable, can out-run and out-turn almost any ship.
- Detection range allows for close range torpedo drops and easy flanking.
- The Torpedoes on Wakatake are the strongest at Tier III. Wakatake has the ability to destroy any ship at tier with a perfect salvo.
- High speed and good concealment make for a good ship to get these torpedoes on target.
Cons:
- Turret rotation cannot keep up with maneuvers. Hard to get a shot off in twisting attacks.
- Torpedo range similar to detection range, thus leaving you a small window of attack.
- Vulnerable to rudder and engine damage.
- Low HP compared to other ships.
- Almost no AA.
- Has very weak artillery.
- Exchanges shorter torpedo range than her predecessor Umikaze for increased damage.
- Has fewer hit points than Umikaze.
Research
Availability of researchable upgrades for Wakatake is as follows:
- Hull: Upgrade to Wakatake (B) for more health, improved maneuverability, and better AA. Research of this module unlocks progression to Isokaze.
Optimal Configuration
Commander Skills
| Recommended Commander Skills | ||||||
|---|---|---|---|---|---|---|
| Cost (points) |
Attack | Defense | ||||
| 1 |
|
|
|
|
|
★★ |
| 2 |
|
★★ |
★★ |
|
|
★★ |
| 3 |
|
★★ |
★★ |
|
|
|
| 4 |
|
★★ |
|
|
★★ |
|
| Key: ★★★ - Extremely Useful ★★ - Frequently Useful ★ - Occasionally Useful No stars - Not Useful | ||||||
Consumables
Wakatake equips the following consumables:
- Slot 1: Damage Control Party

- Slot 2: Smoke Generator
 – 3 charges
- Slot 3: Engine Boost
 – 3 charges
Signals
Recommended Signal Flags 
| |||||
|---|---|---|---|---|---|
| Combat | |||||
 ★★★ |

|

|
 ★ |
 ★ |
 ★ |
 ★★ |

|

|
 ★★ |

|

|
 ★ |

| ||||
Gallery


Historical Info
Historical Gallery
References
Ship Change Log
See here for links to Update notes.
- Added to the game in Update 0.3.0.
- Update 0.5.0:
- The main battery rotation speed was increased from 4 to 6 degrees per second.
- Update 0.5.2:
- Experience earnings increased by 9%.
- Update 0.5.7:
- The armor model of the hull was refined.
- Update 0.5.8:
- The sector of rotation of the main battery turret #1 is now 360 °.
- Update 0.5.10:
- Fixed dynamic rendering of shadows from the hull.
- Update 0.6.2:
- The national flag was moved from the stern to the mast.
- Update 0.6.11:
- Improved appearance with the use of special technology for improved rendering of thin elements.
- Update 0.6.12:
- Detectability when firing main guns in smoke changed to 2.19 km.
- Update 0.6.13:
- Fire extinguishing time now 30 s instead of 60 s.
- Update 0.6.15:
- Added a bonus to the Blade permanent camouflage: a 10% discount to the post-battle service cost.
- Update 0.7.6:
- Improved display of thin elements on the hull.
- Update 0.7.11:
- Fixed textures: added holes to drain water when flooding.
- Update 0.7.12:
- Propulsion protection from damage caused by HE shells was increased.
- Update 0.8.5:
- Credit earnings increased by 5%.
- Update 0.11.11:
- Minor updates to geometry and textures.
Ships of Japan
| Destroyers | II Tachibana |
| Cruisers | I Hashidate • II Chikuma • III Tenryū • III Katori |
| Battleships | II Mikasa |
| Aircraft Carriers | IV [[Ship:Hōshō (< 23.01.2019)|Hōshō (< 23.01.2019)]] • IV Hōshō • V [[Ship:Zuihō (< 23.01.2019)|Zuihō (< 23.01.2019)]] • VI [[Ship:Ryūjō (< 23.01.2019)|Ryūjō (< 23.01.2019)]] • VI Ryūjō • VII [[Ship:Hiryū (< 23.01.2019)|Hiryū (< 23.01.2019)]] • VII [[Ship:Kaga (< 23.01.2019)|Kaga (< 23.01.2019)]] • VIII [[Ship:Shōkaku (< 23.01.2019)|Shōkaku (< 23.01.2019)]] • VIII Shōkaku • VIII Kaga |
Destroyers
| Netherlands | IX Groningen |
| U.S.A. | II Sampson • II Smith |
| Commonwealth | III Vampire |
| Europe | II Tátra • III Romulus • IV Klas Horn • V Visby • V Muavenet • V Kalmar |
| Germany | II V-25 • III G-101 • IV V-170 • V T-22 • VI Ernst Gaede • VI T-61 |
| U.S.S.R. | II Storozhevoi • III Derzki • IV Izyaslav • V Gremyashchy |
| Italy | II Curtatone • III Nazario Sauro • IV Turbine • V Maestrale • VI Aviere • VI Leone |
| Pan-America | VI Juruá |
| Japan | II Tachibana |
| U.K. | II Medea • III Valkyrie • III Campbeltown |
| France | II Enseigne Gabolde • III Fusilier • IV Bourrasque • V L'Adroit • V Jaguar • V Siroco |
| Pan-Asia | II Longjiang • III Phra Ruang • IV Shenyang • V Jianwei • VI Fushun • VI Anshan |
| Spain | X Álvaro de Bazán |
Categories: