Minekaze
| Revision as of 16:55, 29 July 2016 | Revision as of 16:57, 29 July 2016 | |||
| Line 9: | Line 9: | |||
| |Research=<!-- write text about priority sequence of research below --> | |Research=<!-- write text about priority sequence of research below --> | |||
| + | ||||
| *Research the B hull first as it provides a small increase in health and maneuverability. | *Research the B hull first as it provides a small increase in health and maneuverability. | |||
| *after that one can research the fire control or guns modules however it may be best to just skip right to the next ship. | *after that one can research the fire control or guns modules however it may be best to just skip right to the next ship. | |||
Revision as of 16:57, 29 July 2016

| Research price11500 exp |
| Purchase price1,380,000 |
| Hit Points9,600 |
| 120 mm/45 3rd Year Type on a Model G mount4 х 1 pcs. |
| Rate of Fire5.5 shots/min. |
| Reload Time10.9 sec. |
| Rotation Speed6 deg./sec. |
| 180 Degree Turn Time30 sec. |
| Firing Range8.11 km. |
| Maximum Dispersion81 m. |
| HE Shell120 mm HE Type1 |
| Maximum HE Shell Damage1,700 |
| Chance of Fire on Target Caused by HE Shell7 % |
| Initial HE Shell Velocity825 m./s. |
| HE Shell Weight20.3 kg. |
| AP Shell120 mm AP Type0 |
| Maximum AP Shell Damage2,000 |
| Initial AP Shell Velocity825 m./s. |
| AP Shell Weight20.3 kg. |
| 533 mm Twin3 х 2 pcs. |
| Rate of Fire1.43 shots/min. |
| Reload Time42 sec. |
| Rotation Speed25 deg./sec. |
| 180 Degree Turn Time7.2 sec. |
| Torpedo533 mm Type6 |
| Maximum Damage10,833 |
| Torpedo Speed57 knot |
| Torpedo Range6.99 km. |
| 7.7 mm/80 Type 92 on a single mount2 х 1 pcs. |
| . . . Average Damage per Second3.2 |
| . . . Firing Range0.99 km. |
| Maximum Speed39 knot |
| Turning Circle Radius550 m. |
| Rudder Shift Time3.2 sec. |
| Surface Detectability Range6.01 km. |
| Air Detectability Range2.5 km. |

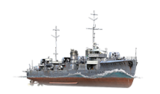
Minekaze — Japanese Tier V destroyer.
The "large" destroyers were conceived to escort Amagi-class battlecruisers. They featured an extended forecastle, and the bridge was set well back from its break—a bank of torpedo tubes was mounted in the well thus created. The Minekaze class was the first mass-produced Japanese destroyer to be equipped with geared turbines. The lead ship was laid down in April 1918. She escorted aircraft carrier Akagi in the 1930s and patrolled the Chinese coast during the Sino-Japanese War. Throughout World War II, the ship was engaged in patrol and escort duties in the East China Sea and Western Pacific regions.
Modules
 |
Rate of Fire (shots/min) | 180° Turn Time (sec) | Maximum Dispersion (m) | Maximum HE Shell Damage (HP) | Chance of Fire on Target Caused by HE Shell (%) | Maximum AP Shell Damage (HP) |
Research price (exp) |
Purchase price ( | |
|---|---|---|---|---|---|---|---|---|---|
| 120 mm/45 3rd Year Type on a Model G mount | 5.5 | 30 | 81 | 1,700 | 7 | 2,000 | 0 | 105,000 | |
| 120 mm/45 3rd Year Type on a Model G mount | 6 | 30 | 81 | 1,700 | 7 | 2,000 | 2,300 | 210,000 |
 |
Hit Points (HP) | Armor (mm) | Armor (mm) | Main Turrets (pcs.) | Secondary Gun Turrets (pcs.) | AA Mounts (pcs.) | Torpedo Tubes (pcs.) | Hangar Capacity (pcs.) |
Research price (exp) |
Purchase price ( | |
|---|---|---|---|---|---|---|---|---|---|---|---|
| Minekaze (A) | 9,600 | 6 | 18 | 4 | 2 | 3 | 0 | 110,000 | |||
| Minekaze (B) | 10,900 | 6 | 18 | 4 | 1/1 | 3 | 3,300 | 300,000 |
 |
Rate of Fire (shots/min) | Torpedo Tubes Reload Time (sec) | 180° Turn Time (sec) | Maximum Damage (HP) | Torpedo Speed (knot) | Torpedo Range (km) |
Research price (exp) |
Purchase price ( | |
|---|---|---|---|---|---|---|---|---|---|
| Type 6 | 1.4 | 42 | 7.2 | 10,833 | 57 | 7 | 0 | 200,000 |
 |
IDS_SHIP_PARAM_SUO_INCREASE_DIST (%) | Maximum Firing Range (km) |
Research price (exp) |
Purchase price ( | |
|---|---|---|---|---|---|
| Type5 mod. 1 | 0 | 0 | 70,000 | ||
| Type5 mod. 2 | 0 | 1,600 | 155,000 |
 |
Maximum Speed (knot) |
Research price (exp) |
Purchase price ( | |
|---|---|---|---|---|
| Propulsion: 38,500 hp | 39 | 0 | 105,000 |
Compatible Upgrades
| Slot 1 |
|||||
|---|---|---|---|---|---|
| Slot 2 |
|||||
| Slot 3 |
Player Opinion
Performance
Oftentimes called the "Ninjakaze" due to her suddenly appearing out of nowhere and in conjunction with her appearance the likelihood of torpedo spreads already launched, the Minekaze is a ship reliant mostly on its torpedoes. She is also probably the weakest of the Japanese destroyers. The guns have a low turn rate of 30 seconds for 180 degrees. However, the torpedoes are your main weapon, skirmishing and infiltrating is what it's best at. It has very weak armor typical of a destroyer so HE will wreck this ship. It is recommended to fire HE from this ship as there is potential for fire and as HE damage is somewhat higher than AP damage with such small artillery. The artillery on this ship should not be used the main cause of damage and should be used sparingly in specific situations. The torpedo spreads on this ship allow the user to decide where 3 pairs of torpedoes should go. This allows the user to save some torpedoes, or launch them in an accurate spread at enemy ships that may turn. A tip for torpedoes is to wait for the enemy ship to be at a broadside and then launch torpedoes directly on the white line and some behind to account for turning.
With patience and good working of the 1km gap between maximum torpedo range and detection range, this ship can devastate entire groups of unaware battleships and cruisers. Its also perfect for circling a solo battleship or carrier until head on, then driving straight at them to deliver a full broadside, as the speed which you can close the gap gives them little chance to react. Avoid other DD's in general, as the ability to launch fast moving torpedoes in stealth is this ships greatest asset, and a gunfight with anything that isnt a mine or isokaze is generally a losing battle.Pros:
- Powerful torpedoes that pack a punch. A full salvo can destroy most enemy ships.
- 1 km window from which ships are in torpedo range without your ship being spotted.
- Rudder shift time is almost nonexistent.
- Excellent torpedo reload time at 47 seconds.
- Great torpedo speed at 68 knots, one of the fastest in the game.
- Easy to spread out torpedoes with 3 double torpedo tubes configuration.
- Very fast at 39 knots, reaching just over 42 knots with engine boost consumable used, faster and more maneuverable than most destroyers up to tier 6.
Cons:
- Fragile like most destroyers.
- Easily damaged torpedoes and main guns.
- Engines and rudder taken out easily (can be taken out by even a missed shot).
- Weak artillery, AA is almost all for show and scarcely shoots anything down
- Guns have very slow rotation speed, reload, and are inferior to the American counterpart
- Torpedoes are center mounted unlike American counterpart.
- Rate of fire is lower than the tier IV Isokaze which has the same torpedoes with less damage.
Research
- Research the B hull first as it provides a small increase in health and maneuverability.
- after that one can research the fire control or guns modules however it may be best to just skip right to the next ship.
