Amagi
| Revision as of 09:03, 9 August 2018 | Revision as of 00:49, 21 February 2019 AA Guns Mod 1 and general rewrite. | |||
| Line 3: | Line 3: | |||
| |Anno=<!-- you can write below short description for the ship. it will replace default once. --> | |Anno=<!-- you can write below short description for the ship. it will replace default once. --> | |||
| ? | + | An upgraded battlecruiser design with very powerful artillery. Though outclassed by other battleships of his time in terms of armor, {{#var:ship_name}} was superior to them in terms of speed.<br><br>{{Model3DViewer|022f02f337594267aac4e82ddaeaf039}} | ||
| |Performance=<!-- write text about performance in battles below --> | |Performance=<!-- write text about performance in battles below --> | |||
| ? | + | ''{{#var:ship_name}}'' has an impressive reputation among battleships at his tier. Sporting five dual turrets each packing a pair of 410mm guns — 10x 16.1" rifles — ''{{#var:ship_name}}'' is unmatched in terms of raw broadside weight. In his current fit, the ship is a reformatted battlecruiser with changes much like those applied to his colleague ''Kongo'' resulting in excellent speed and a powerful main battery with a relatively light weight of armor. (see the [[#Design|Design]] section below) | ||
| ? | + | Despite the solid appearance and heavy broadside weight, ''{{#var:ship_name}}'' can take only so much punishment before he breaks. It is inadvisable to depend heavily on your armor or even enter a prolonged shot for shot duel. The AA suite is not terrible, but not very good either. Only the 16x 127mm rifles can throw shells beyond short range. There are no medium-range AA defenses at all. | ||
| + | Move into range, fire a heavy broadside, and sail away to a new location. Repeat. That is ''{{#var:ship_name}}''. | |||
| |Pros=<!-- write list of positive points below. use * as in ordinary wiki-list. --> | |Pros=<!-- write list of positive points below. use * as in ordinary wiki-list. --> | |||
| ? | * Heaviest broadside weight at | + | * Fast. | |
| ? | * | + | * Heaviest broadside weight at tier with ten 410mm rifles. | |
| ? | + | * Fairly accurate guns with excellent AP and absurd HE. | ||
| ? | * | + | * An AP salvo against an enemy broadside can potentially destroy anything including Tier X. | |
| ? | + | |||
| * Powerful secondary battery that can send out 110 shells per minute per side. | * Powerful secondary battery that can send out 110 shells per minute per side. | |||
| ? | * | + | * Good health pool. | |
| ? | * | + | * Angling can bring about surprising bounces and/or mitigate heavy damage . | |
| ? | * Final hull has an immense bulge | + | * Final hull has an immense TDS bulge. | |
| ? | + | |||
| |Cons=<!-- write list of negative points below. use * as in ordinary wiki-list. --> | |Cons=<!-- write list of negative points below. use * as in ordinary wiki-list. --> | |||
| ? | * Rather underwhelming firing range of | + | * Rather underwhelming firing range of 18/20 km compared to his Tier VIII adversaries, ''[[North Carolina]]'' and ''[[Bismarck]]''. | |
| ? | * Battlecruiser armor is | + | * Battlecruiser armor is vulnerable to battleship shells that catch his side. | |
| ? | * Slow rudder shift combined with large turning radius | + | * Slow rudder shift combined with a large turning radius makes it difficult to dodge torpedoes. | |
| ? | * Despite | + | * Despite his secondary batteries, he cannot duel battleships at close range because of his poor armor and maneuverability. | |
| ? | * Main | + | * Main turrets often get knocked out. | |
| * Rather high detection radius. | * Rather high detection radius. | |||
| ? | * | + | * Weak AA flak bubble. Expect the planes to get close enough. | |
| |Research=<!-- write text about priority sequence of research below --> | |Research=<!-- write text about priority sequence of research below --> | |||
| Line 44: | Line 43: | |||
| ? | '''Upgrade Slot 1''' provides two viable options. The first is {{Main Armaments Modification 1}}, which increases the survivability and reduces repair time of the main armament. | + | '''Upgrade Slot 1''' provides two viable options. The first is {{Main Armaments Modification 1}}, which increases the survivability and reduces repair time of the main armament. If AA defense is more desirable, take {{Auxiliary Armaments Modification 1}} to increase the survivability of AA and secondary battery mounts. | |
| + | ||||
| + | '''Upgrade Slot 3''' provides options for specialization in certain roles. {{Aiming Systems Modification 1}} is typically recommended for ship to ship combat. For AA defense, {{AA Guns Modification 1}} can be mounted instead to reinforce the long-range flak guns. A secondary build is not advised. | |||
| ? | '''Upgrade Slot | + | '''Upgrade Slot 4''' is usually filled with {{Damage Control System Modification 2}}. A valid alternative is {{Steering Gears Modification 2}} to perk up the lazy rudder. | |
| ? | '''Upgrade Slot 5''' provides two options. {{Concealment System Modification 1}} reduces ship detectability and increases dispersion of enemy shells fired at the | + | '''Upgrade Slot 5''' provides two options. {{Concealment System Modification 1}} reduces ship detectability and increases dispersion of enemy shells fired at the ship. The second option is {{Target Acquisition System Modification 1}}, primarily for spotting torpedos. It also improves ship and aircraft spotting range by 20%. | |
| |CommanderSkills=<!-- write text about best set of Commander Skills below --> | |CommanderSkills=<!-- write text about best set of Commander Skills below --> | |||
| Line 104: | Line 105: | |||
| |Signals=<!-- write text about best set of signals below --> | |Signals=<!-- write text about best set of signals below --> | |||
| ? | As with all battleships, ''Amagi'' comes with 8 [[Ship:Flags#Signals|signal flag]] slots. The three most important flags are India Delta, Juliet Yankee Bissotwo and India Yankee; all of which | + | As with all battleships, ''Amagi'' comes with 8 [[Ship:Flags#Signals|signal flag]] slots. The three most important flags are India Delta {{India Delta|Size=18px}}, Juliet Yankee Bissotwo {{Juliet Yankee Bissotwo|Size=18px}}, and India Yankee {{India Yankee|Size=18px}}; all of which improve surviveability. Another good signal to mount would be November Echo Setteseven {{November Echo Setteseven|Size=18px}}, to give ''Amagi''`s AA a slight further increase for self-protection. If the captain insists on a '''Secondary Build''', the addition of Mike Yankee Soxisix {{Mike Yankee Soxisix|Size=18px}} will further improve the performance of the secondaries. | |
| |Gallery=<!-- write below list of files without tags. description (if necessary) for each should be separated with | --><gallery> | |Gallery=<!-- write below list of files without tags. description (if necessary) for each should be separated with | --><gallery> | |||
Revision as of 00:49, 21 February 2019

| Research price135000 exp |
| Purchase price10,900,000 |
| Hit Points59,300 |
| 410 mm/45 3rd Year Type in a twin turret5 х 2 pcs. |
| Rate of Fire2 shots/min. |
| Reload Time30 sec. |
| Rotation Speed4.3 deg./sec. |
| 180 Degree Turn Time41.86 sec. |
| Firing Range18.07 km. |
| Maximum Dispersion227 m. |
| HE Shell410 mm HE Type0 |
| Maximum HE Shell Damage6,500 |
| Chance of Fire on Target Caused by HE Shell30 % |
| Initial HE Shell Velocity805 m./s. |
| HE Shell Weight938.5 kg. |
| AP Shell410 mm AP/APC Type91 |
| Maximum AP Shell Damage12,600 |
| Initial AP Shell Velocity806 m./s. |
| AP Shell Weight1020 kg. |
| 140 mm/50 3rd Year Type on a casemate mount16 х 1 pcs. |
| Firing Range6.6 km. |
| Rate of Fire7.5 shots/min. |
| Reload Time8 sec. |
| HE Shell140 mm HE Type0 |
| Maximum HE Shell Damage2,400 |
| Initial HE Shell Velocity850 m./s. |
| Chance of Fire on Target Caused by HE Shell10 % |
| 127 mm/40 Type 89 on a Model A1 mount8 х 2 pcs. |
| Firing Range6.6 km. |
| Rate of Fire10 shots/min. |
| Reload Time6 sec. |
| HE Shell127 mm HE Type0 |
| Maximum HE Shell Damage2,100 |
| Initial HE Shell Velocity725 m./s. |
| Chance of Fire on Target Caused by HE Shell8 % |
| 127 mm/40 Type 89 on a Model A1 mount8 х 2 pcs. |
| . . . Average Damage per Second80.8 |
| . . . Firing Range5.01 km. |
| 13 mm/76 Type 93 on a quadruple mount12 х 4 pcs. |
| . . . Average Damage per Second34.8 |
| . . . Firing Range1.2 km. |
| 25 mm/60 Type 96 on a single mount42 х 1 pcs. |
| . . . Average Damage per Second75.6 |
| . . . Firing Range2.49 km. |
| Maximum Speed28.05 knot |
| Turning Circle Radius870 m. |
| Rudder Shift Time20.8 sec. |
| Surface Detectability Range16.76 km. |
| Air Detectability Range10.97 km. |

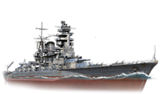
Amagi — Japanese Tier VIII battleship.
An upgraded battlecruiser design with very powerful artillery. Though outclassed by other battleships of his time in terms of armor, Amagi was superior to them in terms of speed.
Modules
 |
Rate of Fire (shots/min) | 180° Turn Time (sec) | Maximum Dispersion (m) | Maximum HE Shell Damage (HP) | Chance of Fire on Target Caused by HE Shell (%) | Maximum AP Shell Damage (HP) |
Research price (exp) |
Purchase price ( | |
|---|---|---|---|---|---|---|---|---|---|
| 410 mm/45 3rd Year Type in a twin turret | 2 | 41.9 | 227 | 6,500 | 30 | 12,600 | 0 | 1,300,000 |
 |
Hit Points (HP) | Armor (mm) | Armor (mm) | Main Turrets (pcs.) | Secondary Gun Turrets (pcs.) | AA Mounts (pcs.) | Torpedo Tubes (pcs.) | Hangar Capacity (pcs.) |
Research price (exp) |
Purchase price ( | |
|---|---|---|---|---|---|---|---|---|---|---|---|
| Amagi (A) | 59,300 | 19 | 458 | 5 | 8/16 | 12/42/8 | 0 | 1,100,000 | |||
| Amagi (B) | 66,300 | 19 | 458 | 5 | 8/16 | 18/24/12/8 | 39,000 | 2,300,000 |
 |
IDS_SHIP_PARAM_SUO_INCREASE_DIST (%) | Maximum Firing Range (km) |
Research price (exp) |
Purchase price ( | |
|---|---|---|---|---|---|
| Type8 mod. 1 | 0 | 0 | 640,000 | ||
| Type8 mod. 2 | 0 | 22,500 | 1,300,000 |
 |
Maximum Speed (knot) |
Research price (exp) |
Purchase price ( | |
|---|---|---|---|---|
| Propulsion: 132,000 hp | 28.1 | 0 | 440,000 | |
| Propulsion: 150,000 hp | 30 | 12,500 | 900,000 |
Compatible Upgrades
| Slot 1 |
||||
|---|---|---|---|---|
| Slot 2 |
||||
| Slot 3 |
||||
| Slot 4 |
||||
| Slot 5 |
Player Opinion
Performance
Amagi has an impressive reputation among battleships at his tier. Sporting five dual turrets each packing a pair of 410mm guns — 10x 16.1" rifles — Amagi is unmatched in terms of raw broadside weight. In his current fit, the ship is a reformatted battlecruiser with changes much like those applied to his colleague Kongo resulting in excellent speed and a powerful main battery with a relatively light weight of armor. (see the Design section below)
Despite the solid appearance and heavy broadside weight, Amagi can take only so much punishment before he breaks. It is inadvisable to depend heavily on your armor or even enter a prolonged shot for shot duel. The AA suite is not terrible, but not very good either. Only the 16x 127mm rifles can throw shells beyond short range. There are no medium-range AA defenses at all.
Move into range, fire a heavy broadside, and sail away to a new location. Repeat. That is Amagi.Pros:
- Fast.
- Heaviest broadside weight at tier with ten 410mm rifles.
- Fairly accurate guns with excellent AP and absurd HE.
- An AP salvo against an enemy broadside can potentially destroy anything including Tier X.
- Powerful secondary battery that can send out 110 shells per minute per side.
- Good health pool.
- Angling can bring about surprising bounces and/or mitigate heavy damage .
- Final hull has an immense TDS bulge.
Cons:
- Rather underwhelming firing range of 18/20 km compared to his Tier VIII adversaries, North Carolina and Bismarck.
- Battlecruiser armor is vulnerable to battleship shells that catch his side.
- Slow rudder shift combined with a large turning radius makes it difficult to dodge torpedoes.
- Despite his secondary batteries, he cannot duel battleships at close range because of his poor armor and maneuverability.
- Main turrets often get knocked out.
- Rather high detection radius.
- Weak AA flak bubble. Expect the planes to get close enough.
Optimal Configuration
Upgrades
The recommended upgrades for Amagi are as follows:
- Slot 1: Main Armaments Modification 1

- Slot 2: Damage Control System Modification 1

- Slot 3: Aiming Systems Modification 1

- Slot 4: Damage Control System Modification 2

- Slot 5: Concealment System Modification 1

Upgrade Slot 1 provides two viable options. The first is Main Armaments Modification 1 ![]() , which increases the survivability and reduces repair time of the main armament. If AA defense is more desirable, take Auxiliary Armaments Modification 1
, which increases the survivability and reduces repair time of the main armament. If AA defense is more desirable, take Auxiliary Armaments Modification 1 ![]() to increase the survivability of AA and secondary battery mounts.
to increase the survivability of AA and secondary battery mounts.
Upgrade Slot 3 provides options for specialization in certain roles. Aiming Systems Modification 1 ![]() is typically recommended for ship to ship combat. For AA defense, AA Guns Modification 1
is typically recommended for ship to ship combat. For AA defense, AA Guns Modification 1 ![]() can be mounted instead to reinforce the long-range flak guns. A secondary build is not advised.
can be mounted instead to reinforce the long-range flak guns. A secondary build is not advised.
Upgrade Slot 4 is usually filled with Damage Control System Modification 2 ![]() . A valid alternative is Steering Gears Modification 2
. A valid alternative is Steering Gears Modification 2 ![]() to perk up the lazy rudder.
to perk up the lazy rudder.
Upgrade Slot 5 provides two options. Concealment System Modification 1 ![]() reduces ship detectability and increases dispersion of enemy shells fired at the ship. The second option is Target Acquisition System Modification 1 (
reduces ship detectability and increases dispersion of enemy shells fired at the ship. The second option is Target Acquisition System Modification 1 (![]() ), primarily for spotting torpedos. It also improves ship and aircraft spotting range by 20%.
), primarily for spotting torpedos. It also improves ship and aircraft spotting range by 20%.
Commander Skills
| Recommended Commander Skills | ||||||||
|---|---|---|---|---|---|---|---|---|
| Cost (points) |
Endurance | Attack | Support | Versatility | ||||
| 1 |
★ |
★★ |
★ |
|
|
|
★ |
|
| 2 |
★★ |
★ |
★★★ |
|
|
|
★★ |
★ |
| 3 |
★★ |
|
|
|
★★ |
★★★ |
★ |
★ |
| 4 |
★ |
★★ |
★ |
|
★★★ |
|
★ |
★★★ |
| Key: ★★★ - Extremely Useful ★★ - Frequently Useful ★ - Occasionally Useful No stars - Meh Χ - Not recommended | ||||||||
Consumables
Amagi can equip the following consumables:
- Slot 1: Damage Control Party

- Slot 2: Repair Party

- Slot 2: Spotting Aircraft
 or Catapult Fighter
Mounting premium versions of these consumables is recommended to decrease their cooldown timers.
Camouflage
Type 1, 2, or 5 camouflage can be equipped for credits; Types 2 or 5 are recommended at a minimum to reduce the accuracy of incoming shells.
Players who wish to spend doubloons can equip Amagi with Type 18 camouflage that lowers her detection radius, reduces the accuracy of incoming shells, reduces her repair costs, increases her credit earnings, and increases the amount of experience she earns.
Signals
As with all battleships, Amagi comes with 8 signal flag slots. The three most important flags are India DeltaGallery
Historical Info
Historical Gallery


.jpg)
| Destroyers | II Tachibana |
| Cruisers | I Hashidate • II Chikuma • III Tenryū • III Katori |
| Battleships | II Mikasa |
| Aircraft Carriers | IV [[Ship:Hōshō (< 23.01.2019)|Hōshō (< 23.01.2019)]] • IV Hōshō • V [[Ship:Zuihō (< 23.01.2019)|Zuihō (< 23.01.2019)]] • VI [[Ship:Ryūjō (< 23.01.2019)|Ryūjō (< 23.01.2019)]] • VI Ryūjō • VII [[Ship:Hiryū (< 23.01.2019)|Hiryū (< 23.01.2019)]] • VII [[Ship:Kaga (< 23.01.2019)|Kaga (< 23.01.2019)]] • VIII [[Ship:Shōkaku (< 23.01.2019)|Shōkaku (< 23.01.2019)]] • VIII Shōkaku • VIII Kaga |