Hatsuharu
| Revision as of 05:50, 3 December 2016 | Revision as of 06:29, 5 December 2016 Revised Performance, Research, and Commander Skills sections. Added Upgrades and Consumables sections. Added Upgrades, Added Historical Gallery photos. | |||
| Line 6: | Line 6: | |||
| |Performance=<!-- write text about performance in battles below --> | |Performance=<!-- write text about performance in battles below --> | |||
| ? | + | As a part of the Japanese destroyer line re-organization and expansion in [[Ship:Update_0.5.15|Update 0.5.15]], ''Hatsuharu'' falls one tier to her new home at Tier VI. There have been a few minor tweaks to ''Hatsuharu'' with the change, but she is largely the same. As before, upgrading to Hull (B) increases her health and anti-aircraft battery, but costs her one of her main battery guns. She retains the same twin triple-tube launchers she had previously. Her detection radius remains 6.7 km, while she loses minor amounts of speed and maneuverability from her previous incarnation. Captains who believed that ''Hatsuharu'' was under-gunned in her previous slot at Tier VII will likely be more comfortable with her armament one tier lower. | ||
| + | ||||
| + | On the other hand, new Japanese destroyer captains who are moving up to ''Hatsuharu'' from ''[[Minekaze]]'' will find their new acquisition to be something a mixed bag: her guns are a significant upgrade from those of ''Minekaze'', while it can be argued that her torpedo armament is a downgrade. Not only is she less flexible with only two torpedo launchers, the reload time is very nearly double that of ''Minekaze''; in exchange, ''Hatsuharu''’s torpedoes can eventually be upgraded to longer-ranged with a bigger punch. Further complicating things is the fact that her torpedo upgrade is locked behind Hull (B), meaning captains must invest experience in the hull upgrade first before having the ability to upgrade her torpedoes. | |||
| + | ||||
| + | Without her improved torpedoes, ''Hatsuharu'' is stuck with fish that have a paltry 6.0 km range. This forces ''Hatsuharu'' into more of a mid-tier American destroyer play style, requiring captains to utilize islands and smoke effectively to land successful torpedo strikes against enemy capital ships. ''Hatsuharu'' plays like a completely different ship once she has her upgraded torpedoes, however. The 10.0 km range of her Type 8 mod. 2 torpedoes is more than workable, and her guns can add notable contributions to her damage when used judiciously in the right situations. | |||
| + | ||||
| + | ''Hatsuharu'' comes off as the inferior destroyer when compared side-by-side with ''[[Fubuki]]'', but things flip back the other way one tier up when the same comparison is made between the successors of both ships (''[[Akatsuki]]'' and ''[[Shiratsuyu]]''). Captains frustrated with ''Hatsuharu'' should remember that she is merely a stepping-stone to better things beyond. | |||
| |Pros=<!-- write list of positive points below. use * as in ordinary wiki-list. --> | |Pros=<!-- write list of positive points below. use * as in ordinary wiki-list. --> | |||
| ? | * Improved guns gain significantly increased fate of fire, range, and | + | * Improved guns gain significantly increased fate of fire, range, and shell arcs. | |
| ? | * | + | * Lowest detection range of Tier VI destroyers. | |
| ? | * Decent torpedo speed makes | + | * Decent torpedo speed makes her torpedoes harder to dodge. | |
| ? | * | + | * Generous torpedo launch arcs. | |
| |Cons=<!-- write list of negative points below. use * as in ordinary wiki-list. --> | |Cons=<!-- write list of negative points below. use * as in ordinary wiki-list. --> | |||
| * Turret traverse and rate of fire remain inferior to American destroyer guns. | * Turret traverse and rate of fire remain inferior to American destroyer guns. | |||
| ? | * Poor armor | + | * Poor armor. | |
| ? | * | + | * Fewer torpedoes than ''[[Fubuki]]'': only two triple-tube launchers compared to ''Fubuki''’s three. | |
| ? | * | + | * Slower than predecessor ''[[Minekaze]]'', with worse detection range to boot. | |
| ? | + | |||
| |Research=<!-- write text about priority sequence of research below --> | |Research=<!-- write text about priority sequence of research below --> | |||
| ? | + | Like the other Tier VI Japanese destroyer, ''[[Fubuki]]'', ''Hatsuharu'' is painful to play until Hull (B) and the Torpedo upgrade module are unlocked and equipped. Those need to be top priority. Save the Fire Control System module for last, or skip it altogether and move on to ''[[Shiratsuyu]]''. | ||
| |OptimalConfiguration=<!-- write some general text about selection of optimal configuration below (optional)--> | |OptimalConfiguration=<!-- write some general text about selection of optimal configuration below (optional)--> | |||
| |Upgrades=<!-- write text about best upgrades below --> | |Upgrades=<!-- write text about best upgrades below --> | |||
| + | Mid-tier destroyers like ''Hatsuharu'' don't have many outstanding options for upgrades. Main Armaments Modification 1 is the best pick for [[Ship:Upgrades#Tier_I.2B_Equipment_.28Slot_1.29|Upgrade Slot 1]], while Propulsion Modification 1 is recommended in [[Ship:Upgrades#Tier_III.2B_Equipment_.28Slot_4.29|Upgrade Slot 4]]. Propulsion Modification 2 is the best pick of a sorry lot for [[Ship:Upgrades#Tier_VI.2B_Equipment_.28Slot_5.29|Upgrade Slot 5]]. [[Ship:Upgrades#Tier_V.2B_Equipment_.28Slot_2.29|Upgrade Slot 2]] offers either Aiming Systems Modification 1 or Main Battery Modification 2; either provides a minor boost to ''Hatsuharu''’s main battery. | |||
| |CommanderSkills=<!-- write text about best set of Commander Skills below --> | |CommanderSkills=<!-- write text about best set of Commander Skills below --> | |||
| + | Tier 1's Basic Firing Training and Tier 5's Concealment Expert are easy choices for ''Hatsuharu'' commander skills. The tiers in between offer an array of options. | |||
| + | ||||
| + | Tier 2 brings a pair of outstanding choices in Torpedo Armament Expertise and Last Stand. The former is best for more offensive-minded captains looking to maximize their damage output; the latter is recommended for captains with longevity in mind. Expert Marksman is also a decent place to invest skill points later on after taking Concealment Expert. Superintendent is the best of the lot at Tier 3. Vigilance is a good skill for players wanting to provide additional help screening teammates from torpedoes, while High Alert is another possible option for captains who anticipate finding themselves under fire frequently. | |||
| + | ||||
| + | While there are no stand-out skills at Tier 4, it contains two moderately decent options: Survivability Expert and Advanced Firing Training. The first or last are good options for captains seeking a general skill that will help them in almost any game: Survivability Expert for those focused on staying alive, Advanced Firing Training for the more offensive-minded looking to get the most out of ''Hatsuharu''’s guns. | |||
| {{Commander Skills | {{Commander Skills | |||
| Line 38: | Line 49: | |||
| | Expert Marksman=2 | | Expert Marksman=2 | |||
| | Torpedo Armament Expertise=3 | | Torpedo Armament Expertise=3 | |||
| ? | | Fire Prevention= | + | | Fire Prevention= | |
| ? | | Incoming Fire Alert= | + | | Incoming Fire Alert= | |
| ? | | Last Stand= | + | | Last Stand=3 | |
| | Torpedo Acceleration=1 | | Torpedo Acceleration=1 | |||
| ? | | High Alert= | + | | High Alert=2 | |
| ? | | Vigilance= | + | | Vigilance=2 | |
| | Dogfighting Expert = | | Dogfighting Expert = | |||
| | Superintendent=3 | | Superintendent=3 | |||
| ? | | Demolition Expert= | + | | Demolition Expert=1 | |
| | Advanced Firing Training=2 | | Advanced Firing Training=2 | |||
| | Survivability Expert=2 | | Survivability Expert=2 | |||
| Line 63: | Line 74: | |||
| |Consumables=<!-- write text about selection of Consumables below --> | |Consumables=<!-- write text about selection of Consumables below --> | |||
| ? | + | All destroyers should invest credits (or doubloons) in [[Ship:Consumables#Damage Control Party|Damage Control Party II]]. [[Ship:Consumables#Engine Boost|Engine Boost II]] probably isn't worth it — ''Hatsuharu''’s speed isn't amazing, but it's not awful either — while [[Ship:Consumables#Smoke Generator|Smoke Generator II]] likely is, especially if her commander does not have the [[Crew_(WoWS)#5th_Row_Skills|Concealment Expert]] skill. | ||
| |Camouflage=<!-- write text about useful camouflage below --> | |Camouflage=<!-- write text about useful camouflage below --> | |||
| Line 72: | Line 83: | |||
| |Signals=<!-- write text about best set of signals below --> | |Signals=<!-- write text about best set of signals below --> | |||
| ? | |Gallery=<!-- write below list of files without tags. description (if necessary) for each should be separated with | + | |Gallery=<!-- write below list of files without tags. description (if necessary) for each should be separated with | --><gallery> | |
| File:HatsuharuStart.png|''Hatsuharu'' scouts ahead for her team. | File:HatsuharuStart.png|''Hatsuharu'' scouts ahead for her team. | |||
| File:HatsuharuTorp.png|''Hatsuharu'' launches her torpedoes at the enemies entering the capture point. | File:HatsuharuTorp.png|''Hatsuharu'' launches her torpedoes at the enemies entering the capture point. | |||
| File:HatsuharuDodge.png|''Hatsuharu'' attempts to dodge incoming shells from multiple enemy vessels. | File:HatsuharuDodge.png|''Hatsuharu'' attempts to dodge incoming shells from multiple enemy vessels. | |||
| ? | File:HatsuharuStrike.png|''Hatsuharu'' prepares to attack an enemy [[ | + | File:HatsuharuStrike.png|''Hatsuharu'' prepares to attack an enemy ''[[Gneisenau]]''. | |
| </gallery> | </gallery> | |||
| Line 109: | Line 120: | |||
| The weight of the hull could generally be reduced by using higher grades of steel that were lighter and smaller for the same strength, reducing dimensions, particularly length, or using advanced construction techniques like welding that saved weight over the conventional riveting. The Japanese used the same high tensile steel for the ''Hatsuharu'' class as they did for the older destroyers and chose not to increase the power of the turbines and boilers to achieve the desired high speed, but lengthened the hull to offset the reduced power of the light-weight machinery. The beam was increased to counter some of the extra top-weight, but the draft was reduced to reduce hull resistance, which also reduced stability by lessening the area of the hull beneath the waterline in comparison to the area above it, which was subject to pressure from the wind. Electric welding was extensively used to reduce weight although it was at an early stage of development in Japan and was still problematic. | The weight of the hull could generally be reduced by using higher grades of steel that were lighter and smaller for the same strength, reducing dimensions, particularly length, or using advanced construction techniques like welding that saved weight over the conventional riveting. The Japanese used the same high tensile steel for the ''Hatsuharu'' class as they did for the older destroyers and chose not to increase the power of the turbines and boilers to achieve the desired high speed, but lengthened the hull to offset the reduced power of the light-weight machinery. The beam was increased to counter some of the extra top-weight, but the draft was reduced to reduce hull resistance, which also reduced stability by lessening the area of the hull beneath the waterline in comparison to the area above it, which was subject to pressure from the wind. Electric welding was extensively used to reduce weight although it was at an early stage of development in Japan and was still problematic. | |||
| ? | Extensive weight-saving measures were used during the design and construction of the hull. More frames of lighter construction were spaced more closely together to reduce the thickness of the hull plating and the extensive use of welding (only the longitudinal strength members and a few other parts were riveted) were some of the techniques utilized to reduce hull weight by 66.5 tonnes (65.4 long tons; 73.3 short tons) in comparison to the ''Fubuki'' class. The ''Hatsuharu'' vessels were some 10 meters (32 ft 10 in) shorter than the ''Fubuki''-class vessels, but weighed 4.9 tonnes (4.8 long tons; 5.4 short tons) per 1 meter (3.3 ft) of hull length compared to the latter's 5.09 tonnes (5.01 long tons; 5.61 short tons) per 1 | + | Extensive weight-saving measures were used during the design and construction of the hull. More frames of lighter construction were spaced more closely together to reduce the thickness of the hull plating and the extensive use of welding (only the longitudinal strength members and a few other parts were riveted) were some of the techniques utilized to reduce hull weight by 66.5 tonnes (65.4 long tons; 73.3 short tons) in comparison to the ''Fubuki'' class. The ''Hatsuharu'' vessels were some 10 meters (32 ft 10 in) shorter than the ''Fubuki''-class vessels, but weighed 4.9 tonnes (4.8 long tons; 5.4 short tons) per 1 meter (3.3 ft) of hull length compared to the latter's 5.09 tonnes (5.01 long tons; 5.61 short tons) per 1 meter (3.3 ft). | |
| ? | The Hatsuharu-class ships were shorter than their predecessors, at 109. | + | The ''Hatsuharu''-class ships were shorter than their predecessors, at 109.5m (359 ft 3 in) overall. The ships had a beam of 10 metres and at full load a draft of 3.35 m (11 ft 0 in). Despite the emphasis on weight-saving during construction, the ships were significantly overweight as completed and displaced 1,530 metric tons (1,510 long tons) at standard load, and 1,981 metric tons (1,950 long tons) at full load, nearly 130 metric tons (100 long tons) more than planned. | |
| ? | The hull of the ''Hatsuharu''-class vessels retained the general configuration of the ''Fubuki''-class destroyers with a long forecastle and a pronounced flare of the forecastle to improve sea-keeping at high speeds by adding buoyancy and reducing the spray and water coming over the deck. A large bridge structure was located at the aft end of the forecastle deck topped by four fire control stations of various types. Lowest, just above the compass bridge, was the torpedo director (Hassha shikisho), with the gunnery fire direction station (Shageki shikisho) next above. The fire director tower (Hōiban shagekito) was third from the bottom and behind it was the | + | The hull of the ''Hatsuharu''-class vessels retained the general configuration of the ''Fubuki''-class destroyers with a long forecastle and a pronounced flare of the forecastle to improve sea-keeping at high speeds by adding buoyancy and reducing the spray and water coming over the deck. A large bridge structure was located at the aft end of the forecastle deck topped by four fire control stations of various types. Lowest, just above the compass bridge, was the torpedo director (Hassha shikisho), with the gunnery fire direction station (Shageki shikisho) next above. The fire director tower (Hōiban shagekito) was third from the bottom and behind it was the 3m (9 ft 10 in) rangefinder. Each of these was protected by 10mm (0.39 in) plates of Dücol steel against strafing and shell splinters. | |
| ? | For the first time in a Japanese destroyer a superfiring turret was fitted forward of the bridge. It was only a single gun Model A turret, to save weight high in the ship, and was mounted on a deckhouse to elevate it above the twin gun Model B Mod 2 (B-gata kai-2) turret mounted on the forecastle deck. The second twin gun turret was mounted at the rear of the ship on the main deck. These turrets were slightly heavier than the earlier Model A and Model B turrets fitted on the ''Fubuki''’s. All turrets were fitted with the | + | For the first time in a Japanese destroyer a superfiring turret was fitted forward of the bridge. It was only a single gun Model A turret, to save weight high in the ship, and was mounted on a deckhouse to elevate it above the twin gun Model B Mod 2 (B-gata kai-2) turret mounted on the forecastle deck. The second twin gun turret was mounted at the rear of the ship on the main deck. These turrets were slightly heavier than the earlier Model A and Model B turrets fitted on the ''Fubuki''’s. All turrets were fitted with the 127mm (5.0 in) Type 3 gun. | |
| ? | The uptakes of the two forward boiler rooms were trunked together aft of the break in the forecastle into the fore funnel while the rear boiler room exhausted into the smaller rear funnel. Both funnels were inclined to the rear to reduce the amount of smoke that might reach the bridge. A tripod mast was fitted between the bridge and the fore funnel. Between the two funnels was the forward 61 centimeters (24 in) triple torpedo tube mount fitted on a low platform. Behind it "was a torpedo locker with its mechanical quick reload system (Kiryoku sōtenshiki jihatsu sōten sochi) for the three reserve torpedoes inside." | + | The uptakes of the two forward boiler rooms were trunked together aft of the break in the forecastle into the fore funnel while the rear boiler room exhausted into the smaller rear funnel. Both funnels were inclined to the rear to reduce the amount of smoke that might reach the bridge. A tripod mast was fitted between the bridge and the fore funnel. Between the two funnels was the forward 61 centimeters (24 in) triple torpedo tube mount fitted on a low platform. Behind it "was a torpedo locker with its mechanical quick reload system (Kiryoku sōtenshiki jihatsu sōten sochi) for the three reserve torpedoes inside." To preserve lateral stability the aft funnel was offset to starboard while the torpedo mount was offset to port. The reload locker was also offset slightly to port and angled inboard to facilitate reloading. The middle torpedo mount was positioned behind the aft funnel on the center line, but its reload locker was positioned identically to that of the forward mount. Superimposed to starboard and overlapping the middle mount was the rear triple torpedo mount positioned on the rear deckhouse. Immediately behind the mount was its locker positioned on the center line, but angled slightly to the right so that its mount only had to traverse slightly to align with the locker and begin reloading. This was the first ship in history to be fitted with superimposed torpedo tubes, made necessary by the designer's insistence on fitting nine torpedo tubes despite the Navy's requirement for only six. | |
| ? | A small platform that carried a | + | A small platform that carried a 2m (6 ft 7 in) rangefinder was mounted above the rear torpedo locker and a 90cm (2 ft 11 in) searchlight was mounted on a tower behind the rear funnel. The two license-built Vickers 40mm (1.6 in) (pom pom) anti-aircraft guns were mounted on an elevated platform at the front of the rear funnel. Curiously they were another case where the designer exceeded the requirements laid down by the Navy. | |
| ====Service==== | ====Service==== | |||
| Line 136: | Line 147: | |||
| |HistoricalGallery=<!-- write below list of files without tags. description (if necessary) for each should be separated with | --><gallery> | |HistoricalGallery=<!-- write below list of files without tags. description (if necessary) for each should be separated with | --><gallery> | |||
| ? | File:Hatsuharu (1932).jpg | + | File:Hatsuharu (1932).jpg|''Hatsuharu'' underway, circa 1932. | |
| ? | + | File:IJN_Hatsuharu_(1).jpg|''Hatsuharu'' at anchor off Sasebo, November 1933. | ||
| + | File:IJN_Hatsuharu_(3).jpg|''Hatsuharu'' undergoing sea trials at Cape Sata, July 1934. | |||
| + | File:1920px-Yugure_II.jpg|''Yugure'' at anchor, October 1935. | |||
| + | File:Wakaba_II.jpg|''Wakaba'' at anchor, 21 October 1937. | |||
| + | File:IJN_Hatsuharu_(2).jpg|''Hatsushimo'' at anchor in Qingdao, China, 28 March 1939. | |||
| + | File:Ariake_1943-07-28.jpg|''Ariake'' under attack by B-25 bombers near Tuluvu, New Britain, 28 July 1943. | |||
| + | File:Ijn-destroyer-hatsuharu-00591.jpg|US Office of Naval Intelligence recognition drawing of ''Hatsuharu''. | |||
| </gallery> | </gallery> | |||
| Line 143: | Line 160: | |||
| |Ref= <!-- write below --> | |Ref= <!-- write below --> | |||
| ? | ||||
| }}<!-- DO NOT DELETE THIS LINE. DO NOT INSERT ANYTHING BELOW THIS LINE --> | }}<!-- DO NOT DELETE THIS LINE. DO NOT INSERT ANYTHING BELOW THIS LINE --> | |||
Revision as of 06:29, 5 December 2016

| Research price34000 exp |
| Purchase price2,950,000 |
| Hit Points10,500 |
| 127 mm/50 3rd Year Type on a Type B mount2 х 2 pcs. |
| Rate of Fire8 shots/min. |
| Reload Time7.5 sec. |
| Rotation Speed7 deg./sec. |
| 180 Degree Turn Time25.71 sec. |
| Firing Range9.85 km. |
| Maximum Dispersion88 m. |
| HE Shell127 mm HE Type1 |
| Maximum HE Shell Damage2,150 |
| Chance of Fire on Target Caused by HE Shell9 % |
| Initial HE Shell Velocity915 m./s. |
| HE Shell Weight23 kg. |
| AP Shell127 mm AP Type0 |
| Maximum AP Shell Damage2,200 |
| Initial AP Shell Velocity915 m./s. |
| AP Shell Weight23 kg. |
| 610 mm Triple2 х 3 pcs. |
| Rate of Fire0.82 shots/min. |
| Reload Time73 sec. |
| Rotation Speed25 deg./sec. |
| 180 Degree Turn Time7.2 sec. |
| TorpedoType8 |
| Maximum Damage14,600 |
| Torpedo Speed63 knot |
| Torpedo Range6 km. |
| 127 mm/50 3rd Year Type on a Type B mount2 х 2 pcs. |
| . . . Average Damage per Second20.2 |
| . . . Firing Range5.01 km. |
| 25 mm/60 Type 96 on a twin mount4 х 2 pcs. |
| . . . Average Damage per Second10.8 |
| . . . Firing Range2.49 km. |
| Maximum Speed36.5 knot |
| Turning Circle Radius580 m. |
| Rudder Shift Time3.4 sec. |
| Surface Detectability Range6.46 km. |
| Air Detectability Range2.81 km. |

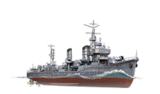
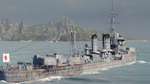
Hatsuharu — Japanese Tier VI destroyer.
Hatsuharu was a high performance ship despite displacement limitations imposed by the London Naval Treaty of 1930. The ship boasted a comparatively good AA defense. The powerful main battery guns were placed in enclosed turret mounts and could deliver anti-aircraft fire.
Modules
 |
Rate of Fire (shots/min) | 180° Turn Time (sec) | Maximum Dispersion (m) | Maximum HE Shell Damage (HP) | Chance of Fire on Target Caused by HE Shell (%) | Maximum AP Shell Damage (HP) |
Research price (exp) |
Purchase price ( | |
|---|---|---|---|---|---|---|---|---|---|
| 127 mm/50 3rd Year Type on a Type B mount | 8 | 25.7 | 88 | 2,150 | 9 | 2,200 | 0 | 190,000 |
 |
Hit Points (HP) | Armor (mm) | Armor (mm) | Main Turrets (pcs.) | Secondary Gun Turrets (pcs.) | AA Mounts (pcs.) | Torpedo Tubes (pcs.) | Hangar Capacity (pcs.) |
Research price (exp) |
Purchase price ( | |
|---|---|---|---|---|---|---|---|---|---|---|---|
| Hatsuharu (A) | 10,500 | 6 | 20 | 2 | 4/2 | 2 | 0 | 245,000 | |||
| Hatsuharu (B) | 11,700 | 6 | 20 | 2 | 14/1/3/2 | 2 | 10,000 | 1,000,000 |
 |
Rate of Fire (shots/min) | Torpedo Tubes Reload Time (sec) | 180° Turn Time (sec) | Maximum Damage (HP) | Torpedo Speed (knot) | Torpedo Range (km) |
Research price (exp) |
Purchase price ( | |
|---|---|---|---|---|---|---|---|---|---|
| Type8 mod. 1 | 0.8 | 73 | 7.2 | 14,600 | 63 | 6 | 0 | 180,000 | |
| Type8 mod. 2 | 0.8 | 76 | 7.2 | 16,266 | 59 | 10 | 4,000 | 400,000 |
 |
IDS_SHIP_PARAM_SUO_INCREASE_DIST (%) | Maximum Firing Range (km) |
Research price (exp) |
Purchase price ( | |
|---|---|---|---|---|---|
| Type6 mod. 1 | 0 | 0 | 105,000 | ||
| Type6 mod. 2 | 0 | 3,200 | 220,000 |
 |
Maximum Speed (knot) |
Research price (exp) |
Purchase price ( | |
|---|---|---|---|---|
| Propulsion: 42,000 hp | 36.5 | 0 | 110,000 |
Compatible Upgrades
| Slot 1 |
|||||
|---|---|---|---|---|---|
| Slot 2 |
|||||
| Slot 3 |
|||||
| Slot 4 |
Player Opinion
Performance
As a part of the Japanese destroyer line re-organization and expansion in Update 0.5.15, Hatsuharu falls one tier to her new home at Tier VI. There have been a few minor tweaks to Hatsuharu with the change, but she is largely the same. As before, upgrading to Hull (B) increases her health and anti-aircraft battery, but costs her one of her main battery guns. She retains the same twin triple-tube launchers she had previously. Her detection radius remains 6.7 km, while she loses minor amounts of speed and maneuverability from her previous incarnation. Captains who believed that Hatsuharu was under-gunned in her previous slot at Tier VII will likely be more comfortable with her armament one tier lower.
On the other hand, new Japanese destroyer captains who are moving up to Hatsuharu from Minekaze will find their new acquisition to be something a mixed bag: her guns are a significant upgrade from those of Minekaze, while it can be argued that her torpedo armament is a downgrade. Not only is she less flexible with only two torpedo launchers, the reload time is very nearly double that of Minekaze; in exchange, Hatsuharu’s torpedoes can eventually be upgraded to longer-ranged with a bigger punch. Further complicating things is the fact that her torpedo upgrade is locked behind Hull (B), meaning captains must invest experience in the hull upgrade first before having the ability to upgrade her torpedoes.
Without her improved torpedoes, Hatsuharu is stuck with fish that have a paltry 6.0 km range. This forces Hatsuharu into more of a mid-tier American destroyer play style, requiring captains to utilize islands and smoke effectively to land successful torpedo strikes against enemy capital ships. Hatsuharu plays like a completely different ship once she has her upgraded torpedoes, however. The 10.0 km range of her Type 8 mod. 2 torpedoes is more than workable, and her guns can add notable contributions to her damage when used judiciously in the right situations.
Hatsuharu comes off as the inferior destroyer when compared side-by-side with Fubuki, but things flip back the other way one tier up when the same comparison is made between the successors of both ships (Akatsuki and Shiratsuyu). Captains frustrated with Hatsuharu should remember that she is merely a stepping-stone to better things beyond.Pros:
- Improved guns gain significantly increased fate of fire, range, and shell arcs.
- Lowest detection range of Tier VI destroyers.
- Decent torpedo speed makes her torpedoes harder to dodge.
- Generous torpedo launch arcs.
Cons:
Research
Optimal Configuration
Upgrades
Mid-tier destroyers like Hatsuharu don't have many outstanding options for upgrades. Main Armaments Modification 1 is the best pick for Upgrade Slot 1, while Propulsion Modification 1 is recommended in Upgrade Slot 4. Propulsion Modification 2 is the best pick of a sorry lot for Upgrade Slot 5. Upgrade Slot 2 offers either Aiming Systems Modification 1 or Main Battery Modification 2; either provides a minor boost to Hatsuharu’s main battery.
Commander Skills
Tier 1's Basic Firing Training and Tier 5's Concealment Expert are easy choices for Hatsuharu commander skills. The tiers in between offer an array of options.
Tier 2 brings a pair of outstanding choices in Torpedo Armament Expertise and Last Stand. The former is best for more offensive-minded captains looking to maximize their damage output; the latter is recommended for captains with longevity in mind. Expert Marksman is also a decent place to invest skill points later on after taking Concealment Expert. Superintendent is the best of the lot at Tier 3. Vigilance is a good skill for players wanting to provide additional help screening teammates from torpedoes, while High Alert is another possible option for captains who anticipate finding themselves under fire frequently.
While there are no stand-out skills at Tier 4, it contains two moderately decent options: Survivability Expert and Advanced Firing Training. The first or last are good options for captains seeking a general skill that will help them in almost any game: Survivability Expert for those focused on staying alive, Advanced Firing Training for the more offensive-minded looking to get the most out of Hatsuharu’s guns.
| Recommended Commander Skills | ||||||||
|---|---|---|---|---|---|---|---|---|
| Cost (points) |
Endurance | Attack | Support | Versatility | ||||
| 1 |
|
★★ |
|
|
|
|
|
|
| 2 |
★★ |
★★ |
★★ |
★ |
|
|
|
★★★ |
| 3 |
★ |
★★ |
★★★ |
|
★★★ |
★★★ |
★ |
★★ |
| 4 |
|
|
|
|
★★ |
|
|
★★★ |
| Key: ★★★ - Extremely Useful ★★ - Frequently Useful ★ - Occasionally Useful No stars - Meh Χ - Not recommended | ||||||||
Consumables
All destroyers should invest credits (or doubloons) in Damage Control Party II. Engine Boost II probably isn't worth it — Hatsuharu’s speed isn't amazing, but it's not awful either — while Smoke Generator II likely is, especially if her commander does not have the Concealment Expert skill.
Camouflage
Type 1, 2, or 5 camouflage can be equipped for credits; Types 1 or 5 are recommended at a minimum to reduce detectibility range.
Players who wish to spend doubloons can equip Hatsuharu with Type 16 camouflage that lowers her detection radius, reduces the accuracy of incoming shells, and increases the amount of experience she earns.Gallery
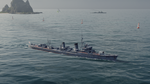
Hatsuharu scouts ahead for her team.
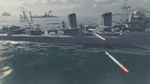
Hatsuharu launches her torpedoes at the enemies entering the capture point.
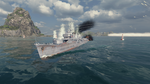
Hatsuharu attempts to dodge incoming shells from multiple enemy vessels.
Hatsuharu prepares to attack an enemy Gneisenau.


Historical Info
Historical Gallery
.jpg)
.jpg)
.jpg)


.jpg)


| Destroyers | II Tachibana |
| Cruisers | I Hashidate • II Chikuma • III Tenryū • III Katori |
| Battleships | II Mikasa |
| Aircraft Carriers | IV [[Ship:Hōshō (< 23.01.2019)|Hōshō (< 23.01.2019)]] • IV Hōshō • V [[Ship:Zuihō (< 23.01.2019)|Zuihō (< 23.01.2019)]] • VI [[Ship:Ryūjō (< 23.01.2019)|Ryūjō (< 23.01.2019)]] • VI Ryūjō • VII [[Ship:Hiryū (< 23.01.2019)|Hiryū (< 23.01.2019)]] • VII [[Ship:Kaga (< 23.01.2019)|Kaga (< 23.01.2019)]] • VIII [[Ship:Shōkaku (< 23.01.2019)|Shōkaku (< 23.01.2019)]] • VIII Shōkaku • VIII Kaga |
| Netherlands | IX Groningen |
| U.S.A. | II Sampson • II Smith |
| Commonwealth | III Vampire |
| Europe | II Tátra • III Romulus • IV Klas Horn • V Visby • V Muavenet • V Kalmar |
| Germany | II V-25 • III G-101 • IV V-170 • V T-22 • VI Ernst Gaede • VI T-61 |
| U.S.S.R. | II Storozhevoi • III Derzki • IV Izyaslav • V Gremyashchy |
| Italy | II Curtatone • III Nazario Sauro • IV Turbine • V Maestrale • VI Aviere • VI Leone |
| Pan-America | VI Juruá |
| Japan | II Tachibana |
| U.K. | II Medea • III Valkyrie • III Campbeltown |
| France | II Enseigne Gabolde • III Fusilier • IV Bourrasque • V L'Adroit • V Jaguar • V Siroco |
| Pan-Asia | II Longjiang • III Phra Ruang • IV Shenyang • V Jianwei • VI Fushun • VI Anshan |
| Spain | X Álvaro de Bazán |