Sampson
| Revision as of 16:47, 23 January 2017 | Revision as of 09:18, 18 July 2019 Fixed skill names | |||
6 intermediate revisions by one other user not shown | ||||
| Line 3: | Line 3: | |||
| |Anno=<!-- you can write below short description for the ship. it will replace default once. --> | |Anno=<!-- you can write below short description for the ship. it will replace default once. --> | |||
| + | One of the "thousand tonner" destroyers in the U.S. Navy. The ship carried very powerful armament for her type, but her speed was rather moderate. Due to impractical arrangement of the torpedo tubes, only half of them could be fired simultaneously during a broadside salvo.<br><br>{{Model3DViewer|287c7318e3f54d6f9f5b92767b0d6bc8}} | |||
| |Performance=<!-- write text about performance in battles below --> | |Performance=<!-- write text about performance in battles below --> | |||
| Line 24: | Line 25: | |||
| |Research=<!-- write text about priority sequence of research below --> | |Research=<!-- write text about priority sequence of research below --> | |||
| + | Availability of researchable upgrades for ''{{#var:ship_name}}'' is as follows: | |||
| + | * '''Hull:''' Upgrade to Hull (B) for a touch more health, improved rudder shift speed, and an extra AA gun. Research of this module unlocks progression to ''[[Wickes]]''. | |||
| + | * '''Torpedoes:''' The upgraded torpedoes move notably quicker, as well as hitting a little harder. Their range does not improve. Hull (B) must be researched in order to research this module. | |||
| + | * '''Gun Fire Control System:''' Upgrade to Mk3 mod. 2 for an extra 10% range on the main battery. | |||
| + | ||||
| Hull (B) is the best place to invest early experience gains in ''Sampson''; the extra hit points aren't much, but every little bit helps. Which module upgrade is taken next is up to individual captains. The Torpedo module upgrade doesn't look like much, but a 10% improvement in speed makes her torpedoes much harder to dodge. | Hull (B) is the best place to invest early experience gains in ''Sampson''; the extra hit points aren't much, but every little bit helps. Which module upgrade is taken next is up to individual captains. The Torpedo module upgrade doesn't look like much, but a 10% improvement in speed makes her torpedoes much harder to dodge. | |||
| Line 29: | Line 35: | |||
| |Upgrades=<!-- write text about best upgrades below --> | |Upgrades=<!-- write text about best upgrades below --> | |||
| ? | + | The recommended upgrades for ''{{#var:ship_name}}'' are as follows: | ||
| + | * '''Slot 1''': {{Main Armaments Modification 1}} | |||
| + | ||||
| + | Captains who are concerned about possible detonations are encouraged to equip {{Magazine Modification 1}} instead. | |||
| |CommanderSkills=<!-- write text about best set of Commander Skills below --> | |CommanderSkills=<!-- write text about best set of Commander Skills below --> | |||
| Line 38: | Line 47: | |||
| | Preventative Maintenance = 3 | | Preventative Maintenance = 3 | |||
| | Expert Loader = 1 | | Expert Loader = 1 | |||
| ? | | | + | | Air Supremacy = | |
| ? | | Direction Center for | + | | Direction Center for Fighters = | |
| ? | | | + | | Improved Engine Boost = | |
| | Incoming Fire Alert = | | Incoming Fire Alert = | |||
| ? | | | + | | Last Gasp = | |
| ? | | High Alert = | + | | High Alert = 2 | |
| | Jack of All Trades = | | Jack of All Trades = | |||
| | Expert Marksman = 2 | | Expert Marksman = 2 | |||
| | Torpedo Acceleration = | | Torpedo Acceleration = | |||
| | Smoke Screen Expert = 1 | | Smoke Screen Expert = 1 | |||
| ? | | | + | | Improved Engines = | |
| | Adrenaline Rush = 2 | | Adrenaline Rush = 2 | |||
| | Last Stand = 3 | | Last Stand = 3 | |||
| ? | ||||
| | Basics of Survivability = 1 | | Basics of Survivability = 1 | |||
| + | | Survivability Expert = 1 | |||
| | Torpedo Armament Expertise = | | Torpedo Armament Expertise = | |||
| ? | | | + | | Aircraft Armor = | |
| | Basic Firing Training = 3 | | Basic Firing Training = 3 | |||
| | Superintendent = 2 | | Superintendent = 2 | |||
| ? | | Demolition Expert = | + | | Demolition Expert = 2 | |
| | Vigilance = 1 | | Vigilance = 1 | |||
| | Manual Fire Control for Secondary Armament = | | Manual Fire Control for Secondary Armament = | |||
| | Fire Prevention = | | Fire Prevention = | |||
| ? | | Inertia Fuse for HE Shells = | + | | Inertia Fuse for HE Shells = 1 | |
| ? | | | + | | Sight Stabilization = | |
| | Advanced Firing Training = 1 | | Advanced Firing Training = 1 | |||
| | Manual Fire Control for AA Armament = | | Manual Fire Control for AA Armament = | |||
| Line 73: | Line 82: | |||
| |Consumables=<!-- write text about selection of Consumables below --> | |Consumables=<!-- write text about selection of Consumables below --> | |||
| ? | '' | + | ''{{#var:ship_name}}'' can equip the following consumables: | |
| + | * '''Slot 1:''' {{Damage Control Party}} | |||
| + | * '''Slot 2:''' {{Smoke Generator}} | |||
| + | * '''Slot 3:''' {{Engine Boost}} | |||
| + | ||||
| + | Investing in {{Damage Control Party II}} and {{Smoke Generator II}} is recommended, but spending the credits (or doubloons) on the premium version of {{Engine Boost}} isn't really necessary. | |||
| |Camouflage=<!-- write text about useful camouflage below --> | |Camouflage=<!-- write text about useful camouflage below --> | |||
| Line 79: | Line 93: | |||
| |Signals=<!-- write text about best set of signals below --> | |Signals=<!-- write text about best set of signals below --> | |||
| + | {{Signal Flags | |||
| + | | November Echo Setteseven = | |||
| + | | Mike Yankee Soxisix = | |||
| + | | India X-Ray = 2 | |||
| + | | Juliet Whiskey Unaone = 2 | |||
| + | | Victor Lima = 2 | |||
| + | | Hotel Yankee = 1 | |||
| + | | November Foxtrot = 1 | |||
| + | | Sierra Mike = 3 | |||
| + | | India Delta = | |||
| + | | Juliet Yankee Bissotwo = | |||
| + | | India Yankee = | |||
| + | | Juliet Charlie = 2 | |||
| ? | | | + | | Zulu = 1 | |
| + | | India Bravo Terrathree = | |||
| + | | Equal Speed Charlie London = 3 | |||
| + | | Zulu Hotel = 1 | |||
| + | | Papa Papa = | |||
| + | | Wyvern = | |||
| + | | Red Dragon = | |||
| + | | Dragon Flag = 1 | |||
| + | | Ouroboros = | |||
| + | | Hydra = | |||
| + | }} | |||
| + | ||||
| + | ||||
| + | |Gallery=<!-- write below list of files without tags. description (if necessary) for each should be separated with |} --><gallery> | |||
| </gallery> | </gallery> | |||
| Line 116: | Line 156: | |||
| |HistoricalGallery=<!-- write below list of files without tags. description (if necessary) for each should be separated with | --><gallery> | |HistoricalGallery=<!-- write below list of files without tags. description (if necessary) for each should be separated with | --><gallery> | |||
| ? | File:USS_Sampson_sl.jpg|Launching of USS ''Sampson'' at Quincy, Massachusetts, 4 March 1916. | + | File:USS_Sampson_sl.jpg|Launching of USS ''Sampson'' (DD-63) at Quincy, Massachusetts, 4 March 1916. | |
| ? | File:Rowan_running_trials_-_22JUL1916.jpg|USS ''Rowan'' running trials, 22 July 1916. Note the ship's very dirty paintwork and incomplete condition, with weights installed in place of her guns. | + | File:Rowan_running_trials_-_22JUL1916.jpg|USS ''Rowan'' (DD-64) running trials, 22 July 1916. Note the ship's very dirty paintwork and incomplete condition, with weights installed in place of her guns. | |
| ? | File:USS_Shaw_Build_2.jpg|Launching of USS ''Shaw'' at Mare Island, California, 9 December 1916. | + | File:USS_Shaw_Build_2.jpg|Launching of USS ''Shaw'' (DD-68) at Mare Island, California, 9 December 1916. | |
| ? | File:USS_Davis_Hampton_Roads.jpg|USS ''Davis'' anchored off of Hampton Roads, Virginia, 10 December 1916. | + | File:USS_Davis_Hampton_Roads.jpg|USS ''Davis'' (DD-65) anchored off of Hampton Roads, Virginia, 10 December 1916. | |
| File:USS_Sampson_anchor.jpg|''Sampson'' anchored off of Hampton Roads, Virginia, 13 December 1916. | File:USS_Sampson_anchor.jpg|''Sampson'' anchored off of Hampton Roads, Virginia, 13 December 1916. | |||
| ? | File:Uss_Sampson_class_destroyer.png|USS ''Allen'' anchored at Queenstown, Ireland, circa 1918. | + | File:Uss_Sampson_class_destroyer.png|USS ''Allen'' (DD-66) anchored at Queenstown, Ireland, circa 1918. | |
| File:USS_Shaw_Aquitania_3.jpg|Damage to ''Shaw'' after her collision with RMS ''Aquitania'' on 9 October 1918. | File:USS_Shaw_Aquitania_3.jpg|Damage to ''Shaw'' after her collision with RMS ''Aquitania'' on 9 October 1918. | |||
| ? | File:USS_Wilkes_1916.jpg|USS ''Wilkes'' on patrol during the Prohibition Era, undated. | + | File:USS_Wilkes_1916.jpg|USS ''Wilkes'' (DD-67) on patrol during the Prohibition Era, undated. | |
| File:USS_Davis_Coast_Guard_3.jpg|''Davis'' in Boston Harbor on 20 February 1932, during her years of service with the US Coast Guard. | File:USS_Davis_Coast_Guard_3.jpg|''Davis'' in Boston Harbor on 20 February 1932, during her years of service with the US Coast Guard. | |||
| File:USS_Allen_Perl_Harbor_2.jpg|''Allen'' underway off Pearl Harbor, Oahu, Hawaii, 17 December 1942. She was the only flush-deck destroyer to serve in World War II. | File:USS_Allen_Perl_Harbor_2.jpg|''Allen'' underway off Pearl Harbor, Oahu, Hawaii, 17 December 1942. She was the only flush-deck destroyer to serve in World War II. | |||
Revision as of 09:18, 18 July 2019

| Research price720 exp |
| Purchase price60,000 |
| Hit Points8,500 |
| 102 mm/50 Mk.9 on a single mount4 х 1 pcs. |
| Rate of Fire8.57 shots/min. |
| Reload Time7 sec. |
| Rotation Speed11.5 deg./sec. |
| 180 Degree Turn Time15.65 sec. |
| Firing Range7.78 km. |
| Maximum Dispersion73 m. |
| HE Shell102 mm HE/HC Mk15 |
| Maximum HE Shell Damage1,500 |
| Chance of Fire on Target Caused by HE Shell6 % |
| Initial HE Shell Velocity884 m./s. |
| HE Shell Weight14.97 kg. |
| AP Shell102 mm AP/SC Mk16 |
| Maximum AP Shell Damage1,700 |
| Initial AP Shell Velocity884 m./s. |
| AP Shell Weight14.97 kg. |
| 533 mm Twin4 х 2 pcs. |
| Rate of Fire2.73 shots/min. |
| Reload Time22 sec. |
| Rotation Speed25 deg./sec. |
| 180 Degree Turn Time7.2 sec. |
| TorpedoBliss Leavitt Mk2 |
| Maximum Damage5,900 |
| Torpedo Speed49 knot |
| Torpedo Range5.001 km. |
| 12.7 mm Browning on a single mount2 х 1 pcs. |
| . . . Average Damage per Second7.6 |
| . . . Firing Range1.2 km. |
| Maximum Speed29.5 knot |
| Turning Circle Radius520 m. |
| Rudder Shift Time4 sec. |
| Surface Detectability Range5.76 km. |
| Air Detectability Range2.38 km. |

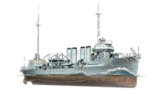
Sampson — American Tier II destroyer.
One of the "thousand tonner" destroyers in the U.S. Navy. The ship carried very powerful armament for her type, but her speed was rather moderate. Due to impractical arrangement of the torpedo tubes, only half of them could be fired simultaneously during a broadside salvo.
Modules
 |
Rate of Fire (shots/min) | 180° Turn Time (sec) | Maximum Dispersion (m) | Maximum HE Shell Damage (HP) | Chance of Fire on Target Caused by HE Shell (%) | Maximum AP Shell Damage (HP) |
Research price (exp) |
Purchase price ( | |
|---|---|---|---|---|---|---|---|---|---|
| 102 mm/50 Mk.9 on a single mount | 8.6 | 15.7 | 73 | 1,500 | 6 | 1,700 | 0 | 7,500 |
 |
Hit Points (HP) | Armor (mm) | Armor (mm) | Main Turrets (pcs.) | Secondary Gun Turrets (pcs.) | AA Mounts (pcs.) | Torpedo Tubes (pcs.) | Hangar Capacity (pcs.) |
Research price (exp) |
Purchase price ( | |
|---|---|---|---|---|---|---|---|---|---|---|---|
| Sampson (A) | 8,500 | 6 | 13 | 4 | 2 | 4 | 0 | 10,000 | |||
| Sampson (B) | 9,100 | 6 | 13 | 4 | 2 | 4 | 250 | 28,000 |
 |
Rate of Fire (shots/min) | Torpedo Tubes Reload Time (sec) | 180° Turn Time (sec) | Maximum Damage (HP) | Torpedo Speed (knot) | Torpedo Range (km) |
Research price (exp) |
Purchase price ( | |
|---|---|---|---|---|---|---|---|---|---|
| Whitehead Mk5 | 2.7 | 22 | 7.2 | 5,900 | 49 | 5 | 0 | 9,500 | |
| Bliss Leavitt Mk7 | 2.6 | 23 | 7.2 | 6,033 | 54 | 5 | 200 | 24,000 |
 |
IDS_SHIP_PARAM_SUO_INCREASE_DIST (%) | Maximum Firing Range (km) |
Research price (exp) |
Purchase price ( | |
|---|---|---|---|---|---|
| Mk3 mod. 1 | 0 | 0 | 4,500 | ||
| Mk III mod. 2 | 0 | 130 | 16,000 |
 |
Maximum Speed (knot) |
Research price (exp) |
Purchase price ( | |
|---|---|---|---|---|
| Propulsion: 18,000 hp | 29.5 | 0 | 5,000 |
Compatible Upgrades
| Slot 1 |
|---|
Player Opinion
Performance
Budding American destroyer captains start their journey here with Tier II's Sampson. Sampson has a lot in common with her Japanese counterpart, Umikaze: both are hard to detect; both have torpedo reload speeds that allow them to put seemingly endless amounts of torpedoes in the water; both are fairly maneuverable and devilishly hard to hit.
They're far from identical, however. Sampson’s main battery is more usable than Umikaze’s in that the guns traverse and reload faster, though Umikaze’s shells hit harder. V-25 remains the best gunboat destroyer at Tier II thanks to her rate of fire, but Sampson’s guns do well enough for what they are.
It's her "other" main battery weapon that that terrifies low-tier battleships: wave after wave of torpedoes. Sampson’s fish are faster than those of Umikaze, and they come just as relentlessly, like clockwork, every 22-23 seconds. They have pretty short legs for torpedoes — only 4.5 km — but that's a handicap that American destroyer captains are advised to get used to early; they won't start seeing torpedoes capable of hitting targets at medium range until Mahan at Tier VII. The extremely short range will require Sampson captains to use islands as cover to approach their targets, or to make near-suicidal head-on charges against ships with far more health and bigger guns. In that sense, Sampson is a perfect introduction to the flavor of the line, though the guns do steadily improve over the next few tiers.Pros:
- Excellent concealment allows her work in very close to targets before launching torpedoes.
- Highly maneuverable.
- Low, flush-deck profile makes her a difficult target.
- Torpedoes reload amazingly fast.
Cons:
- Very little armor.
- Anti-aircraft suite is essentially useless; luckily, she shouldn't see aircraft carriers.
- Sheds a lot of speed while maneuvering.
- Main battery reload time is painfully slow.
Research
Availability of researchable upgrades for Sampson is as follows:
- Hull: Upgrade to Hull (B) for a touch more health, improved rudder shift speed, and an extra AA gun. Research of this module unlocks progression to Wickes.
- Torpedoes: The upgraded torpedoes move notably quicker, as well as hitting a little harder. Their range does not improve. Hull (B) must be researched in order to research this module.
- Gun Fire Control System: Upgrade to Mk3 mod. 2 for an extra 10% range on the main battery.
Optimal Configuration
Upgrades
The recommended upgrades for Sampson are as follows:
- Slot 1: Main Armaments Modification 1

Captains who are concerned about possible detonations are encouraged to equip Magazine Modification 1 ![]() instead.
instead.
Commander Skills
Preventative Maintenance is the best pick out of the Level 1 skills, to reduce the chances of having her engine knocked out by enemy gunfire. Level 2 offers Last Stand for those times when her engine goes out anyway. Basic Firing Training is probably the best of the lot at Level 3, though Superintendent isn't a bad pick either. Level 4's Concealment Expert makes her even harder to detect and is highly recommended.
| Recommended Commander Skills | ||||||||
|---|---|---|---|---|---|---|---|---|
| Cost (points) |
Endurance | Attack | Support | Versatility | ||||
| 1 |
★ |
★★★ |
★ |
|
|
|
|
|
| 2 |
★★ |
|
★★ |
|
★ |
|
★★ |
★★★ |
| 3 |
★ |
★ |
|
|
★★★ |
★★ |
★★ |
★ |
| 4 |
|
|
★ |
|
★ |
|
|
★★★ |
| Key: ★★★ - Extremely Useful ★★ - Frequently Useful ★ - Occasionally Useful No stars - Meh Χ - Not recommended | ||||||||
Consumables
Sampson can equip the following consumables:
- Slot 1: Damage Control Party

- Slot 2: Smoke Generator

- Slot 3: Engine Boost

Investing in Damage Control Party II (![]() ) and Smoke Generator II (
) and Smoke Generator II (![]() ) is recommended, but spending the credits (or doubloons) on the premium version of Engine Boost
) is recommended, but spending the credits (or doubloons) on the premium version of Engine Boost ![]() isn't really necessary.
isn't really necessary.
Camouflage
Type 1, 2, or 5 camouflage can be equipped for credits; Types 1 or 5 are recommended at a minimum to reduce detectibility range.
Signals
Recommended Signal Flags 
| |||||
|---|---|---|---|---|---|
| Combat | |||||
 ★★ |

|

|
 ★ |
 ★★ |
 ★★ |
 ★★ |

|

|
 ★★★ |
 ★ |

|

|

| ||||
Note: Use of the Juliet Charlie signal makes detonation impossible.
Gallery
Historical Info
Historical Gallery


