Phoenix
| Revision as of 20:13, 3 September 2016 Added research sequence and updated pros & cons section | Revision as of 01:03, 14 November 2016 Switched research & pros & cons sections in structure; added commander skills | |||
| Line 6: | Line 6: | |||
| |Performance=<!-- write text about performance in battles below --> | |Performance=<!-- write text about performance in battles below --> | |||
| ? | ||||
| ? | ||||
| |Pros=<!-- write list of positive points below. use * as in ordinary wiki-list. --> | |Pros=<!-- write list of positive points below. use * as in ordinary wiki-list. --> | |||
| * Very good maneuverability | * Very good maneuverability | |||
| Line 21: | Line 19: | |||
| * Poor surface detection | * Poor surface detection | |||
| * Underwhelming AA firepower | * Underwhelming AA firepower | |||
| + | ||||
| + | |Research=<!-- write text about priority sequence of research below --> | |||
| + | Quickly research to the B hull and 152mm/53 Mk14 guns, as the ship pathetically has only 3 guns per side to shoot with stock and has abysmal rate of fire for a stock cruiser. Then research the C hull and finally the Gun Fire Control System upgrade. The range is upgraded last because it's already decent and has the best range of all the tier 4 cruisers, even when stock. | |||
| + | ||||
| + | |OptimalConfiguration=<!-- write some general text about selection of optimal configuration below (optional)--> | |||
| + | ||||
| + | |Upgrades=<!-- write text about best upgrades below --> | |||
| + | ||||
| + | |CommanderSkills=<!-- write text about best set of Commander Skills below --> | |||
| + | {{Commander Skills | |||
| + | | Expert Loader=1 | |||
| + | | Basic Firing Training=2 | |||
| + | | Basics of Survivability=2 | |||
| + | | Expert Rear Gunner= | |||
| + | ||||
| + | | Expert Marksman=3 | |||
| + | | Torpedo Armament Expertise=1 | |||
| + | | Fire Prevention=2 | |||
| + | | Incoming Fire Alert=2 | |||
| + | | Last Stand=3 | |||
| + | ||||
| + | | Torpedo Acceleration= | |||
| + | | High Alert=2 | |||
| + | | Vigilance=3 | |||
| + | | Dogfighting Expert = | |||
| + | | Superintendent=2 | |||
| + | ||||
| + | | Demolition Expert=3 | |||
| + | | Advanced Firing Training=2 | |||
| + | | Survivability Expert=1 | |||
| + | | Aircraft Servicing Expert= | |||
| + | | Manual Fire Control for AA Armament= | |||
| + | ||||
| + | | Last Chance=1 | |||
| + | | Manual Fire Control for Secondary Armament=1 | |||
| + | | Preventative Maintenance=2 | |||
| + | | Concealment Expert=3 | |||
| + | | Air Supremacy= | |||
| + | | Jack of All Trades=2 | |||
| + | }} | |||
| + | ||||
| + | |Consumables=<!-- write text about selection of Consumables below --> | |||
| + | ||||
| + | |Camouflage=<!-- write text about useful camouflage below --> | |||
| + | ||||
| + | |Signals=<!-- write text about best set of signals below --> | |||
| |Gallery=<!-- write below list of files without tags. description (if necessary) for each should be separated with template {{!}} --><gallery> | |Gallery=<!-- write below list of files without tags. description (if necessary) for each should be separated with template {{!}} --><gallery> | |||
Revision as of 01:03, 14 November 2016
Phoenix

Tech Tree Position
stock
top
General
| Research price5600 exp |
| Purchase price660,000 |
| Hit Points21,300 |
Main Battery
| 152 mm/50 Mk.8 on a Mk.10 mount6 х 1 pcs. |
| Rate of Fire6 shots/min. |
| Reload Time10 sec. |
| Rotation Speed11 deg./sec. |
| 180 Degree Turn Time16.36 sec. |
| Firing Range13.88 km. |
| Maximum Dispersion128 m. |
| HE Shell152 mm HE 105 lb |
| Maximum HE Shell Damage2,100 |
| Chance of Fire on Target Caused by HE Shell7 % |
| Initial HE Shell Velocity853 m./s. |
| HE Shell Weight47.7 kg. |
| AP Shell152 mm AP 105 lb |
| Maximum AP Shell Damage3,000 |
| Initial AP Shell Velocity853 m./s. |
| AP Shell Weight47.7 kg. |
Torpedo Tubes
| 533 mm Twin2 х 2 pcs. |
| Rate of Fire1.36 shots/min. |
| Reload Time44 sec. |
| Rotation Speed25 deg./sec. |
| 180 Degree Turn Time7.2 sec. |
| TorpedoMk11 |
| Maximum Damage11,733 |
| Torpedo Speed56 knot |
| Torpedo Range5.49 km. |
AA Defense
| 76.2 mm/50 Mk.10 on a Mk.11 mount2 х 1 pcs. |
| . . . Average Damage per Second4.2 |
| . . . Firing Range3 km. |
| 7.62 mm Hotchkiss2 х 1 pcs. |
| . . . Average Damage per Second2.6 |
| . . . Firing Range0.99 km. |
Maneuverability
| Maximum Speed35 knot |
| Turning Circle Radius630 m. |
| Rudder Shift Time7 sec. |
Concealment
| Surface Detectability Range12.76 km. |
| Air Detectability Range5.38 km. |
Battle Levels
12345678910

IV
660,000
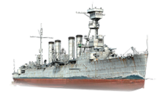
Phoenix — American Tier IV cruiser.
With the outbreak of World War I, the U.S. found itself in need of a stronger navy. The new shipbuilding program also included cruisers—squadron scouts. Some of the requirements were a speed of 35 knots, a narrow hull, and a relatively small portion of displacement allocated for defense. The main battery artillery was placed in casemates on the bow and stern, which could provide anti-splinter protection only. The design also featured two guns placed on each side of amidships and torpedo tubes in gun ports at the stern casemate.
Modules
 |
Rate of Fire (shots/min) | 180° Turn Time (sec) | Maximum Dispersion (m) | Maximum HE Shell Damage (HP) | Chance of Fire on Target Caused by HE Shell (%) | Maximum AP Shell Damage (HP) |
Research price (exp) |
Purchase price ( | |
|---|---|---|---|---|---|---|---|---|---|
| 152 mm/50 Mk.8 on a Mk.10 mount | 7.5 | 18 | 128 | 1,700 | 7 | 2,400 | 0 | 56,000 | |
| 152 mm/53 Mk.12 on a Mk.17 mount | 10.7 | 18 | 128 | 1,750 | 12 | 2,500 | 800 | 125,000 |
 |
Hit Points (HP) | Armor (mm) | Armor (mm) | Main Turrets (pcs.) | Secondary Gun Turrets (pcs.) | AA Mounts (pcs.) | Torpedo Tubes (pcs.) | Hangar Capacity (pcs.) |
Research price (exp) |
Purchase price ( | |
|---|---|---|---|---|---|---|---|---|---|---|---|
| Phoenix (A) | 21,300 | 6 | 76 | 6 | 2/2 | 2 | 0 | 78,000 | |||
| Phoenix (B) | 24,000 | 6 | 76 | 8 | 4 | 2 | 900 | 165,000 | |||
| Phoenix (C) | 24,000 | 6 | 76 | 10 | 4/4 | 2 | 1,500 | 220,000 |
 |
Rate of Fire (shots/min) | Torpedo Tubes Reload Time (sec) | 180° Turn Time (sec) | Maximum Damage (HP) | Torpedo Speed (knot) | Torpedo Range (km) |
Research price (exp) |
Purchase price ( | |
|---|---|---|---|---|---|---|---|---|---|
| Mark 11 | 0.9 | 66 | 7.2 | 11,733 | 56 | 5.5 | 0 | 22,000 |
 |
IDS_SHIP_PARAM_SUO_INCREASE_DIST (%) | Maximum Firing Range (km) |
Research price (exp) |
Purchase price ( | |
|---|---|---|---|---|---|
| Mk4 mod. 1 | 0 | 0 | 44,000 | ||
| Mk4 mod. 2 | 0 | 600 | 110,000 |
 |
Maximum Speed (knot) |
Research price (exp) |
Purchase price ( | |
|---|---|---|---|---|
| Propulsion: 90,000 hp | 35 | 0 | 40,000 |
Compatible Upgrades
| Slot 1 |
|||
|---|---|---|---|
| Slot 2 |
Player Opinion
Pros:
- Very good maneuverability
- Even when stock, it has the best range of all the tier 4 cruisers.
- Great range with 2nd GFCS researched
- When upgraded, rate of fire is just as good as with St. Louis.
- Some players aren't aware that Omaha has torpedoes - best to use as ambush or surprise for unaware enemy ships
Cons:
- Rather poor survivability - the Phoenix has the 3rd least amount of hitpoints, with only destroyers having less.
- Abysmal torpedo range
- Very poor armor
- Poor surface detection
- Underwhelming AA firepower
Research
Quickly research to the B hull and 152mm/53 Mk14 guns, as the ship pathetically has only 3 guns per side to shoot with stock and has abysmal rate of fire for a stock cruiser. Then research the C hull and finally the Gun Fire Control System upgrade. The range is upgraded last because it's already decent and has the best range of all the tier 4 cruisers, even when stock.
Optimal Configuration
Commander Skills
| Recommended Commander Skills | ||||||||
|---|---|---|---|---|---|---|---|---|
| Cost (points) |
Endurance | Attack | Support | Versatility | ||||
| 1 |
|
★★ |
★ |
|
|
|
★★ |
|
| 2 |
★★ |
★★ |
★★★ |
|
|
|
|
★★★ |
| 3 |
★★ |
★ |
★ |
|
★★ |
★★ |
★★★ |
★★★ |
| 4 |
★ |
★★ |
|
|
★★ |
|
|
★★★ |
| Key: ★★★ - Extremely Useful ★★ - Frequently Useful ★ - Occasionally Useful No stars - Meh Χ - Not recommended | ||||||||
Gallery
Historical Gallery
Ships of U.S.A.
| Destroyers | II Sampson • II Smith |
| Cruisers | I Erie • II Chester • II Albany |
| Battleships | III South Carolina • IV Wyoming • IV Arkansas Beta |
| Aircraft Carriers | IV [[Ship:Langley (< 23.01.2019)|Langley (< 23.01.2019)]] • IV Langley • V [[Ship:Bogue (< 23.01.2019)|Bogue (< 23.01.2019)]] • VI [[Ship:Independence (< 23.01.2019)|Independence (< 23.01.2019)]] • VI Independence • VI Ranger • VII [[Ship:Ranger (< 23.01.2019)|Ranger (< 23.01.2019)]] • VII [[Ship:Saipan (< 23.01.2019)|Saipan (< 23.01.2019)]] • VIII [[Ship:Lexington (< 23.01.2019)|Lexington (< 23.01.2019)]] • VIII Yorktown • VIII Lexington • VIII [[Ship:Enterprise (< 23.01.2019)|Enterprise (< 23.01.2019)]] • VIII Enterprise |
Cruisers
Categories: