Phoenix
| Revision as of 05:12, 1 January 2018 Updated upgrades section. | Revision as of 04:33, 15 February 2018 Reworked research section; fixed upgrades, pros and cons, and commander skills; added consumables, camouflage, and signals sections | |||
| Line 6: | Line 6: | |||
| |Performance=<!-- write text about performance in battles below --> | |Performance=<!-- write text about performance in battles below --> | |||
| ? | A very fast cruiser with top speed of 35 knots (as fast as destroyers), coupled with a rudder shift time of | + | A very fast cruiser with top speed of 35 knots (as fast as destroyers), coupled with a rudder shift time of 5.4 makes ''{{#var:ship_name}}'' a very maneuverable ship. The long range guns (15.27 km upgraded) are great for setting fires on enemy ships, especially battleships (which are a favorite target of the ''{{#var:ship_name}}''). Meanwhile, avoid showing the broadside because a battleship can severely punish your hitpoints. | |
| ? | The long range guns (15.27 km upgraded) are great for setting fires on enemy ships, especially battleships (which are a favorite target of the '' | + | It is best to stay close to allies and support and protect battleships by scaring off destroyers and cruisers. Keep in mind that the ''Pheonix'' has a weak AA suite, so it cannot protect them against aircraft. | |
| ? | It is best to stay close to allies and support and protect battleships by scaring off destroyers and cruisers. Keep in mind that the ''Pheonix'' has a weak AA suite, so it cannot protect them against aircraft. | + | ||
| You can surprise enemies that come from behind an island with the 5.5 km range torpedoes, sometimes they can be used later on in game when you are in duel with a battleship, to destroy it eventually. That may cost your own life if that battleship has time to fire a salvo of AP on your broadside when you release your torpedoes, though. | You can surprise enemies that come from behind an island with the 5.5 km range torpedoes, sometimes they can be used later on in game when you are in duel with a battleship, to destroy it eventually. That may cost your own life if that battleship has time to fire a salvo of AP on your broadside when you release your torpedoes, though. | |||
| |Pros=<!-- write list of positive points below. use * as in ordinary wiki-list. --> | |Pros=<!-- write list of positive points below. use * as in ordinary wiki-list. --> | |||
| + | * Good main battery firepower (when fully upgraded) - can fire forwards as well as she can backwards; good turret traverse, good reload time, and great firing range | |||
| + | * Has defensive torpedoes - may also be useful in ambushing unsuspecting enemy ships | |||
| * Very good maneuverability - 35 knots top speed and 5.4 seconds rudder shift time | * Very good maneuverability - 35 knots top speed and 5.4 seconds rudder shift time | |||
| ? | ||||
| ? | ||||
| ? | ||||
| ? | ||||
| |Cons=<!-- write list of negative points below. use * as in ordinary wiki-list. --> | |Cons=<!-- write list of negative points below. use * as in ordinary wiki-list. --> | |||
| ? | * | + | * Poor survivability - very thinly armored and prone to rudder and engine incapacitations, coupled with her very low hit points for a Tier IV cruiser. | |
| ? | * | + | * Poor torpedo range - can only reach out to 5.5km and thus are for last resort occasions | |
| ? | * Poor | + | * Poor concealment - can be easily spotted as she can rain on her enemies | |
| ? | * Underwhelming AA firepower | + | * Underwhelming AA firepower - can easily be targeted by aircraft carriers with little to no resistance | |
| |Research=<!-- write text about priority sequence of research below --> | |Research=<!-- write text about priority sequence of research below --> | |||
| ? | + | This is a suggested research path: | ||
| + | # Phoenix (B) Hull | |||
| + | # 152 mm/53 Mk14 main batteries | |||
| + | # Phoenix (C) Hull | |||
| + | # Mk4 FCS mod. 2 | |||
| + | Due to ''{{#var:ship_name}}''’s low number of main armaments and fragility, it is highly recommended to research to the (C) Hull as quickly as possible to gain access to more armaments and the {{Hydroacoustic Search}} consumable. | |||
| |OptimalConfiguration=<!-- write some general text about selection of optimal configuration below (optional)--> | |OptimalConfiguration=<!-- write some general text about selection of optimal configuration below (optional)--> | |||
| |Upgrades=<!-- write text about best upgrades below --> | |Upgrades=<!-- write text about best upgrades below --> | |||
| ? | {{Main Armaments Modification 1}} - | + | *'''Slot 1:''' {{Main Armaments Modification 1}} - lowers chance of destroyed armament and faster repair. Useful because the enemy can easily destroy armament. | |
| ? | {{Steering Gears Modification 1}} - comes in handy to prevent steering gears being incapacitated and faster repair. Use together with captain skill Last Stand. This will prevent you | + | *'''Slot 2:''' {{Steering Gears Modification 1}} - comes in handy to prevent steering gears being incapacitated and faster repair. Use together with captain skill Last Stand. This will help prevent you giving broadsides to enemy ships and better odds of avoiding torpedoes. | |
| |CommanderSkills=<!-- write text about best set of Commander Skills below --> | |CommanderSkills=<!-- write text about best set of Commander Skills below --> | |||
| Line 74: | Line 77: | |||
| |Consumables=<!-- write text about selection of Consumables below --> | |Consumables=<!-- write text about selection of Consumables below --> | |||
| + | ''{{#var:ship_name}}'' can equip the following consumables: | |||
| + | *'''Slot 1:''' {{Damage Control Party}} | |||
| + | *'''Slot 2:''' {{Hydroacoustic Search}} | |||
| |Camouflage=<!-- write text about useful camouflage below --> | |Camouflage=<!-- write text about useful camouflage below --> | |||
| + | [[Ship:Camouflage#Standard Camouflage|Type 1, 2, or 5 camouflage]] can be equipped for credits; Types 2 or 5 are recommended at a minimum to reduce the accuracy of incoming shells. | |||
| |Signals=<!-- write text about best set of signals below --> | |Signals=<!-- write text about best set of signals below --> | |||
| ? | + | {{Signal Flags | ||
| + | | November Echo Setteseven = | |||
| + | | Mike Yankee Soxisix = | |||
| + | | India X-Ray = 3 | |||
| + | | Juliet Whiskey Unaone = | |||
| + | | Victor Lima = 3 | |||
| + | | Hotel Yankee = 1 | |||
| + | | November Foxtrot = 2 | |||
| + | | Sierra Mike = 3 | |||
| + | | India Delta = | |||
| + | | Juliet Yankee Bissotwo = | |||
| + | | India Yankee = 2 | |||
| + | | Juliet Charlie = 2 | |||
| + | ||||
| + | | Zulu = | |||
| + | | India Bravo Terrathree = | |||
| + | | Equal Speed Charlie London = 3 | |||
| + | | Zulu Hotel = 3 | |||
| + | | Papa Papa = | |||
| + | ||||
| + | | Wyvern = | |||
| + | | Red Dragon = | |||
| + | | Dragon Flag = 2 | |||
| + | | Ouroboros = | |||
| + | | Hydra = | |||
| + | }} | |||
| |Gallery=<!-- write below list of files without tags. description (if necessary) for each should be separated with template {{!}} --><gallery> | |Gallery=<!-- write below list of files without tags. description (if necessary) for each should be separated with template {{!}} --><gallery> | |||
Revision as of 04:33, 15 February 2018

| Research price5600 exp |
| Purchase price660,000 |
| Hit Points21,300 |
| 152 mm/50 Mk.8 on a Mk.10 mount6 х 1 pcs. |
| Rate of Fire6 shots/min. |
| Reload Time10 sec. |
| Rotation Speed11 deg./sec. |
| 180 Degree Turn Time16.36 sec. |
| Firing Range13.88 km. |
| Maximum Dispersion128 m. |
| HE Shell152 mm HE 105 lb |
| Maximum HE Shell Damage2,100 |
| Chance of Fire on Target Caused by HE Shell7 % |
| Initial HE Shell Velocity853 m./s. |
| HE Shell Weight47.7 kg. |
| AP Shell152 mm AP 105 lb |
| Maximum AP Shell Damage3,000 |
| Initial AP Shell Velocity853 m./s. |
| AP Shell Weight47.7 kg. |
| 533 mm Twin2 х 2 pcs. |
| Rate of Fire1.36 shots/min. |
| Reload Time44 sec. |
| Rotation Speed25 deg./sec. |
| 180 Degree Turn Time7.2 sec. |
| TorpedoMk11 |
| Maximum Damage11,733 |
| Torpedo Speed56 knot |
| Torpedo Range5.49 km. |
| 76.2 mm/50 Mk.10 on a Mk.11 mount2 х 1 pcs. |
| . . . Average Damage per Second4.2 |
| . . . Firing Range3 km. |
| 7.62 mm Hotchkiss2 х 1 pcs. |
| . . . Average Damage per Second2.6 |
| . . . Firing Range0.99 km. |
| Maximum Speed35 knot |
| Turning Circle Radius630 m. |
| Rudder Shift Time7 sec. |
| Surface Detectability Range12.76 km. |
| Air Detectability Range5.38 km. |

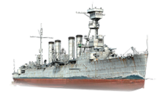
Phoenix — American Tier IV cruiser.
With the outbreak of World War I, the U.S. found itself in need of a stronger navy. The new shipbuilding program also included cruisers—squadron scouts. Some of the requirements were a speed of 35 knots, a narrow hull, and a relatively small portion of displacement allocated for defense. The main battery artillery was placed in casemates on the bow and stern, which could provide anti-splinter protection only. The design also featured two guns placed on each side of amidships and torpedo tubes in gun ports at the stern casemate.
Modules
 |
Rate of Fire (shots/min) | 180° Turn Time (sec) | Maximum Dispersion (m) | Maximum HE Shell Damage (HP) | Chance of Fire on Target Caused by HE Shell (%) | Maximum AP Shell Damage (HP) |
Research price (exp) |
Purchase price ( | |
|---|---|---|---|---|---|---|---|---|---|
| 152 mm/50 Mk.8 on a Mk.10 mount | 6 | 18 | 128 | 2,100 | 7 | 3,000 | 0 | 56,000 | |
| 152 mm/53 Mk.12 on a Mk.17 mount | 8.6 | 18 | 128 | 2,200 | 12 | 3,100 | 800 | 125,000 |
 |
Hit Points (HP) | Armor (mm) | Armor (mm) | Main Turrets (pcs.) | Secondary Gun Turrets (pcs.) | AA Mounts (pcs.) | Torpedo Tubes (pcs.) | Hangar Capacity (pcs.) |
Research price (exp) |
Purchase price ( | |
|---|---|---|---|---|---|---|---|---|---|---|---|
| Phoenix (A) | 21,300 | 6 | 76 | 6 | 2/2 | 2 | 0 | 78,000 | |||
| Phoenix (B) | 24,000 | 6 | 76 | 8 | 4 | 2 | 900 | 165,000 | |||
| Phoenix (C) | 24,000 | 6 | 76 | 10 | 4/4 | 2 | 1,500 | 220,000 |
 |
Rate of Fire (shots/min) | Torpedo Tubes Reload Time (sec) | 180° Turn Time (sec) | Maximum Damage (HP) | Torpedo Speed (knot) | Torpedo Range (km) |
Research price (exp) |
Purchase price ( | |
|---|---|---|---|---|---|---|---|---|---|
| Mark 11 | 0.9 | 66 | 7.2 | 11,733 | 56 | 5.5 | 0 | 22,000 |
 |
IDS_SHIP_PARAM_SUO_INCREASE_DIST (%) | Maximum Firing Range (km) |
Research price (exp) |
Purchase price ( | |
|---|---|---|---|---|---|
| Mk4 mod. 1 | 0 | 0 | 44,000 | ||
| Mk4 mod. 2 | 0 | 600 | 110,000 |
 |
Maximum Speed (knot) |
Research price (exp) |
Purchase price ( | |
|---|---|---|---|---|
| Propulsion: 90,000 hp | 35 | 0 | 40,000 |
Compatible Upgrades
| Slot 1 |
||||
|---|---|---|---|---|
| Slot 2 |
Player Opinion
Performance
A very fast cruiser with top speed of 35 knots (as fast as destroyers), coupled with a rudder shift time of 5.4 makes Phoenix a very maneuverable ship. The long range guns (15.27 km upgraded) are great for setting fires on enemy ships, especially battleships (which are a favorite target of the Phoenix). Meanwhile, avoid showing the broadside because a battleship can severely punish your hitpoints. It is best to stay close to allies and support and protect battleships by scaring off destroyers and cruisers. Keep in mind that the Pheonix has a weak AA suite, so it cannot protect them against aircraft.
You can surprise enemies that come from behind an island with the 5.5 km range torpedoes, sometimes they can be used later on in game when you are in duel with a battleship, to destroy it eventually. That may cost your own life if that battleship has time to fire a salvo of AP on your broadside when you release your torpedoes, though.Pros:
- Good main battery firepower (when fully upgraded) - can fire forwards as well as she can backwards; good turret traverse, good reload time, and great firing range
- Has defensive torpedoes - may also be useful in ambushing unsuspecting enemy ships
- Very good maneuverability - 35 knots top speed and 5.4 seconds rudder shift time
Cons:
- Poor survivability - very thinly armored and prone to rudder and engine incapacitations, coupled with her very low hit points for a Tier IV cruiser.
- Poor torpedo range - can only reach out to 5.5km and thus are for last resort occasions
- Poor concealment - can be easily spotted as she can rain on her enemies
- Underwhelming AA firepower - can easily be targeted by aircraft carriers with little to no resistance
Research
This is a suggested research path:
- Phoenix (B) Hull
- 152 mm/53 Mk14 main batteries
- Phoenix (C) Hull
- Mk4 FCS mod. 2
Optimal Configuration
Upgrades
- Slot 1: Main Armaments Modification 1
 - lowers chance of destroyed armament and faster repair. Useful because the enemy can easily destroy armament.
- Slot 2: Steering Gears Modification 1
 - comes in handy to prevent steering gears being incapacitated and faster repair. Use together with captain skill Last Stand. This will help prevent you giving broadsides to enemy ships and better odds of avoiding torpedoes.
Commander Skills
| Recommended Commander Skills | ||||||||
|---|---|---|---|---|---|---|---|---|
| Cost (points) |
Endurance | Attack | Support | Versatility | ||||
| 1 |
★★★ |
★★★ |
★ |
|
|
|
★★ |
|
| 2 |
★★ |
★★ |
★★ |
|
|
|
★★★ |
★★★ |
| 3 |
★ |
★ |
★★ |
|
★ |
|
★★★ |
★★ |
| 4 |
|
★ |
★ |
|
★ |
|
★★ |
★★★ |
| Key: ★★★ - Extremely Useful ★★ - Frequently Useful ★ - Occasionally Useful No stars - Meh Χ - Not recommended | ||||||||
Consumables
Phoenix can equip the following consumables:
- Slot 1: Damage Control Party

- Slot 2: Hydroacoustic Search

Camouflage
Type 1, 2, or 5 camouflage can be equipped for credits; Types 2 or 5 are recommended at a minimum to reduce the accuracy of incoming shells.
Signals
Recommended Signal Flags 
| |||||
|---|---|---|---|---|---|
| Combat | |||||
 ★★ |

|
 ★★ |
 ★ |
 ★★★ |
 ★★★ |

|

|

|
 ★★★ |
 ★★ |

|

|

| ||||
Note: Use of the Juliet Charlie signal makes detonation impossible.
Gallery
Historical Info
Historical Gallery
